Understanding Customer Portal
The many features and benefits of Customer Portal, include:
Issue Tracker: Web Forms - Issue Tracker customer portal features are two basic types: Public and Secure.
The Public Feature allows the general public to create new issues for a particular binder and view the current status of the issue by clicking on the link emailed to them. This portal allows the public to report bugs, suggest ideas, comment on company offerings, or any other area of interest.
The Secure Feature allows the trusted and logged in user to view all current issues for a binder, create new issues, add notes to the issue, or change the status of the issue.
Calendar - Customers, partners, or general users can view the group calendar. Also, the portal users can request an appointment which the Administrators will receive through email
Reports - OfficeClip reports can be shared with customers in a secured manner. Available reports include Timesheet, Expense, and CRM reports.
Documents - Selected documents can be shared via Customer portal.
User List
The User List screen shows all the list of activated users in the customer portal.
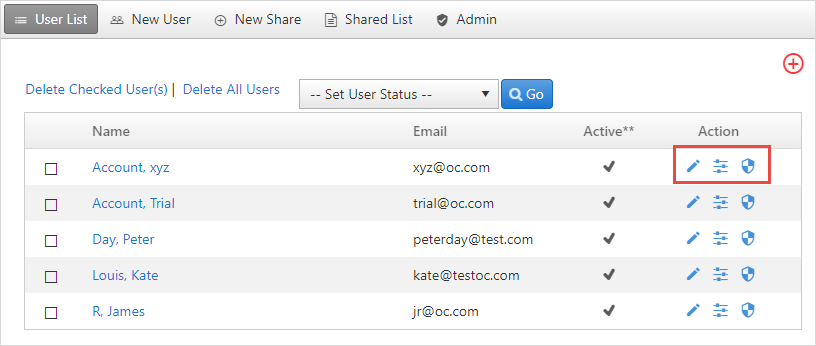
From this screen the Administrators can edit the user information, set permissions and change password for the user.
To edit the user information:
- Click on the
 icon on the user list screen.
 - The User screen will pop-up.
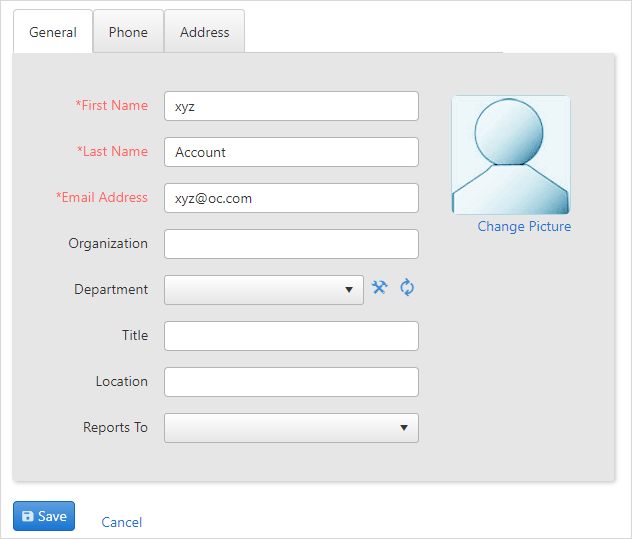
- Edit or add new user information and click Save.
To set permissions to access various reports:
- Click on the
 icon on the User list screen.
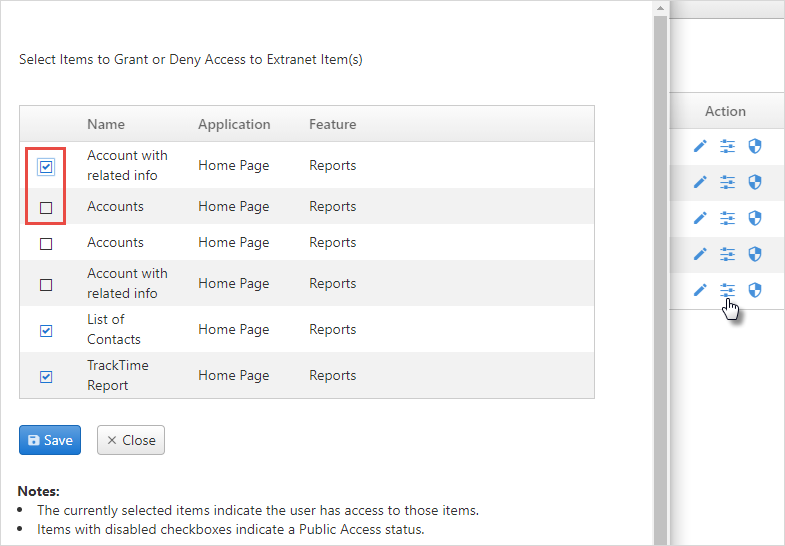
- A pop-up will appear with a list of various reports.
- Checkmark or uncheck the reports as per the requirement.
- Click Save to save all the changes.
- The user will have access to the selected items.
To change password for the user:
- Click on the
 icon on the User list screen.
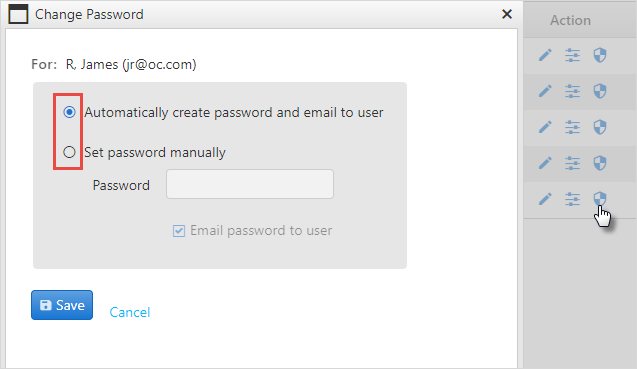
- Select the appropriate option.
- Click Save.
To set the user status:
- Users can be activated, deactivated and deleted from the user
list.
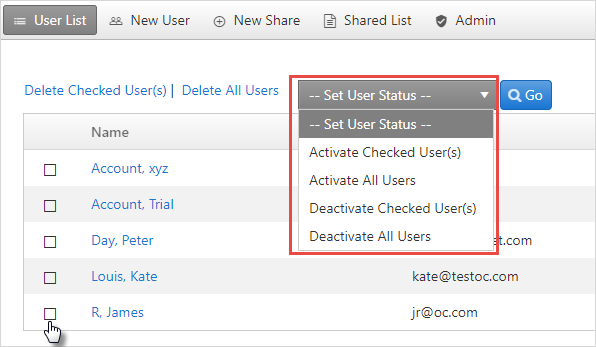
- Checkmark the box of the users to activate, deactivate or delete.
- To activate or deactivate users select the appropriate option from the dropdown.
- To delete users select the option Delete checked users option besides the dropdown.
- Click Go.
Add new Users
You can add new user or remove existing user from the New User screen.
To add a new user:
Click Desktop > Customer Portal > New User.

- On this screen add the user details, create password automatically or manually.
- Click Add.
- You can also add or remove users, by clicking on
Settings > Organization
Settings > Users >
Add/Remove.
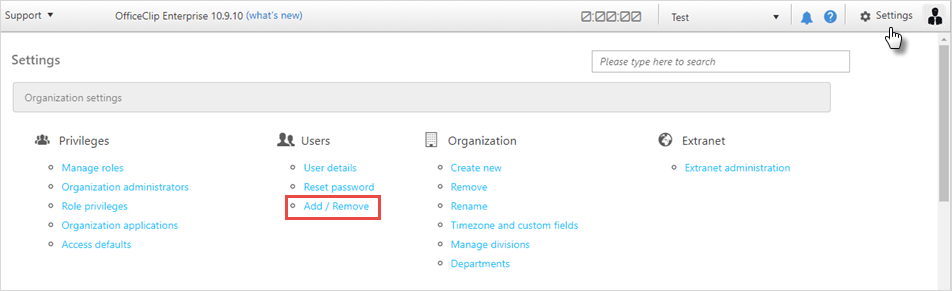
- To learn more about how to add/remove users from Settings section, click here.
To remove existing users:
Click Desktop > Customer Portal > New User.
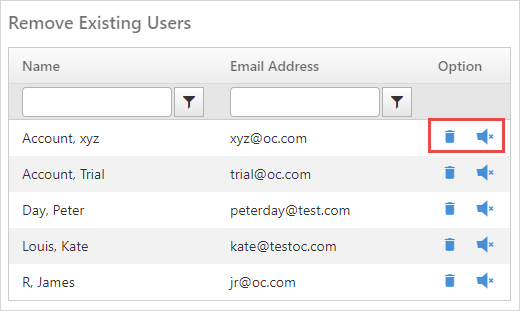
- Click on the
 icon to remove the user and the user will also receive an email
notification that his/her name is removed from the existing user
list.
icon to remove the user and the user will also receive an email
notification that his/her name is removed from the existing user
list. - To remove an existing user without notification, click on the
 icon.
icon.
Creating Customer Portal Shares shares
Customer-portal shares allow administrators to share certain information from OfficeClip with users outside the OfficeClip communities.
Sharing Documents
External customer-portal users can easily view folders and documents that organization administrators have created and organized for external access. As a safeguard, documents can be locked against accidental overwrite or deletion. OfficeClip users can organize folders, and securely share documents with external customer-portal users by adding an access password and expiration date. To access this feature:
Click CRM > Documents.
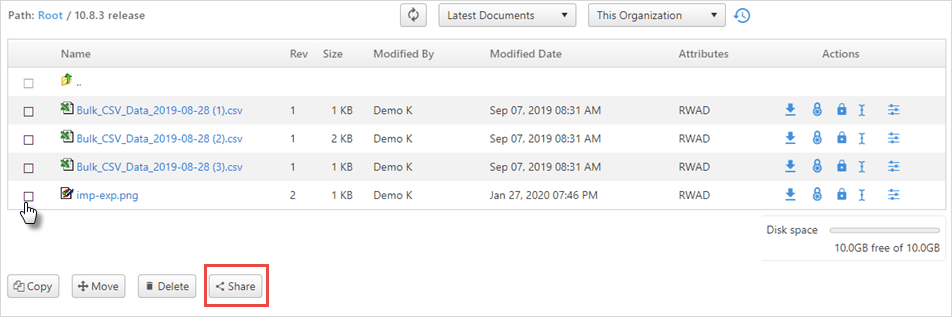
Select a document you want to share by placing a check mark in the box and clicking the Share button at the bottom.
Give a share name and select whether you want to make a public link (
web link) orsecured link. ThroughWeb Linkdocuments can be shared with the public without any login id or password. If you select aweb link:- Add a password to the document if required and expiration date
can also be added. Then, click the Create
Share button go to the next screen.
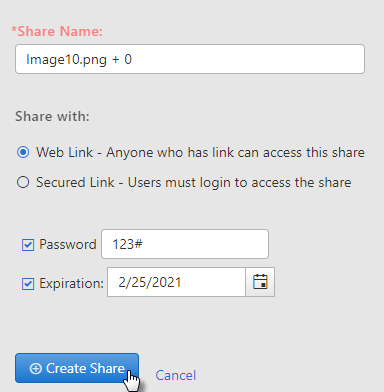
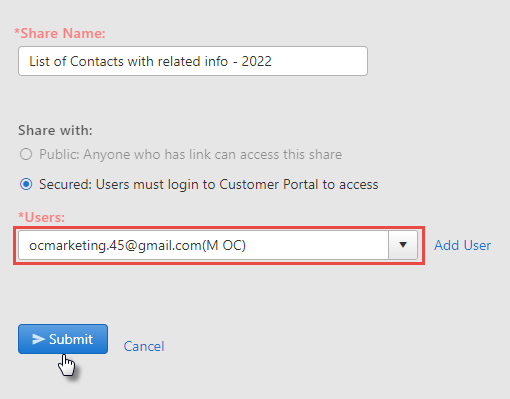
- If a secured link is selected, select the user with whom you
want to share the document or click on Add
User button. Here, you will be able to add a new user,
whose name will automatically get saved in the contacts database.
Enter the password or expiration date if required and click on the
Create Share button.

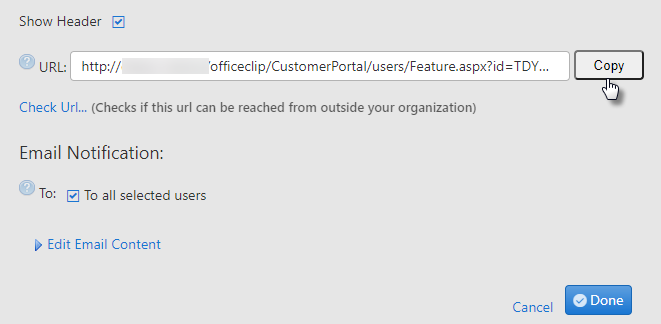
The users can see the URL for the share. Copy the URL and paste it in the browser, the users with public share or web link will be able to see the shared report easily.
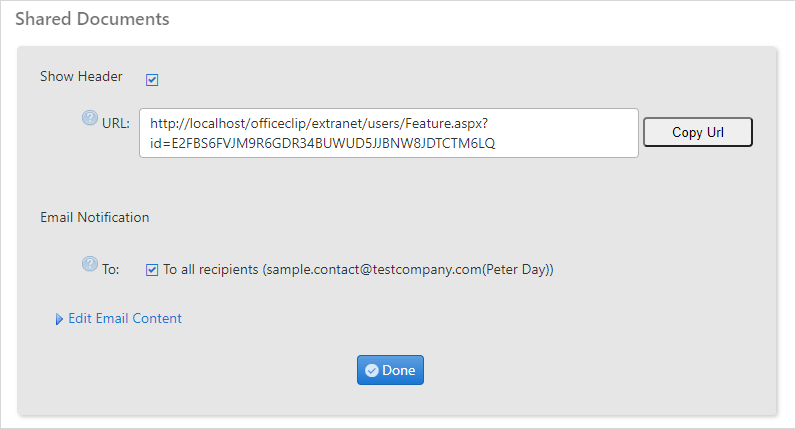
The user with secured link will be able to access the shared report only after entering the login id and password.
If you want to let others know about this share, checkmark the email address. If the outgoing email needs modification, click Edit Email Content link to personalize the email.
Finally, click the Done button.
Sharing Reports
External users can securely access a variety of reports.
For the detailed description of sharing reports, click here.
Issue Tracker: Web Forms
Web form allows external users to submit issues that can be managed using the OfficeClip issue tracker.
The Web Forms in customer-portal are similar to Web Forms in Issue Tracker. For the detailed description of Web Forms, click here.
Shared List
This screen contains the list of all the shared reports and documents. These documents or reports are shared with customer portal users only.
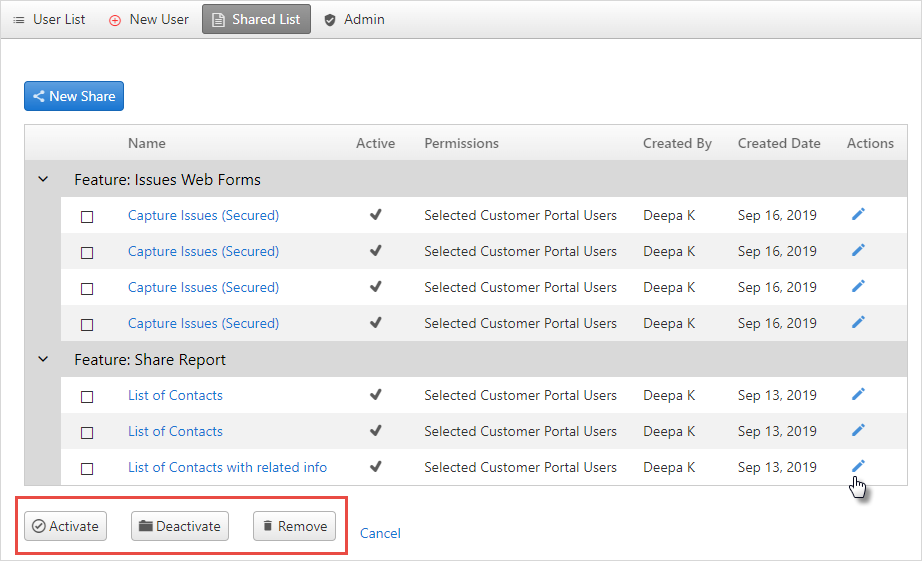
- When you click on the
icon, the selected document share can be edited.
- The users can activate, deactivate or remove the documents or reports from the list. Checkmark the required document or report and select the necessary action.
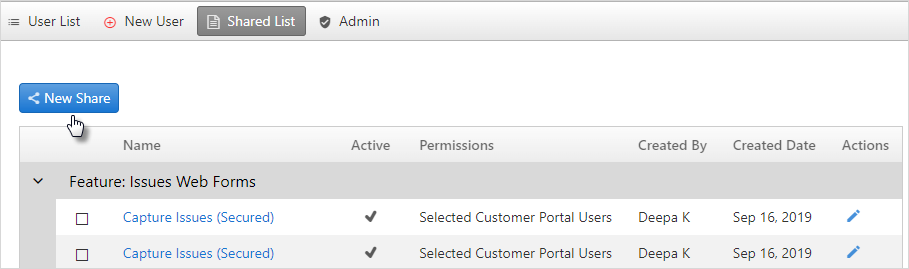
Create a New Share
To create a new share or share a document or report with customer portal users:
- Click on the New Share button under
Shared List.
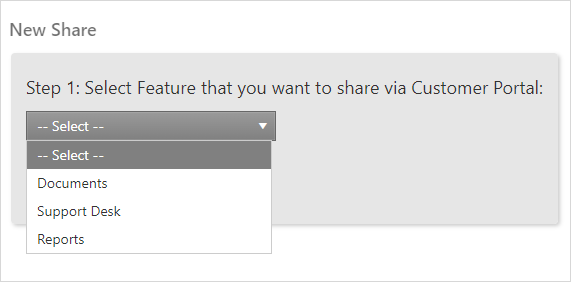
- On the next screen, select the document, support desk or report
you want to share and click on the Next
button.
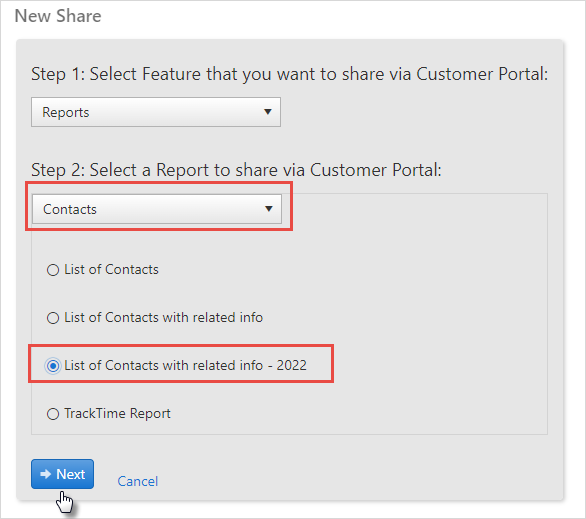
- Select the desired category and their entity which you want to
share and click on the Next button.
- Checkmark the customer portal users from the dropdown with whom
you want to share the documents or reports. You can also create a
share with new users by clicking on the Add
User link. Finally click on
Submit link.
- On the next screen, you will see the share link. Copy and send
the link to customer portal users. The customer portal users can
copy and paste the link in the browser.
- Once they login and enter the password they will be able to view the report shared with them.
Admin
The Admin screen in Customer Portal helps to set up the Customer portal screen for external users.
To set up the Admin screen:
- Click Desktop > Customer
Portal > Admin.

- Upload the logo, add Logo custom navigation link, Copyright text, Copyright URL and Welcome message.
- Click Save.
You will see all the above details in the Customer portal home screen.
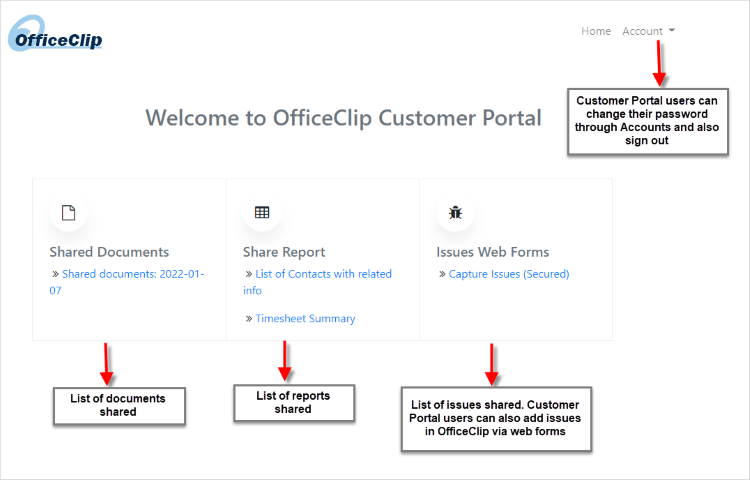
Customer Portal Home Screen
A customer portal can log into OfficeClip with there own login and password. On the home screen users can see the reports, issues, documents shared with them.