Generating, Editing and Accessing Reports
OfficeClip Reports display information of data in an organized and tabular form. Reports help to analyze and quickly access your customer data, employee data, sales and marketing data, etc. The advantages of a good reporting system are it will lead to better planning and will lead towards goal progression. OfficeClip can also help to build custom reports and reports can be saved or exported in various formats such as Adobe PDF (.pdf), Microsoft Word (.doc) and Microsoft Excel (.xls). Reports can also be scheduled and shared with users.
Creating New Report
Click on the application where you want to create a new report, and then click Reports and . Follow the steps in the wizard to set up the new report:
General Information
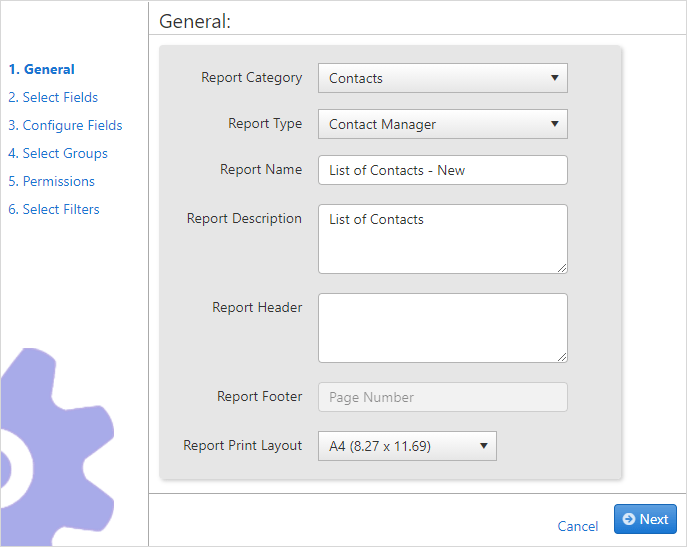
Select the Report Category where you are generating the report, whether it is in Contacts, Accounts, Opportunities, etc.
Select the Report Type. Report types are templates in which reports are already created. These templates allow you to pick and choose a pre-defined report and modify it.
Give an appropriate Name to the report.
Fill in the Report Description. This field is shown on the list screen and allows users to find the report they need quickly.
Add a Report Header if needed. The Report Header shows up at the top of every page of the report.
The Report Footer shows at the bottom of every page of the report. You can also add page numbers if needed.
Report Print Layout allows you to select the kind of page to which the report prints.
Select Fields
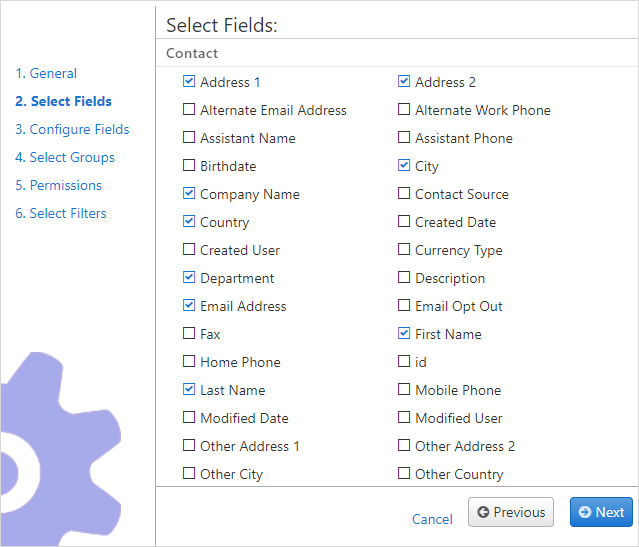
Fields are columns in the report. This user interface allows selection of the fields in various entities to be displayed on the report.
If the number of fields selected is more than the page size permits, the additional fields will run over to the next page.
Configure Fields
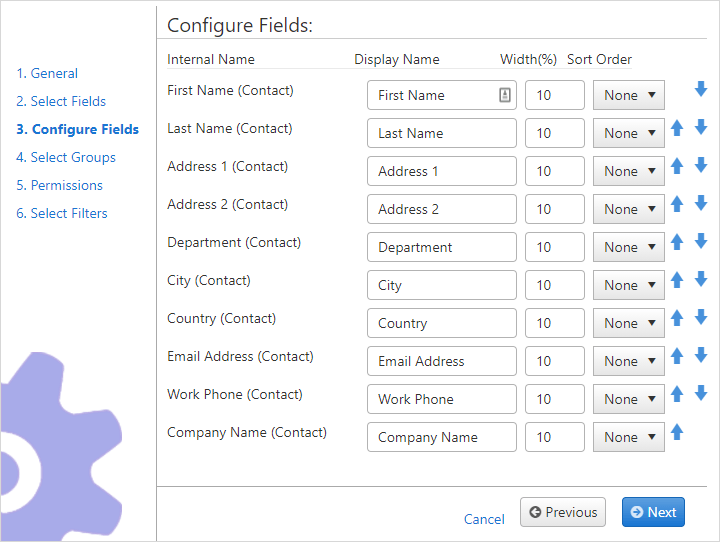
Some of the field names selected in the previous step may not be
friendly (for example, pre-defined field names could be
Contact.Address1, Contact.City,
etc., instead of just Address1 and
City). This step allows the user to rename these
fields. The order of the fields can also be set as per the
requirement.
Select Groups
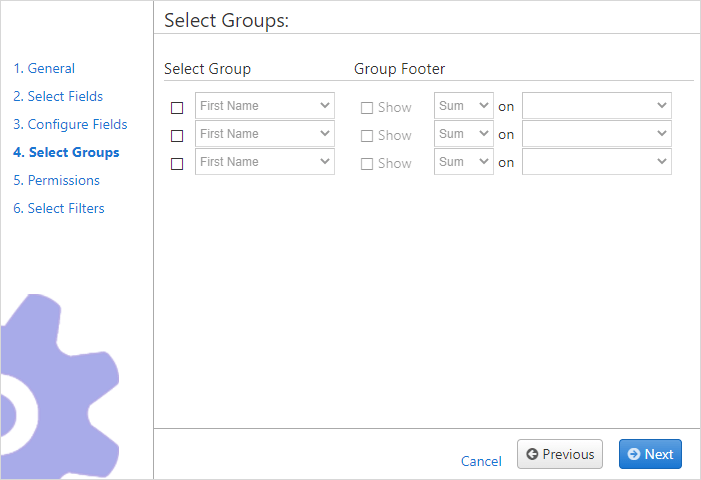
The users can create groupings for various columns in the report. For example, the total number of hours and count of the users are groups. Group totals can also be put at the bottom of the groups.
Permissions
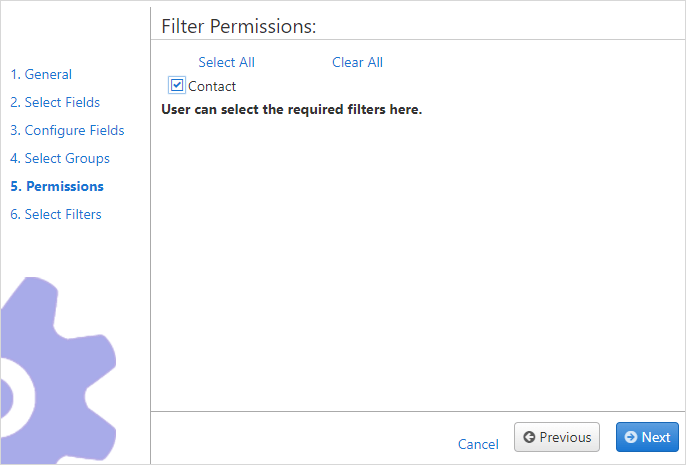
Sometimes it is necessary to restrict filters for a group of users. For example, you may not want to allow your users to change the customer of a timesheet report but it is okay if they change the date range. This option allows users to restrict certain filters to non-administrators and Customer Portal users.
Select Filters
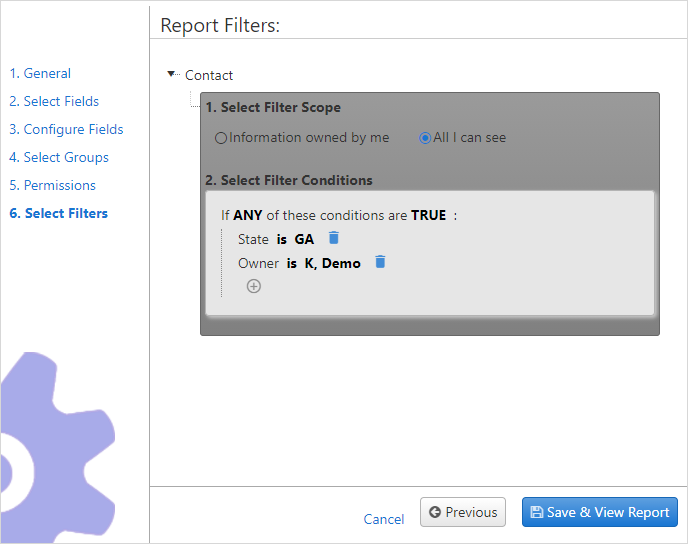
Filters allow selection of a range of values based on given criteria. Various types of filters are supported for OfficeClip reports and vary by the category and type of the report. For example, reports can be filtered by date range, users, status, etc.
To see how to create filters, click here.
Click Save and View Report to view the report.
Editing Reports
You can edit, delete, change permissions, schedule a report, share a report and clone a report with the icons in the Actions column.
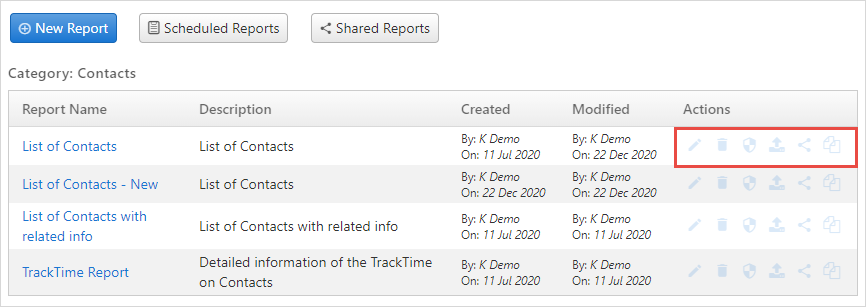
To edit a report, click on the
 icon to make
the changes to the report.
icon to make
the changes to the report. To delete a report, click the
 icon,
if you want to delete click OK or to exit
without deleting, click Cancel.
icon,
if you want to delete click OK or to exit
without deleting, click Cancel.To copy or clone a report, click the
 icon and
you will see the duplicate copy of the report.
icon and
you will see the duplicate copy of the report.To change permissions for a report:
Click the
 icon under the actions column.
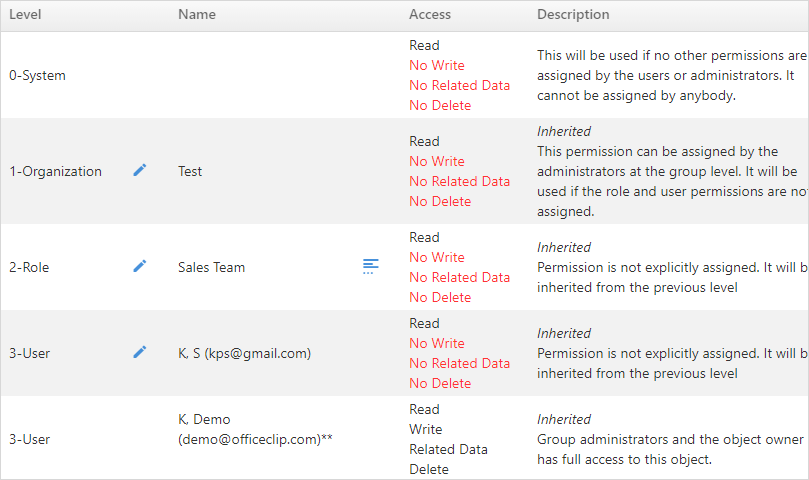
In the screen that pops up, you can see the access or permissions that various users have, and you can change the access by clicking the
icon to the
left of the username.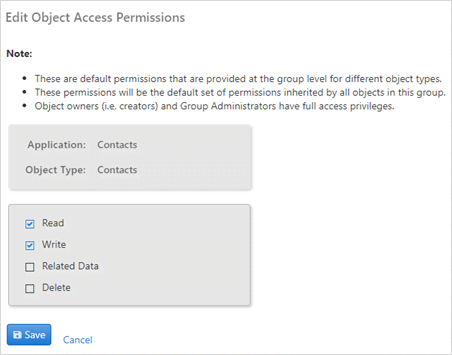
Check the appropriate boxes based on the permissions needed and click Save when finished, or Cancel to return to the previous screen.
To see the users for a user-defined role, click the
 icon next to the role you want to view.
Sharing Reports
Share the Reports with Customer Portal users. Customer Portal users are OfficeClip users that do not have access to all the features of OfficeClip. They can only view reports in a restricted fashion (based on the filters they have been permitted to use). Shared reports can be used to empower your customers, partners, and service providers to create their reports based on the data they are allowed to access
A fine example of sharing an Customer Portal report is when you want
to share project information with your customers. They see only the
information you allow them to see. To view, the Shared reports click on
the ![]() shared
reports icon above the list of reports.
shared
reports icon above the list of reports.
To share reports:
Go to the Reports page in any application then click on the
 share
icon of the report in the Actions column that
you want to share.
share
icon of the report in the Actions column that
you want to share.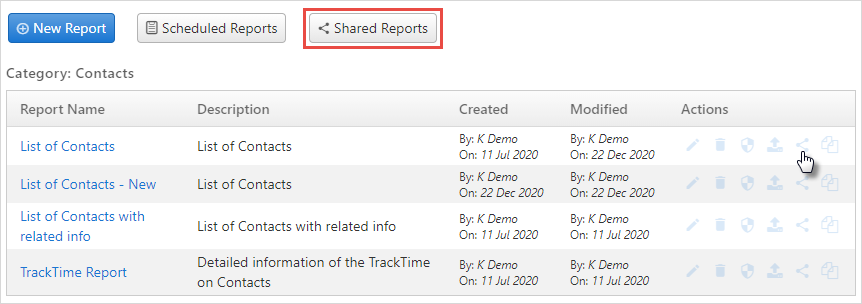
Give a share name and select whether you want to make a public link (
web link) orsecured link.
If web link is selected, then click on the Create Share button go to the next screen.
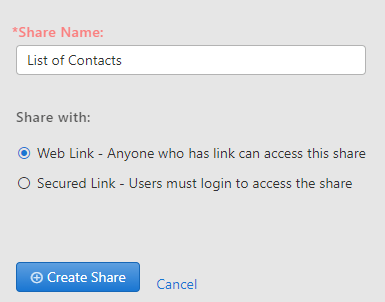
- If a secured link is selected, select the user from the dropdown
with whom you want to share the document.
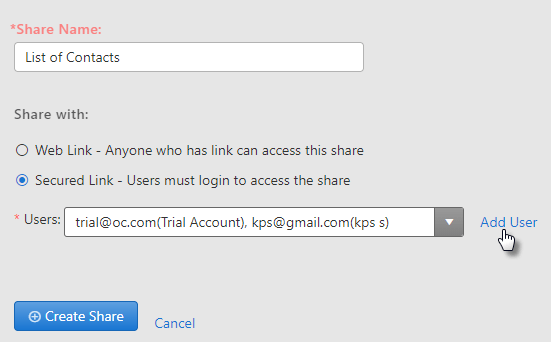
- If you want to share the document with a new user click on
Add User link.
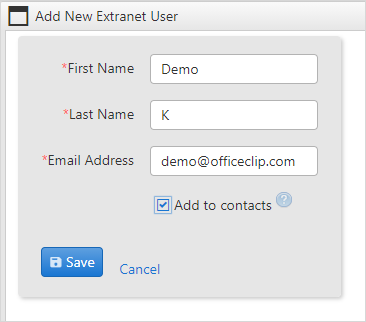
- Enter the details, if you want to add the name to your contact list checkmark the box in the Add to contacts option and click Save.
- After selecting the users, click Create Share.
The users can see the URL for the share. Click on the Copy URL link to view the report.
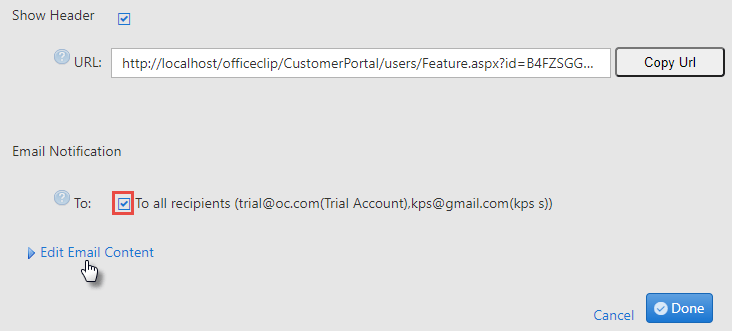
- Copy and paste the URL in the browser. If the link used is web link, the user will have an easy access to the report. If the link shared is secured, after pasting the link in the browser the user will have to enter the login id and password to view the report.
- If you want the users to know about this share, checkmark the box to notify users about the share.
- If the outgoing email needs modification, click on the Edit Email Content link to personalize the email.
Finally, click on the Done button.
Scheduling Reports
OfficeClip allows reports to be scheduled so that they can be run in the background at regular intervals (daily and weekly) and then emailed to the designated user who requested the report.
To schedule a report, do the following:
Go to the Reports screen.
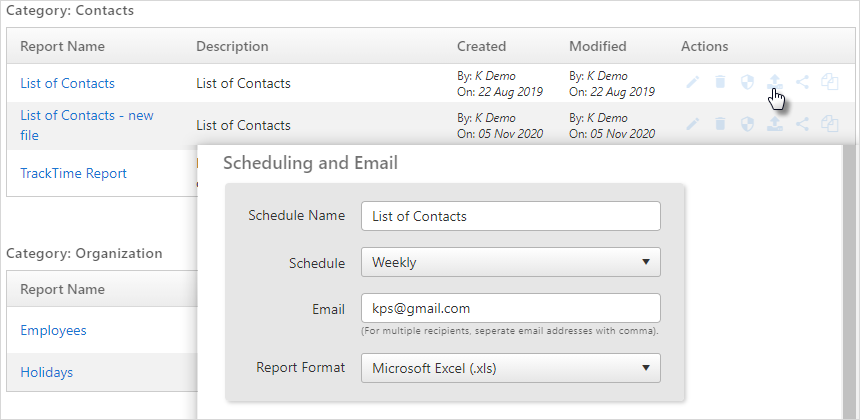
Click on the
 icon
in the Actions column and fill in the time to schedule the
report.
icon
in the Actions column and fill in the time to schedule the
report.Type the email address of the recipient to whom the report needs to be sent and select the report format.
Click Save.
To see the list of scheduled reports click on the
 icon above the list of reports.
Report Permission
Roles and individual users can fine-tune report access permissions. To change report permissions:
Click the
icon under the actions column.
In the screen that pops up, you can see the access or permissions that various users have, and you can change the access by clicking the
icon to the
left of the username. Check the appropriate boxes based on the permissions needed and click Save when finished, or Cancel to return to the previous screen.
To see the users for a user-defined role, click the
icon next to the role you want to view.
Shared Reports
Shared Reports shows the list of all shared reports which can be edited.
Click Reports > Shared Reports

It will display the list of shared reports with permissions, created date, and these reports can be edited.
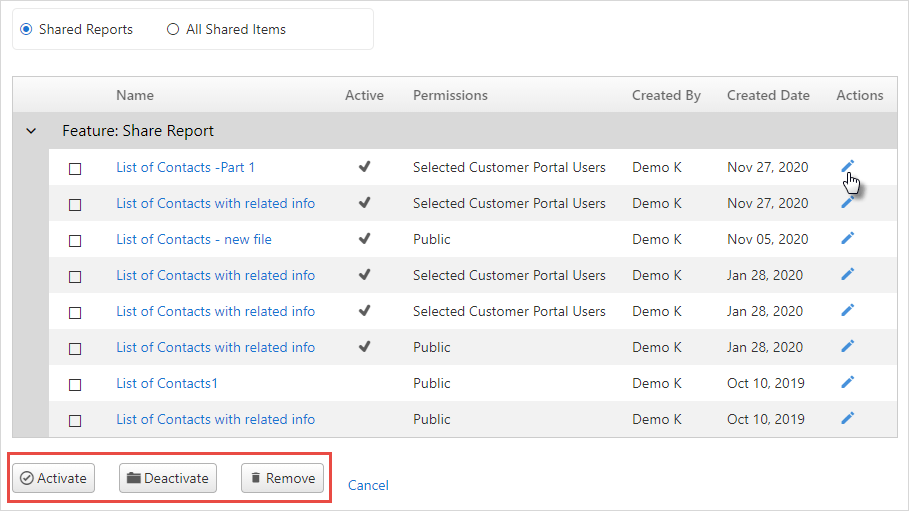
Click on
 Edit icon in Actions column to
make changes to the share
Edit icon in Actions column to
make changes to the shareBy clicking on the checkbox you can
Activate,Deactivatethe share or by clicking on the Remove button you can delete the reports from the list.
Scheduled Reports
Scheduled Reports shows the list of all the reports scheduled at predetermined intervals to be emailed to the OfficeClip users.
To check the list of Scheduled reports:
Click Reports > Scheduled Reports

It will display the list of scheduled reports along with the time intervals fixed, the format, created by, emailed to.
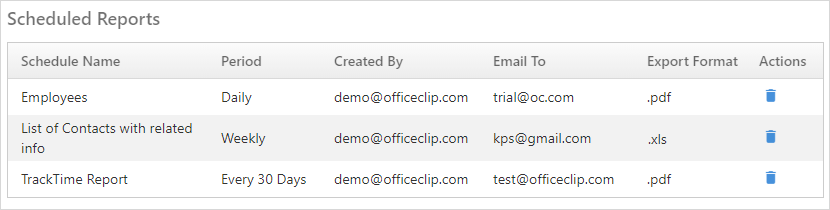
You can also delete this reports by clicking on the
 Delete icon.