Using Expense
Creating an Expense
Note: The Add Receipt feature is only available in the Enterprise Edition of OfficeClip.
Expense types are the types of expenses incurred by a user involved in a project. OfficeClip has some default expense types built into the expense report template.
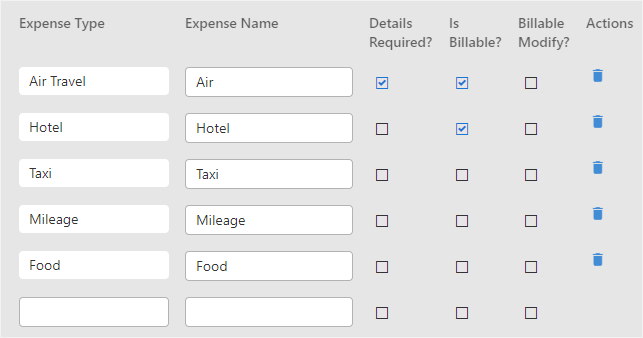
You can customize your expense types by giving them specific names, which are displayed in the expense type column of the New Expense screen.
To create a New Expense:
- Click HRM >
Expense > New
Expense.
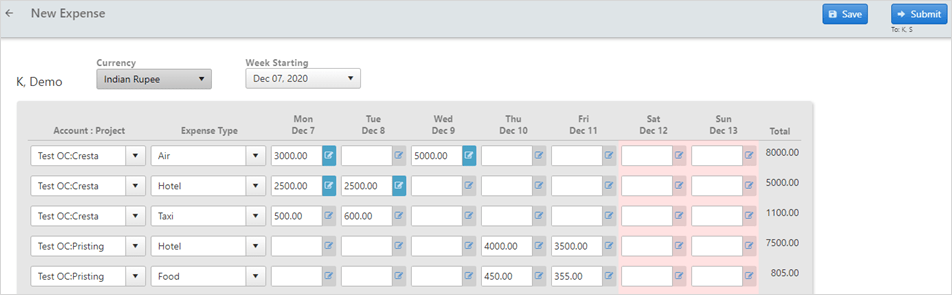
- Each row of the New Expense screen can be used to record expenses for a combination of Customers, Projects, and Expense Types, and expenses for a particular day can be entered in the textbox.
- If the administrator has enabled the details required option, then
the user must click the
 icon besides the text box, and provide all the necessary information
about the expense on the expense detail screen.
icon besides the text box, and provide all the necessary information
about the expense on the expense detail screen. 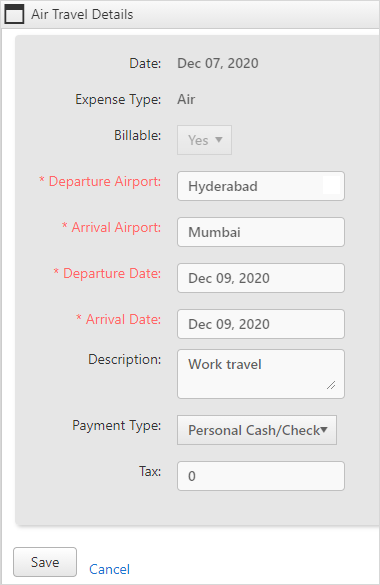
OfficeClip Expenses reuses the Customer, Projects, and Expense Types from the last expense sheet that you filled in. This saves time when you work on multiple projects for more than one period. Any row that is kept empty will not be remembered in the expense sheet for the next period.
- Additional information related to the entire expense report can be
entered in the Comments text box, and the text
can be spell-checked before saving.

- You can also attach documents such as bills, vouchers, and
invoices to support the expenses by clicking the
 icon.
icon. - You can drag and drop a file from your windows explorer application, or you can click the Select button and choose the file from the desired location.
Use the Comments field to notify the supervisor of certain things that pertain to the entire expense report. For example, you may want to notify the supervisor as to why you had to extend your stay and submit some documental proof for this as well.
A history of all the comments is kept and shown with the expenses. These are preserved for audit purposes.
Remember to double-check your comments before submitting the expenses. Once submitted, the comments cannot be removed from the history.
- Finally, the user can save the expenses by clicking on the Save button; cancel the entry by clicking on the Cancel button.
- If the manual workflow is set for the user (which is the default), the approver can be selected from the drop-down box, and the expenses can be sent by clicking on the Submit button.
- If the approver sets automated routing, the user cannot select the approver; clicking on the Submit button automatically routes the expenses to the approver.
- Once the expense is submitted, it appears
Pendingin the user's Outbox. The user will not be able to do further editing on the timesheet. The same expense also appears in the approver's Inbox withSubmittedstatus, allowing approval or rejection of the expense. When the approver selects a timesheet and clicks Bulk Approve, the expense is removed from the approver's Inbox and appears in the user's Inbox withApprovedstatus.
To allow Bulk Approve, administrator must set up Bulk Approve in
Expense > Admin > Options screen.
Inbox/Outbox Portlet
When you log in with your credentials, you can view the dashboard displaying the list of approved, rejected, or saved expenses. Pending items are listed in the outbox.

To view or edit the detailed expenses, click on the view/edit
 icon. approved expenses cannot be edited; only expenses with
Saved status can be modified. This can be done
by updating the expense details, comments, or adding new attachments.
You can view the workflow history in the edit screen if the
administrator has enabled the feature. To view a printer-friendly
screen of the expense, click on the printer
icon. approved expenses cannot be edited; only expenses with
Saved status can be modified. This can be done
by updating the expense details, comments, or adding new attachments.
You can view the workflow history in the edit screen if the
administrator has enabled the feature. To view a printer-friendly
screen of the expense, click on the printer  icon.
icon.You can delete expenses by selecting the checkbox of a particular item and clicking Delete.
To maintain a manageable number of expense sheets in your Inbox, you can archive approved expenses by selecting them and clicking the Archive button.
If you are the approver of expenses, you see the Bulk Approve button. Select the expenses you want to approve using the checkboxes and click the Bulk Approve button.
This button is not visible for users who do not have the privilege of approving expenses. If you have the privilege, you can approve your own expenses.
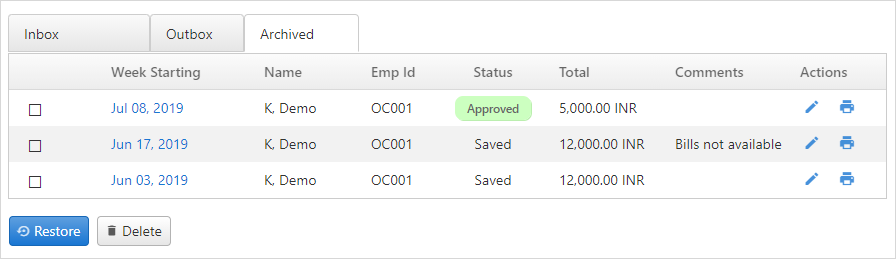
Archiving Expenses
OfficeClip allows you to manage your inbox by allowing you to archive expenses for future reference.
To archive an expense, select it from the Expense inbox and click Archive.
You can restore the expenses if you need to edit or modify them again. To restore an expense, click Archive in the expense menu bar, select the expense and click Restore.
Expense Filters
With Expense filters you can view expenses with a particular status, for a particular week or for a particular employee.
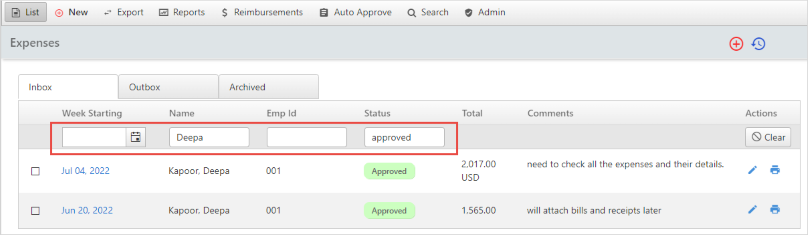
To view expenses using different filters:
- Week Starting: To view expense with week starting, click on the calendar icon. Select the week for which you want to view the expense and it will display the expense for that particular week.
- Name: Enter the employee name and click enter, to see expense sheet for that particular employee.
- Emp Id: Enter the employee id and click enter.
- Status: Enter the expense status like Saved, Approved, Submitted, or Rejected and click enter. It will display all the expenses with that particular status.
To clear the filter click on the ![]() icon.
icon.
You can view expenses using two or more filters. Select week starting, add name and status, and you will be able to see the filters as per your requirement.
Reimbursements
Approved expenses can be reimbursed. The user can view all the reimbursed bills and their details for a selected period under the Reimbursement tab. The administrator can use this tab to process reimbursements.
The administrators should follow this process:
Click HRM > Expense > Reimbursements.
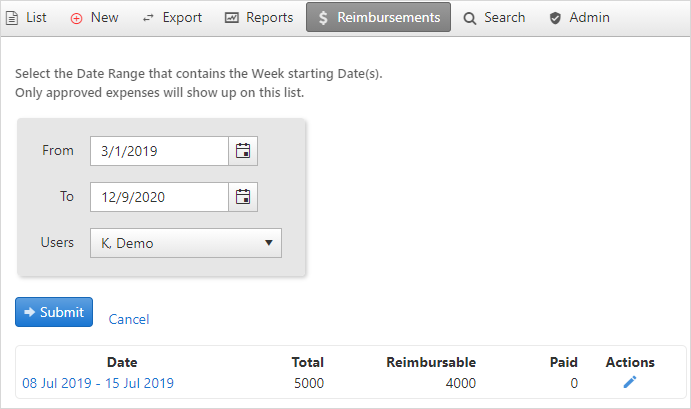
Select the
Date Rangeand theUserand click Submit.Click on the Expense that you want to reimburse.
Fill in the amounts of reimbursements, cash advance, and adjustments.