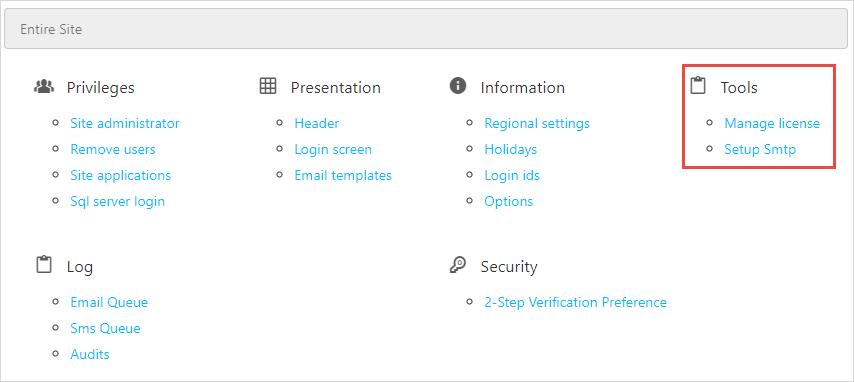
License management within Tools section
This section will help you to manage the license information and setup the SMTP for sending emails.
Manage License
Depending on which version of OfficeClip you have, Hosted or Local, you will see different information regarding your license. If you have the Hosted Edition of OfficeClip, you will be able to renew your subscription, increase or decrease the number of licenses, and pay by credit card. If you have the Local Edition of OfficeClip, it will show you a screen with additional links described below.
Show License Information
This option is only available in the Installed Version of OfficeClip.
This screen shows the user's current license information.
Renew License Information
This option is only available in the Hosted Version of OfficeClip.
This is an informational screen that gives the details of the company's license with OfficeClip. It displays the version, number of active users and groups, the package, expiration date, etc.
To renew for the Hosted version of OfficeClip license:
- Click Settings > Entire
Site > Tools >
Manage License.
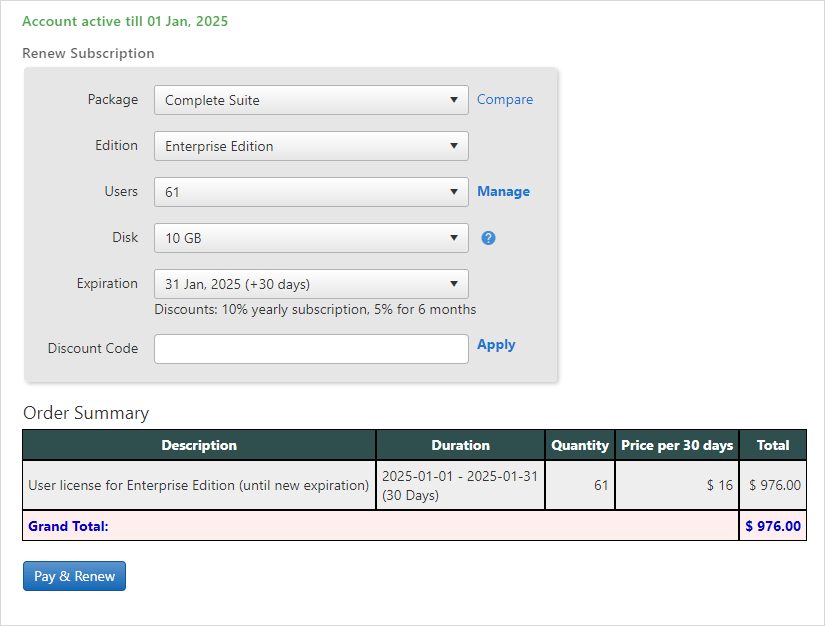
- On this screen, you can see the information about your current license .
- Click Pay & Renew to renew the license.
- It will take you to the payment screen, where you can choose an option between Paypal and pay using your credit card.
To renew license for the Installed version of OfficeClip:
- Click Settings > Entire
Site > Tools >
Manage License.
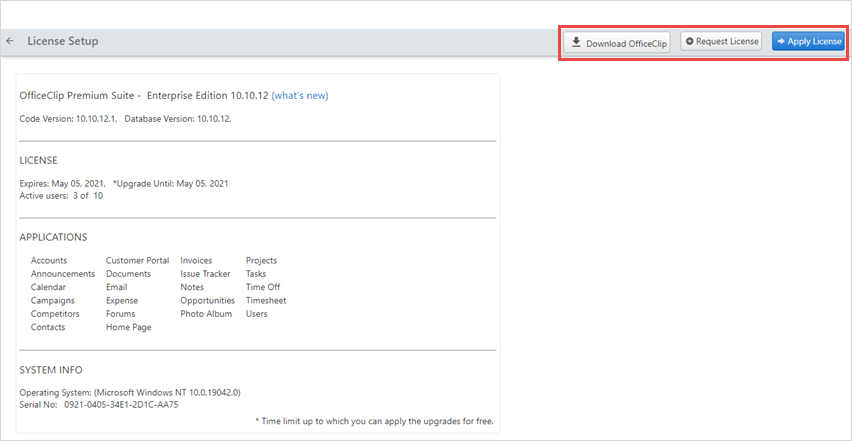
- On this screen, you can see the information about your current license and the applications you are using.
- Click Request License to renew the license.
- It will take you to the payment screen, where you can choose an option between Paypal and pay using your credit card.
Request New License
This option is only available in the Installed Version of OfficeClip.
To request a new license, you can select how many users and what package you want. Once you press the Request License button, your site directly connects to the OfficeClip license server and checks your license information.
If you are requesting a license for the first time or are changing requirements, a temporary thirty-day license is issued and can be downloaded by following the displayed instructions. After this is complete, it is necessary to contact OfficeClip and pay for the new license(s), after which OfficeClip issues a permanent license.
To request a new license key:
- Click Settings > Entire
Site > Tools >
Manage License.
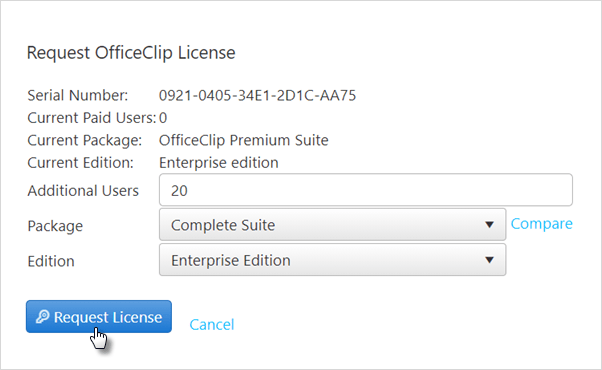
- Click Request License.
- Fill in the appropriate package, number of users and the Edition.
- Click on the Request License button.
Download Latest Patches
This section is only available in the Installed Version of OfficeClip.
Clicking this link brings up a window on the OfficeClip website where you can download the latest version of OfficeClip.
To download the latest OfficeClip patches:
- Click Settings > Entire Site > Tools > Manage License.
- Click Download Latest Patches. Here you will find the latest downloads, as well as a variety of both required and additional components.
Apply License Information
This section is only available in the Installed Version of OfficeClip.
This section is used to apply the license information that is sent from OfficeClip. To access it:
Click Settings > Entire Site > Manage License (under License).
Click Apply License Information, then choose the license file and click on Apply License.
Log out and log back in again and click on Support > About OfficeClip from the top menu and verify the license.
Setup SMTP
With the SMTP option users can easily send emails out of OfficeClip.
To setup the SMTP:
- Click Settings > Entire Site > Tools > Setup Smtp.
- On the next screen, enter all the requisite details for setting up
an SMTP. This SMTP information you will get from your system
Administrator or from your Internal service provider.

- You can confirm your SMTP settings by sending a test email by clicking on the Send Test Mail button. If the settings are correct the email will be sent to the user.
- Finally click Save to save the settings.