Manage Accessibility with Privileges
These sections allow you to create various roles in the organization and to set restrictions on those roles. This feature adds security to the organization to ensure that users are only given to access to the areas they need.
Organization Administrators cannot have any restrictions; they are given all access to all functions.
What are Roles
Within an organization there can be many administrators and also many roles, which determine the access of a person who is a user of that organization. The administrator, in creating roles, can group like people together in one role and give them permissions in that role. This determines not only what they can and cannot do, but also the information to which they do and do not have access.
OfficeClip has two predefined roles:
Administrator- This role cannot be restricted. An Organization Administrator will have access to all the resources in the organization-all the screens, all the data, etc.All UsersAll the users in an organization automatically belong to this role and the administrator can restrict privileges in this role but cannot delete it.
The administrator can create other roles based on the needs of the organization, such as a sales role in which he can put various users and assign privileges and restrictions based on what the users of that role need to do.
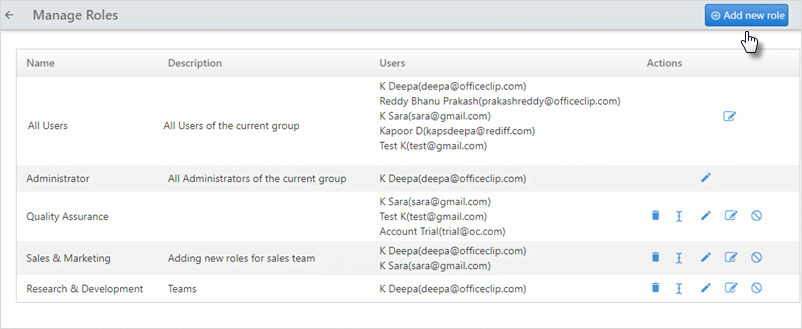
Manage Roles
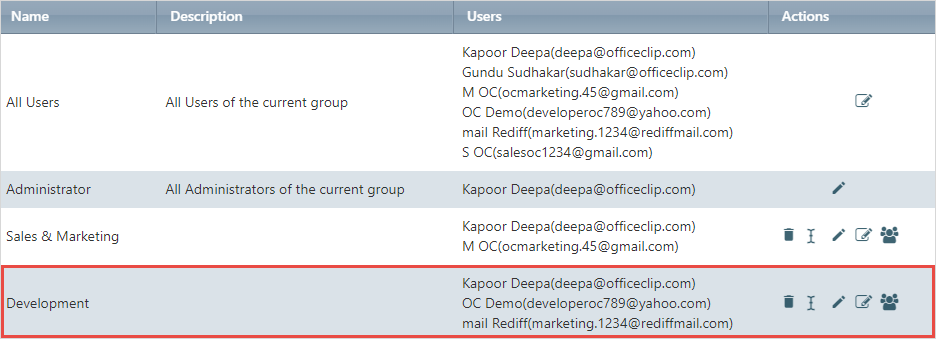
This screen allows for the management of individual roles. It also shows the names of the roles in the organization, a description, all the users within each role and, in the far right column, various icons that allow the administrator to manage user roles.
These icons are based on the roles so that they can be edited
according to the privileges each role has. The ![]() icon, which is visible in the
icon, which is visible in the All Users
role, gives a list of the applications and their parts to which a user
can have access.
Notice that the icons are different for each role. This is because, in some cases, certain actions cannot be performed against those roles; such as, the Administrator role, which cannot be deleted or have any restrictions assigned to it.
To manage roles:
- Click Settings > Organization Settings > Organization Settings > Privileges.
- On the Manage Role screen, you will be able to see the roles of
all the users.
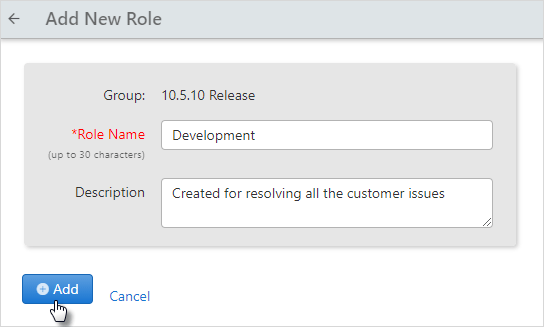
- To add a new role, click Add New Role.
- Add the role name and description, and click
Add.
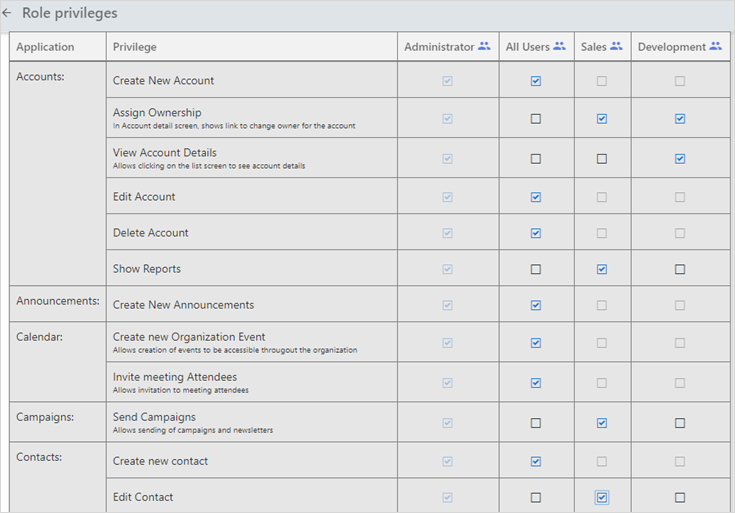
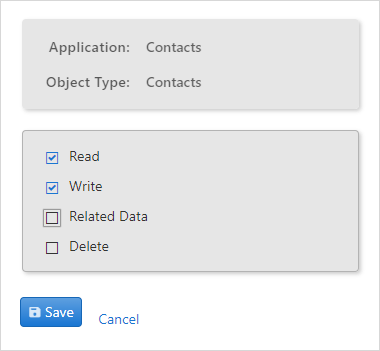
- On the next screen, checkmark the privileges within each
application, for which you want to give access for a particular role.
Click Save once done.
- After managing privileges for different roles, you need to add users for that particular role(sales, development, etc.)
- To add users for a role, go to Manage role
screen under Settings >
Organization settings >
Privileges and click on the
 icon.
icon. 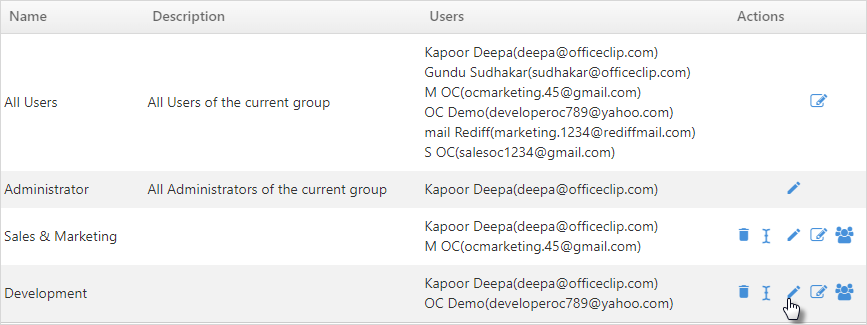
- It will take you to the add user screen for that particular role. It will show a list of available users.
- Select a user or hold the Ctrl key and select users to make
multiple selections and click on the
 icon.
It will add a user for the role which you have created. To move all
the users to the right side, click on the
icon.
It will add a user for the role which you have created. To move all
the users to the right side, click on the  icon. After adding users in role, click
Save.
icon. After adding users in role, click
Save.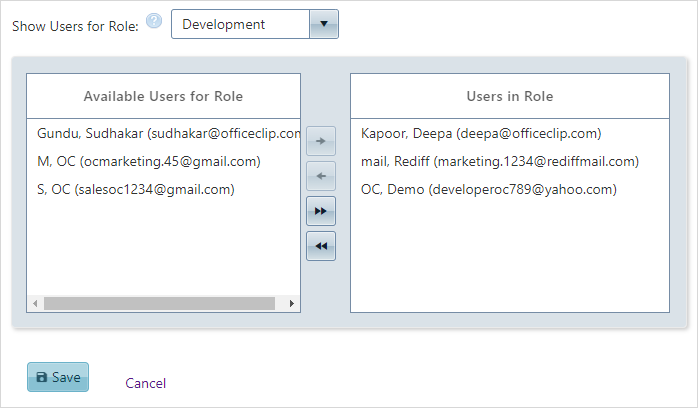
- Finally, on the Manage role screen, you will see the new role
created and its users.
- To delete a role, click the
 icon from the Actions column.
 - To change the name of an existing role, click the
 icon, add a new role name and click
Add to save the changes.
icon, add a new role name and click
Add to save the changes. - To add or remove role privileges, or to change access for any task
within an application, click on the
 icon from the Actions column.
Checkmark or uncheck the privilege box and click
Save.
icon from the Actions column.
Checkmark or uncheck the privilege box and click
Save. - To edit the Users in role click on the
icon from the Actions column. Add or remove the
users and click Save.
- To manage applications for each role, click on the
 icon.
icon. - On the next screen you will see current applications which your
organization is using. From here you can switch On or Off the
applications. And for the switched on applications you can set access
for each roles in your organization.

- To provide access for different roles, checkmark on the
appropriate box where you want to give access and keep the box blank
or uncheck if you do not want to give any access for that role and
click Save.
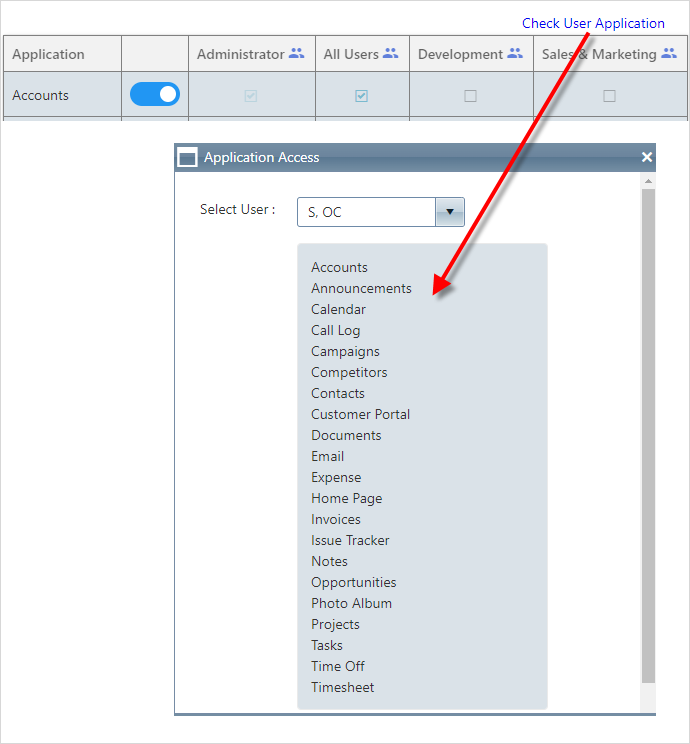
- To see the which users are alloted which role, click on the
 icon.
icon. 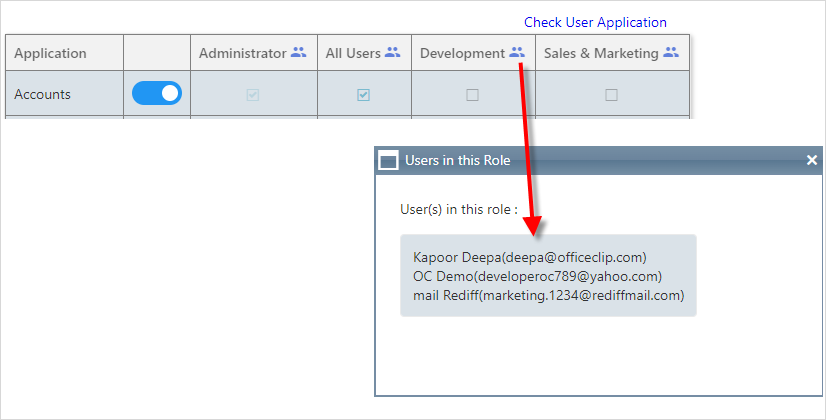
- To see which applications each user is alloted, click on the
Check User Application link. A pop-up will
appear. In that pop-up select a user and you will see all the access
of applications that particular user is given.
Organization Administrators
This screen allows the administrator to view the Available Users for Role and Users in Role by selecting the appropriate role from the Show Users for Role drop-down menu.
To view the roles:
- Click Settings > Organization
Settings > Privileges >
Organization Administrator.
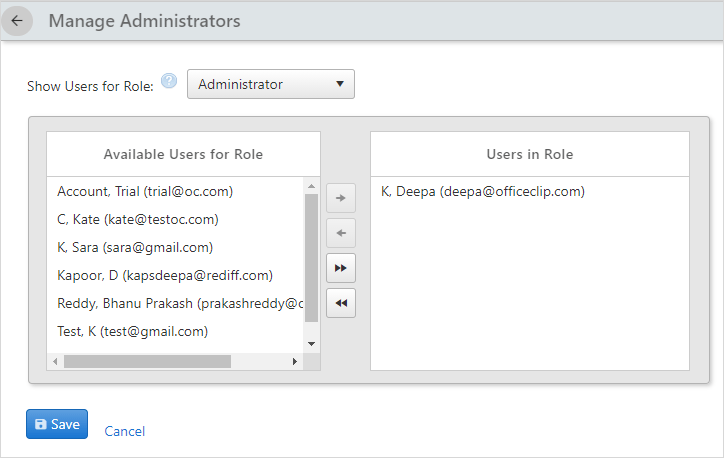
- You can easily move available users into a role, such as
Administrator, by clicking on each user or holding down the Ctrl key
and selecting users to make multiple selections, and click the button.
- To remove users from a particular role, simply make the selections
from the Users in Role box and click the
 button. The selected user(s) will no longer belong to
that role, but will always at least belong to the All Users
role.
button. The selected user(s) will no longer belong to
that role, but will always at least belong to the All Users
role. - Click to move all the selection to the right and click
 to move all the selection to the left.
At least one user in an organization must be in the Administrator role at all times.
Role Privileges
The administrator can give different permissions to each role within OfficeClip. This is a way to make sure that only the necessary applications and information sources are accessible to users of that role.
Users can be in multiple roles, but the most restrictive role will take precedence. This allows the administrator to restrict a user without changing an existing role.
For example, the administrator can give users in the All
Users role access to Edit Content within
the Contact Manager application by checking the box.
However, he/she can deny the privilege to another role, such as
Standard Employee, by selecting the role from the
drop-down menu and unchecking the box next to Edit
Content.
In this scenario, no one who is a user of the Standard
Employee role can edit content within the Contact
Manager application, even though they are granted the access as
a user in the All Users role. The more restrictive role
becomes the effective role.
To set role privileges:
- Click Settings > Organization Settings > Privileges > Role Privileges.
- You will see a screen with different roles and their
privileges.
- Check or uncheck the privileges for each role as per your requirement.
- Click Save when finished.
- To see the which users are alloted which role, click on the icon.
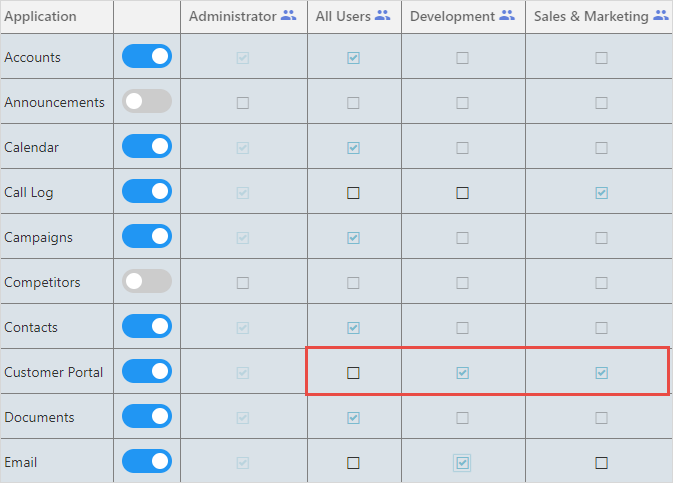
Organization Applications
This feature gives the administrator control over what applications are visible on the screens in OfficeClip. For example, if a particular organization is not using the Document Sharing application, it can be blocked so that it does not appear on the users' screens. This is also useful for security purposes as it allows the administrator to block an organization's access to certain applications.
Administrators can also decide which role can access which application and take action accordingly.
To setup application access to roles:
- Click Settings > Organization Settings > Privileges > Organization Applications.
- You will see various applications, Roles available in the
organization and their access.
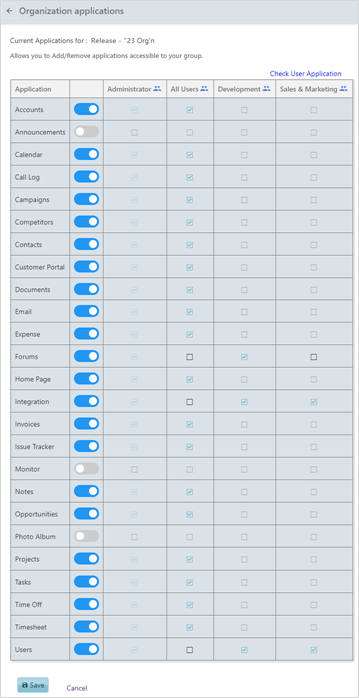
- From here you can switch On or Off the applications. And for the
switched on applications you can set access for each roles in your
organization.
- To provide access for different roles, checkmark on the
appropriate box where you want to give access and keep the box blank
or uncheck if you do not want to give any access for that role and
click Save.
- To see the which users are alloted which role, click on the icon.
- To see which applications each user is alloted, click on the
Check User Application link. A pop-up will
appear. In that pop-up select a user and you will see all the access
of applications that particular user is given.
Access Defaults
This feature controls the default access of every type of object in the OfficeClip database. For example, you can define that all Contacts created in the system are not modifiable by anybody except the creator and administrators.
After a default is set, it can be changed for any contacts or by using a rule.
To change the default access:
- Click Settings > Organization
Settings > Privileges >
Access Defaults.
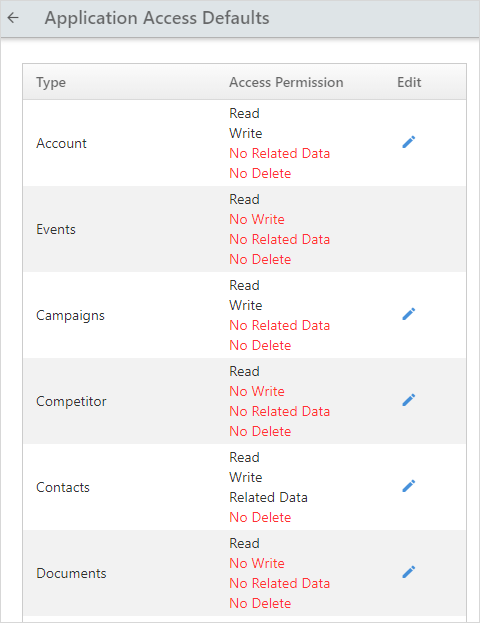
- Click on the
edit icon on the row that you want to change.
- Set the access and click on Save button.