Track Time for tasks
The track time feature serves as a tool to create estimates and monitor the time spent on various tasks. Measuring and analyzing the time spent on a task will help in making better planning of time management.
Adding Estimate/Duration
With Estimates, the supervisor will get an idea of the estimated time for the task.
- Users can enter two estimates.
- Initial estimate entered will be the First estimate
- Second estimate or estimates entered after that will be the Final estimate.
- If the user enters only one estimate then that estimate will be the first and final estimate.
- In the track time window, users can also enter the time spent on a task manually.
Few things to understand about setting up Estimates.
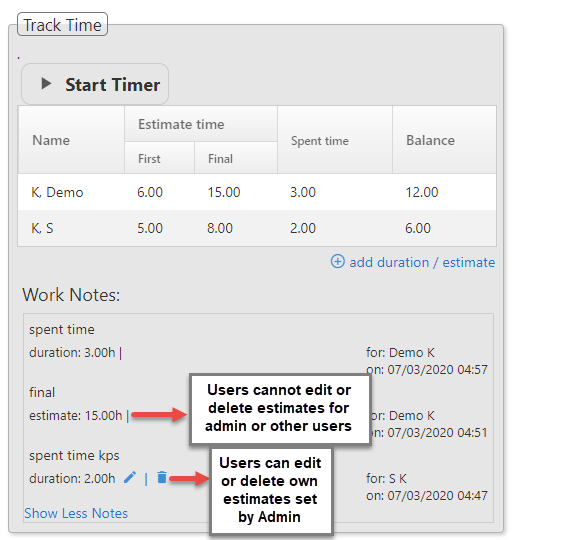
- Admin can set own estimates as well as estimates for other users
also.
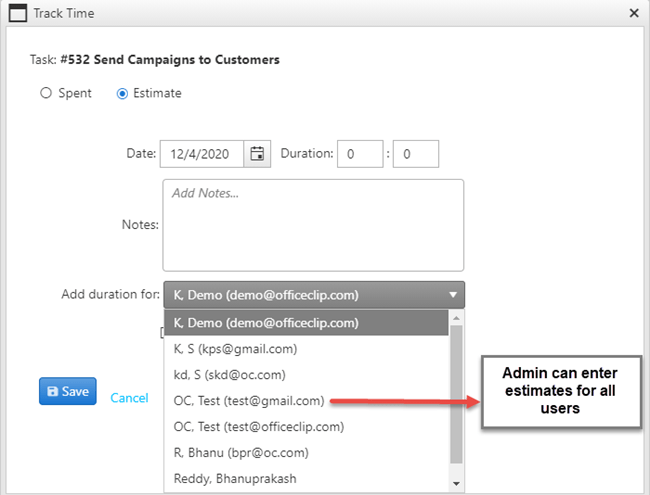
- Admin can edit or delete estimates for other users.
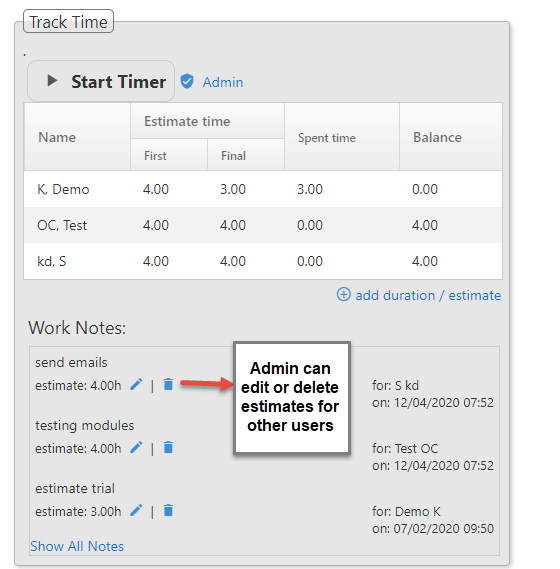
- Users can set estimates only for themselves.
Users can edit own estimates set by Admin.
Adding First Estimate
To add the first estimate:
Click on the Add duration/estimate button on the task details screen.
A new window displays on the screen. Select the Estimate radio button.
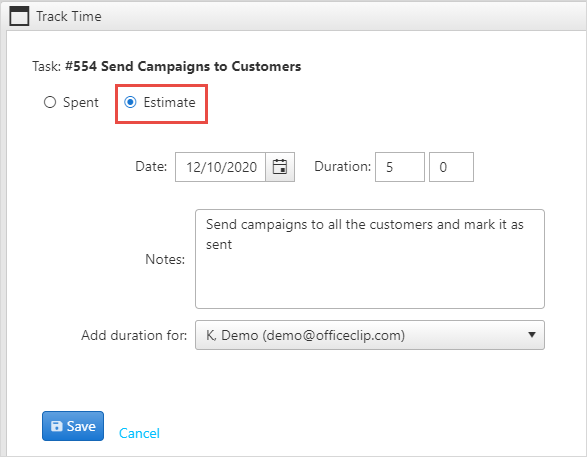
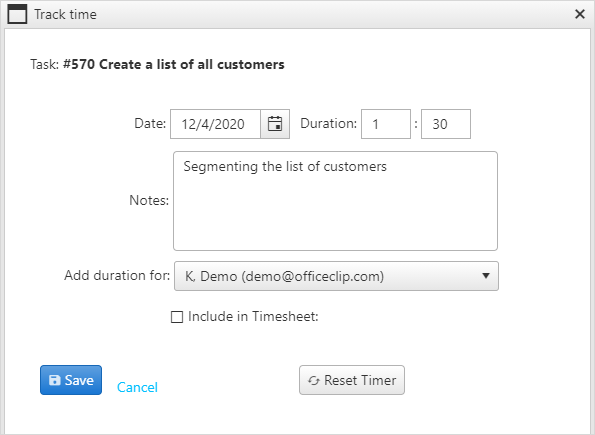
- Enter the date, notes and the estimated duration for the task.
- Click Save.
Adding Duration manually
To record the hours spent on a task manually:
- Click on the Add estimate/duration button.
Select the Spent radio button.
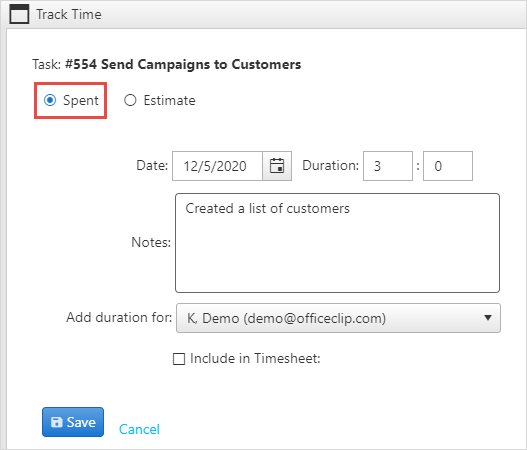
- Enter the date, notes and duration of the task.
- To check the steps for including the time spent on a task in the timesheet, click here.
- Click Save.
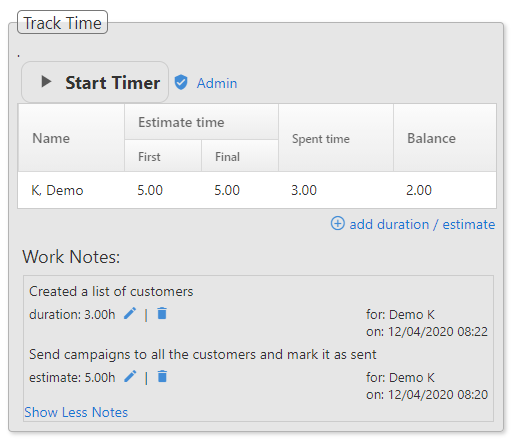
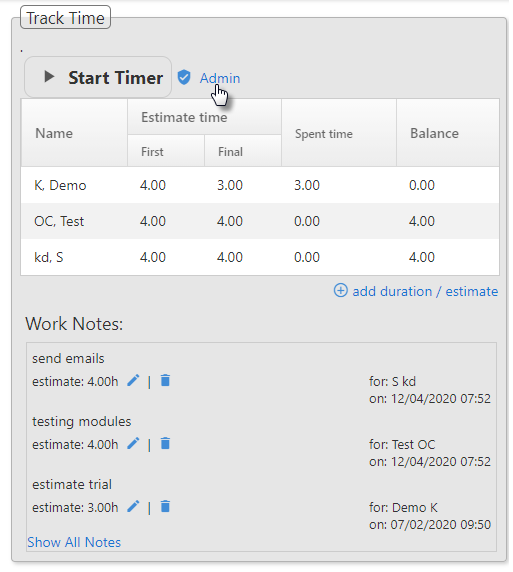
The track time window will display all the work notes, estimates, and duration entered for a task.
Adding Final Estimate
The user can increase the estimated time, if while working they realize that the estimated time mentioned is not enough.
To add Final estimate:
- Click on the Add duration/estimate button.
Click Estimate radio button.
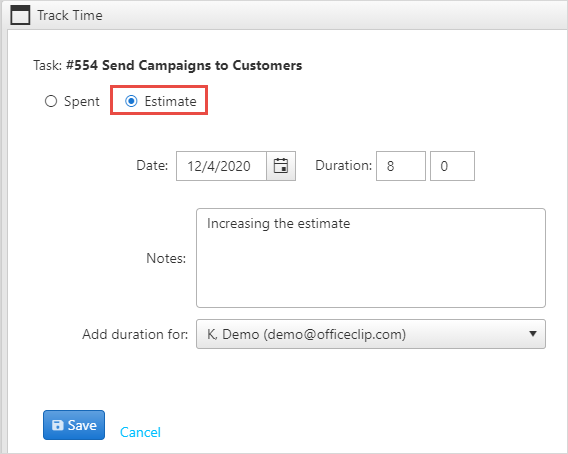
- If the first estimate entered was 5 hours, and if the user wants to increase the estimate by 3 hours more, then the Final estimate entered will be 8 hours. Final estimate will be the total of the first estimate and the second estimate.
The track time window will show the first estimate, final estimate, the actual time spent on the task and balance hours
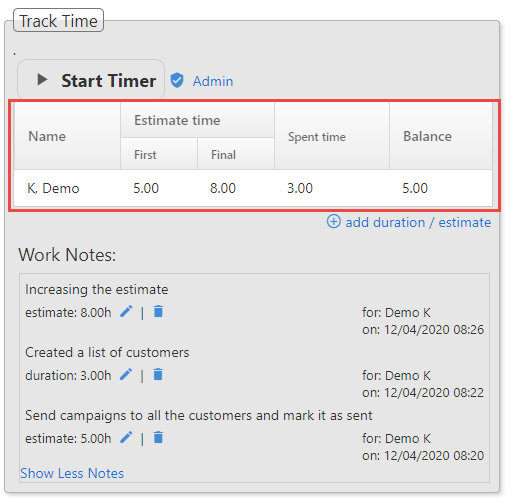
- The spent hours will be subtracted from the final estimated hours.
- If the user realizes that the estimated time required for a task is less than the mentioned Final estimated time, the user can enter the estimate again which will be the Final estimate.
- Check the example given below.
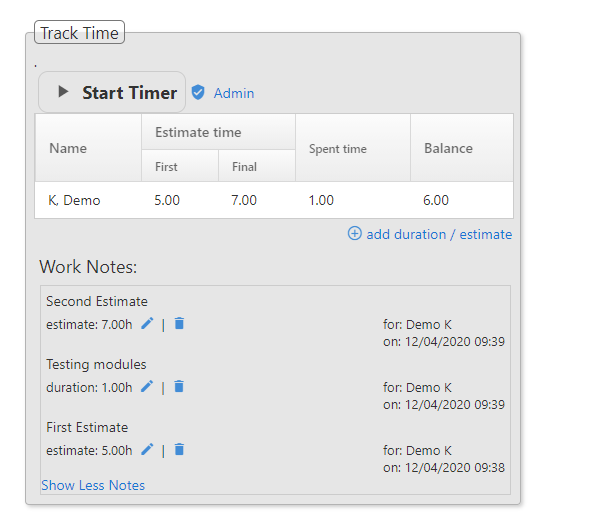
- The user Demo has entered first estimate of 5 hours, time spent on a task is 1 hour.
- But Demo wants to increase the estimate by 2 hours so the second
estimate entered is 7 hrs.
- But Demo realizes that the total time required for the task is
only 4 hours, then again Demo enters the estimate of 4 hours which
will be the Final estimate.
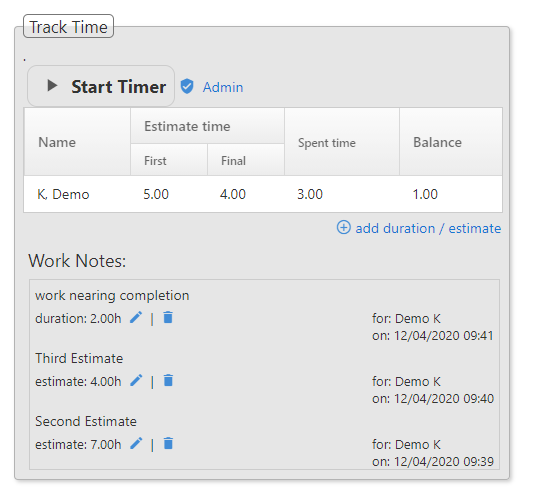
- The total time spent will be subtracted from the third and final estimate.
- Users can edit the work notes by clicking on the
 icon. Please, note the users can change the estimate
and the time spent on tasks.
icon. Please, note the users can change the estimate
and the time spent on tasks. - Delete the work notes by clicking on the
 icon.
icon.
Timer
This section describes how to track time for a task in two ways:
Start Timer button inside the Track Time widget
Click the Start Timer button.
The timer on the menu bar will start recording the time.

- After the work on the task is complete, click the Stop Timer button inside the track time widget.
The track time window will display.
- Enter the work notes.
- To learn about Include in timesheet feature, click here.
- Click Save and you will see the work
details and time in the
Work Notes.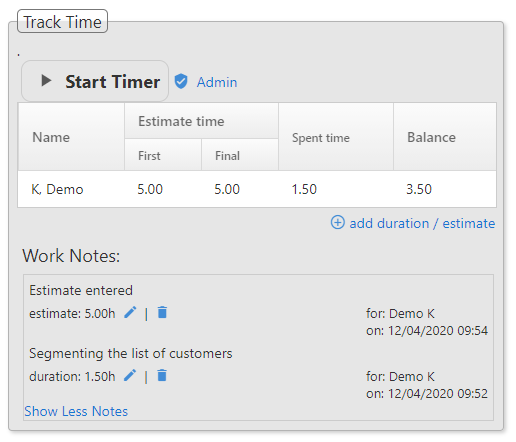
- Users can also reset the time by clicking on the Reset Timer button.
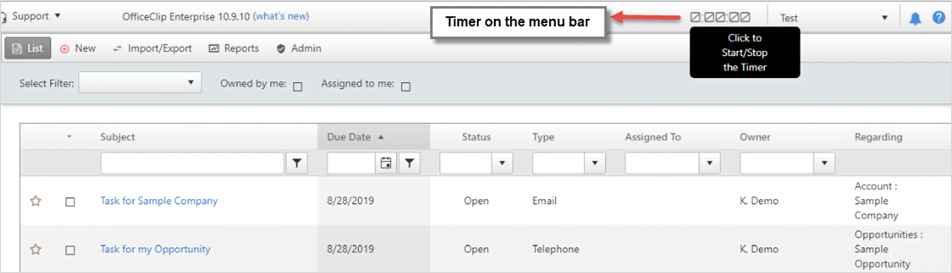
The Timer widget on the menu bar
Click on the Timer on the menu bar to start the timer.
A screen will display where the user needs to select the application and entity from the dropdown for which time is to be tracked.
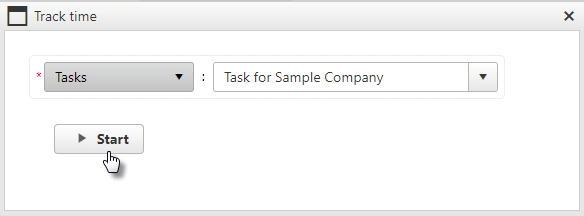
- Click Start.
- The timer will start recording the time for the selected application.
- After the work on the task is complete, click on the timer on the menu bar to stop the timer.
- The track time window pop-up will show up with the duration.
- Enter the work notes.
- To learn more Include in timesheet feature, click here.
- Click Save.
- Users can also reset the time by clicking on the Reset Timer button.
Include in Timesheet
Tasks module has a provision of including the tracked time directly in the Timesheet module of OfficeClip. Time is recorded in two ways in OfficeClip Timesheet:
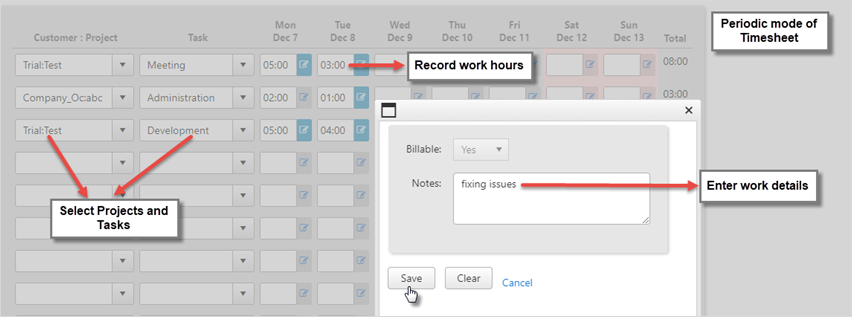
Periodic mode: In this mode, the time is recorded manually where user enters the working hours and work details in the timesheet and saves it.
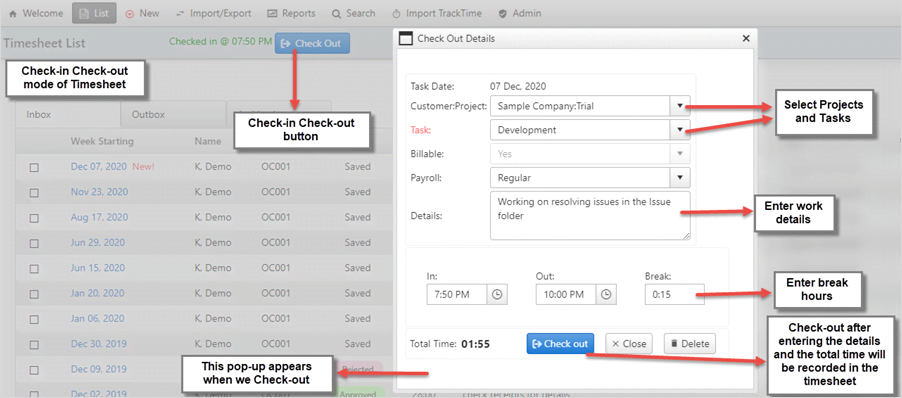
Check-in Check-out mode: In this mode, user clicks on the Check-in button when they start working on a task and click Check-out after finishing the work. This Check-in Check-out system will automatically record the work hours in the timesheet.
Similarly, if you want to include the time recorded for a task in the timesheet, it will be recorded depending on the timesheet mode you are using.
- Periodic mode:
If the user is using the timesheet in the Periodic mode, after stopping the timer in the task modules and if the user selects the Include in Timesheet option, the track time screen will look like this:

- The duration is recorded in the Duration box, users need to enter the work notes and select the Project and Service Item from the dropdown.
- Click Save.
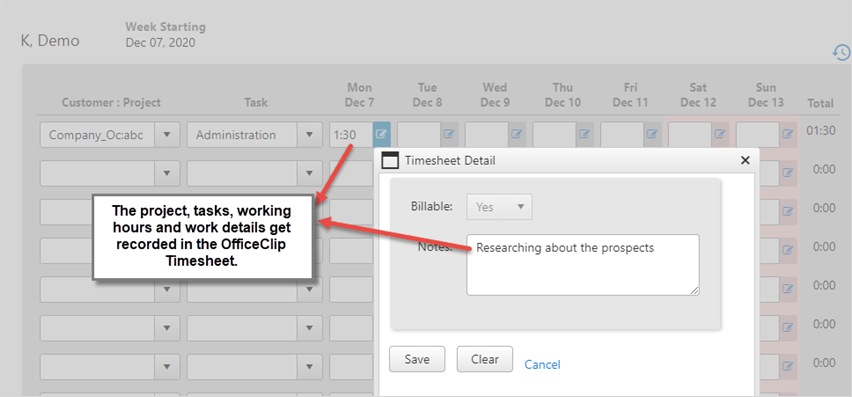
Check the time getting recorded in the timesheet.
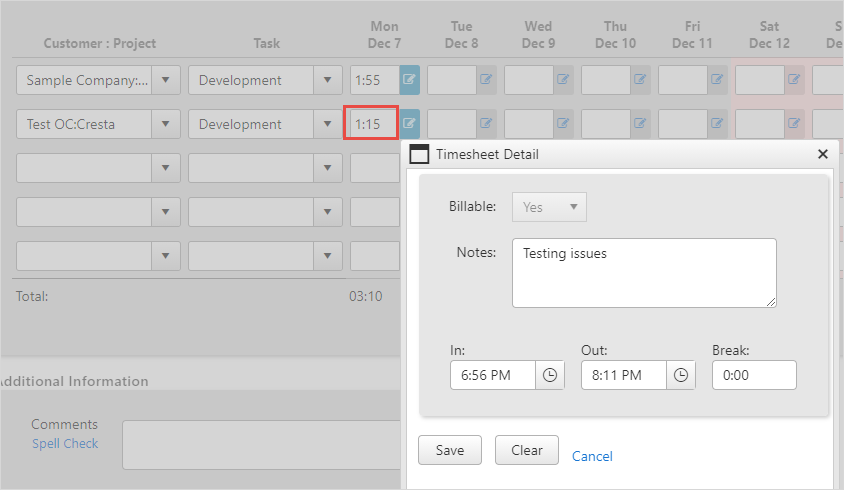
- Check-in Check-out mode:
If the user is using the timesheet in Check-in Check-out mode, after stopping the timer in the tasks module and if the user selects the Include in Timesheet option, the track time screen will look like:
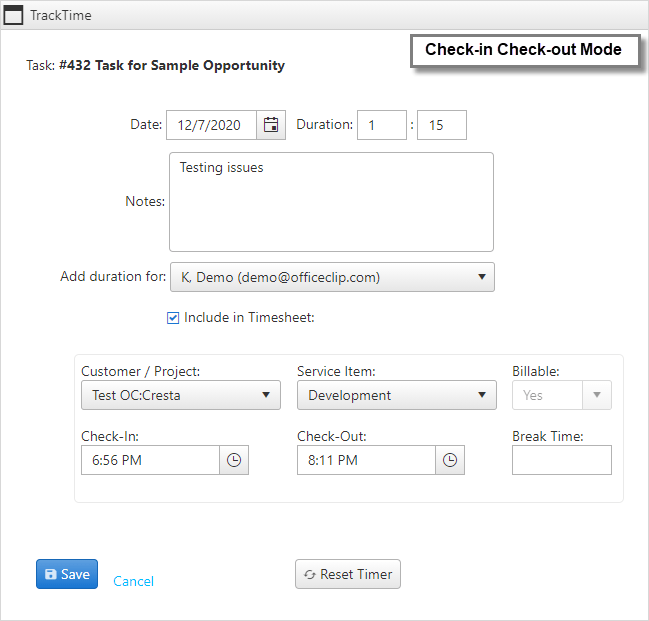
- The Check-in Check-out time gets recorded automatically.
- Enter the work notes and select the project and service item from the dropdown.
- Enter break hours, if any.
- Click Save.
Check the time and work notes recorded in the timesheet.
Admin
- With the Admin screen the Administrator
decides what features the track time window will show.
- Click on the Admin button.
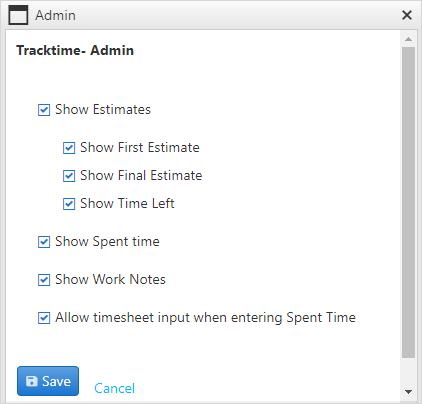
- The Administrator needs to check mark the features which are to be displayed.