
Timesheet Import/Export
The OfficeClip Timesheet application provides various ways to exchange information with external systems.
Importing bulk Timesheets via CSV
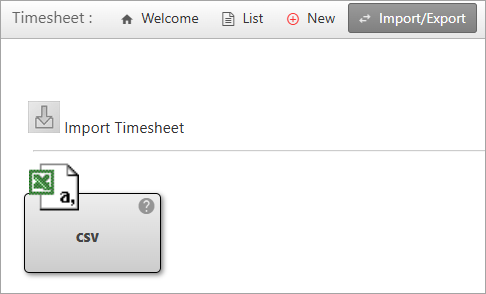
Uploading large volumes of time logs is now faster and more reliable. The new CSV import feature validates your data in real-time and provides a detailed preview, ensuring your records are 100% accurate before they hit your timesheet.
CSV Bulk Timesheets
If your team tracks hours externally in CSV format, you can quickly consolidate this data for payroll by using the bulk import feature in timesheet. This ensures all time logs are centralized and accurate before processing. Follow these steps to import timesheets for your users:
- Click on Timesheet > Import/Export > CSV
- The following screen provides downloadable templates for your Headers, Customers, Projects, and Tasks. Use these to format your data correctly. Once your file is ready, upload your CSV here to run the built-in validation.
- In the below image, check the formats of the downloadable
templates.
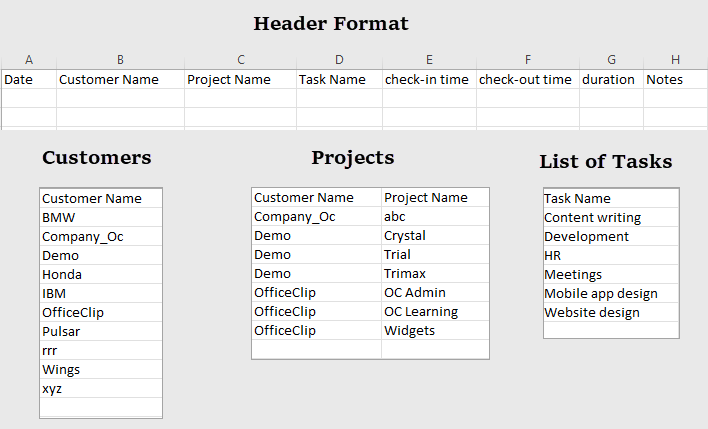
- Your users will be filling up their work logs in the Headers template.
- Ensure your CSV file adheres to the following formatting rules
to avoid import errors:
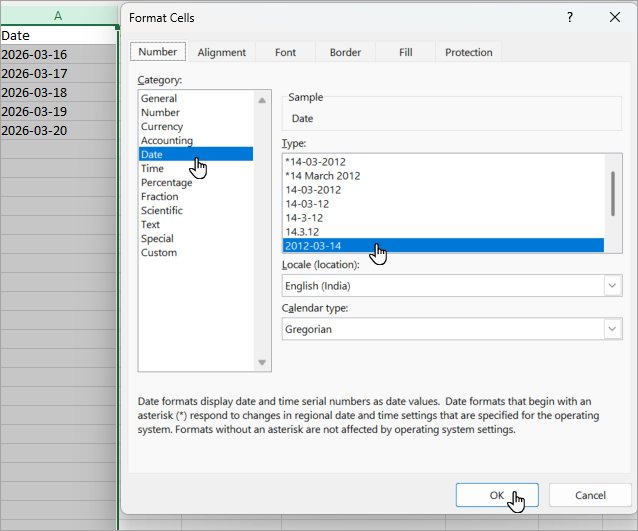
- The date format should be yyyy-mm-dd. To apply this format
in Excel, select the date column, right click and select format
cells. Select the date category and then select the yyyy-mm-dd
format.
- Ensure Customer, Project, and Task names match your OfficeClip settings exactly. Any discrepancies will result in a validation error.
- Enter Check-In/Check-Out times using a 24-hour format (e.g., 14:00 for 2:00 PM).
- Calculate and enter the total duration accurately based on your time entries.
- Add descriptive notes for each entry as required.
- The date format should be yyyy-mm-dd. To apply this format
in Excel, select the date column, right click and select format
cells. Select the date category and then select the yyyy-mm-dd
format.
- Once the data is ready, save your CSV file with a descriptive name.
- Navigate to the Timesheet import screen and click on Choose File to select your saved document.
- Click Preview and Validate CSV to
initiate the system check. The screen will display the status of
each row:
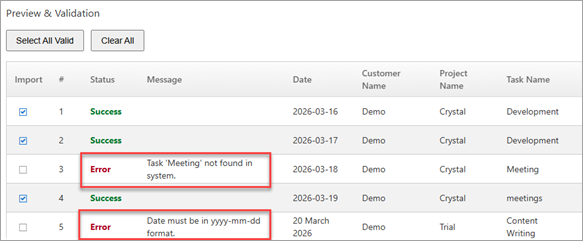
- Success: The data is formatted correctly and ready for import.
- Error: There is an issue with the data that requires correction.
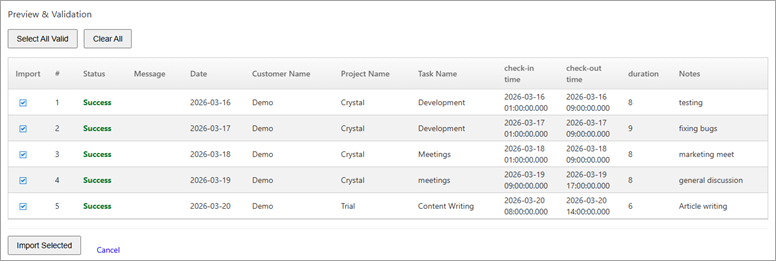
- If the status shows an Error, review the Message column to
identify the specific issue. See the example below in the
image.
- Fix the identified errors in your CSV file, save it, and re-upload the file for a fresh validation.
- Once all rows display a Success status, click the Import Selected button at the bottom of the screen.
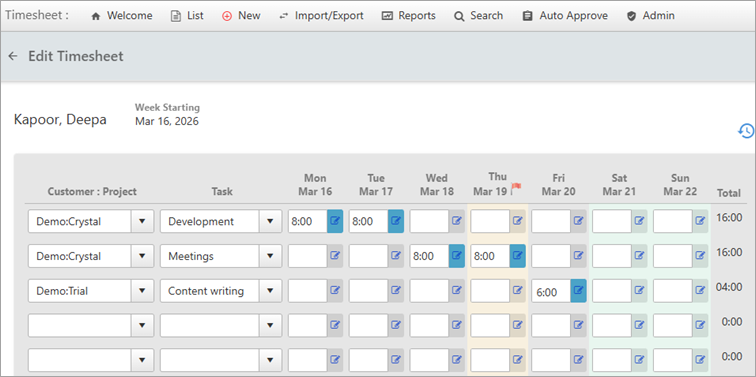
- The system will confirm the import, and you can now view the
centralized data within your timesheet.
Exporting Timesheets

Timesheet data can be exported in various formats. These format includes:
CSV - Individual timesheets
ADP - Payroll Export
CSV - bulk export for all timesheets
QuickBooks - iif files
You can export individual timesheets or export bulk timesheets at once.
CSV - Individual Timesheets
This option allows the user to export their own timesheet.
- Click HRM > Timesheets > Import/Export > CSV(Individual Timesheet).
- Choose the
Date Rangeand select theUsersusing the checkbox, and click Continue. - Click Select all to select all users at a
time. Click Clear all to clear the
selections.

- You will be able to see the details of the
Individual
          Timesheet Export
. - To preview a timesheet click on the
 icon and to export a timesheet in CSV format click on
the
 icon.

- When you click on the export icon, a CSV file will automatically get downloaded in your system.
CSV - All Timesheets
This feature is only available in the Enterprise edition of OfficeClip.
To export timesheet details for multiple users to a comma separated (CSV) file:
- Click HRM > Timesheet > Import/Export > CSV (All Timesheets).
- Choose the
Date Rangeand select theUsers. Select the appropriate checkbox on the screen for exporting approved timesheets or submitted timesheets. Then click Continue.
- In the following screen, you can rename the fields and move the
fields as you wish them to appear in the output. Click the
 or
 buttons to move the fields up or down the list;
determining their order on the exported Excel sheet. In the top
section, select the checkbox if you want the column names to appear
as the first row in the comma separated file.

Click Export to view or save as an Excel file.
This feature is only available to the administrators of the OfficeClip organization.
ADP - Payroll export
This feature is only available in the Enterprise edition of OfficeClip.
This function allows sending the OfficeClip timesheet information to the ADP payroll system.
To export timesheet details for multiple users to ADP - Payroll file:
- Click HRM > Timesheet > Import/Export > ADP - Payroll export.
- Choose the
Date Rangeand select theUsers.
- The followings settings are necessary to export timesheets
accurately within OfficeClip:
- Click Settings >
Organization Settings >
Organization > Time Zone
& Custom Fields:
- (Required) Set the Company Code (Co Code) field in Custom 4 field with three characters.
- (Optional) Payroll period defaults to Semi-Monthly; to
change it, set the value of Custom 5
field to Weekly, Biweekly, Semi-monthly or Monthly.

- For each employee, certain fields needs to be set:
- Click Settings > Organization Settings > Users > User details.
- (Required) Set the File# in the Payroll Custom field 5 with six characters
- (if Department is Checked)Set the Employee Department in the Department drop-down, use only the first six characters.
- (if Social Security Number is Checked)Set the
Employee's Social
SecurityNumber in the
Payroll Custom field 4 (only nine
digits allowed)

- Click Settings >
Organization Settings >
Organization > Time Zone
& Custom Fields:
- After saving all the necessary details in Settings, click Export.
QuickBooks iif Files
This feature is only available in the Enterprise edition of OfficeClip.
OfficeClip can create iif export files for QuickBooks 2005 or higher versions.
To learn Step-by-step on-screen instructions for creating and importing the QuickBooks compliant iif files, click on the Quickbooks button.

OfficeClip Addins
This feature is only available in the Enterprise edition of OfficeClip.
OfficeClip provides add-ins that can be downloaded and used with the timesheet software.

The Timesheet application supports the following add-ins:
QuickBooks- Allows Customer, Projects, Service Items, Employees, Time and Expense information to be exchanged between OfficeClip and QuickBooks. Download the Quickbooks Add-in.Sage 50 Accounting- Allows Customer, Projects, Service Items, Employees, Time and Expense information to be exchanged between OfficeClip and Sage 50 Accounting (formerly Peachtree Accounting). Download the Sage-50 Add-in.