Using Timesheet
This section describes the workings of the Timesheet application.
Following are the various features and modules of OfficeClip Timesheet Applications:
- Button Bar: This menu consists of:
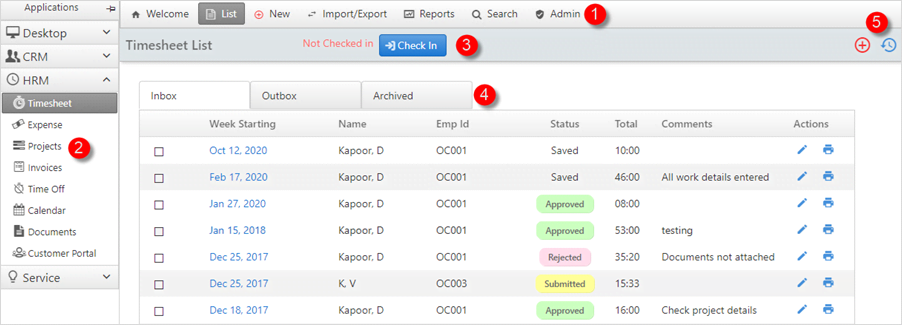
- List: Displays the list of all the saved, approved, rejected, and submitted timesheets.
- New: Creates a new timesheet.
- Export: Exports the timesheets in CSV format and also with the ADP Payroll system. Timesheets can also be integrated with Quickbooks and Sage50 Accounting software.
- Reports: Displays detailed reports related to timesheet detail, summary, projects, tasks, approvals, etc.
- Search: Helps to find the individual or group timesheets.
- Track Time: Track time from other applications of OfficeClip like Contact Manager, Tasks, Issue Tracker and adds it in the existing timesheet or creates a new timesheet.
- Admin: Allows setting up various features required for a timesheet, e.g., setting up service items, profiles, setting up project rates, payroll, rules, custom fields, etc.
- Left Bar: This menu consists of various
timesheet modules like:
- Expenses: Tracks all the expenses for all the projects.
- Projects: Manages all the projects along with their clients and also provides details of project status.
- Invoices: Create invoices by using various templates.
- Time Off: Keeps track of all the employee's leaves and accruals.
- Calendar: Helps to manage all the official and personal events like meetings, seminars, tasks, and also displays the time offs of other team members.
- Documents: Helps to store and organize all the organizational documents.
- In/Out Timesheet: consists of
- Check-in Check-out Button: With the In/Out Timesheet mode, employees can click on the check-in button when they start their work and click the check-out button when they stop their work.
- Inbox/Outbox/Archived Tabs: consists of
- Other features: consists of
- New
Timesheet: The
 icon creates
a new timesheet.
icon creates
a new timesheet. - History: Shows the history of all the modifications done in the applications by the employees.
- New
Timesheet: The
Creating a Timesheet
Each row of the new Timesheet screen can be used to record time for a particular combination of Customers, Projects, and Service Items.
To create a new Timesheet:
- Click HRM >
Timesheet > New
Timesheet.
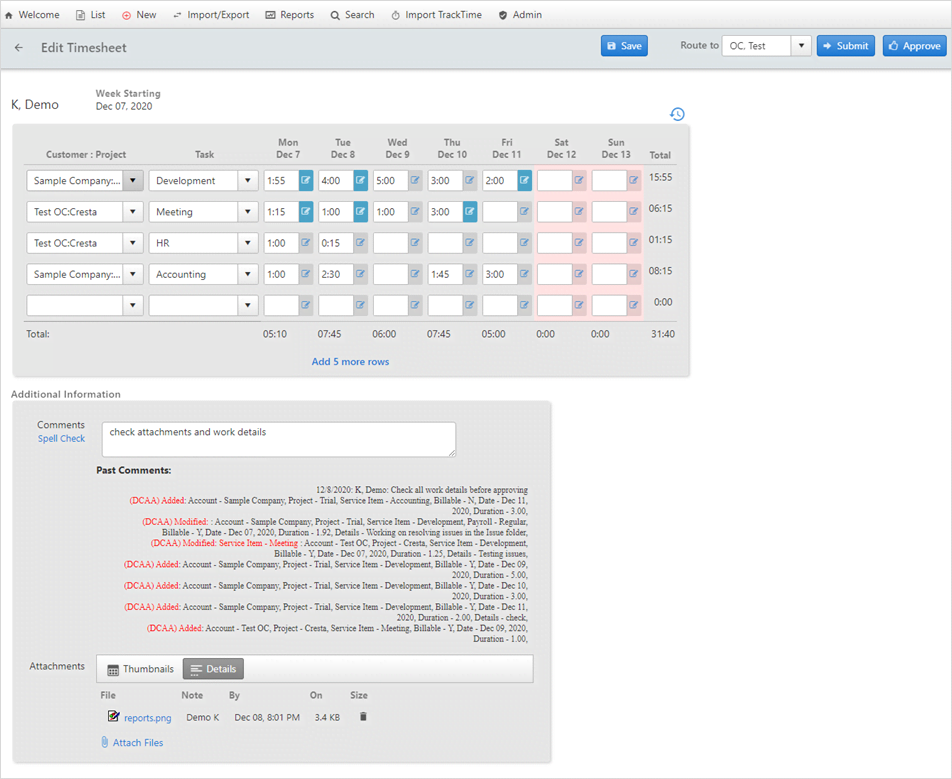
- You can select the
Project, theService Itemwhich can be related to the services provided like meetings, development, sales, documentation, etc. - Learn how to create a project.
- Learn how to create a service item for any project.
- Time for a particular day can be entered in the textbox in decimal notation (e.g., 5.5, for 5 and one-half hours) or in colon notation (e.g., 5:30, for 5 hours and 30 minutes).
- Employee can enter the details for the time worked by clicking on
the
 icon besides the textbox. It also allows the employee to specify if
the service item is billable (this is possible only if the billable
property is specified as
icon besides the textbox. It also allows the employee to specify if
the service item is billable (this is possible only if the billable
property is specified as Bothby the administrator).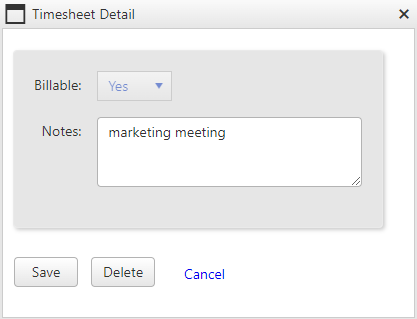
- Employees can enter the
Commentsfor the entire timesheet by typing them in the Comment text box below the time entry grid. These comments are saved with the entire timesheet rather than the individual time entries.Tip:Use the Comment field to notify the supervisor of certain things that pertain to the entire timesheet. For example, you may want to notify the supervisor as to why you could not submit a timesheet on time, or comment on time adjustments.
- A history of all the comments is kept and shown with the timesheet. These are preserved for audit purposes.
- To add Attachments click the
 icon.
icon. - You can drag and drop a file from your windows explorer application, or you can click the Select button and choose the file from the desired location.
- Finally, the employee can save the timesheet by clicking on the Save button, cancel the entry by clicking on the Cancel button, or select one of the submission buttons.
- If the manual workflow is set for the employee (which is the
default), an approver can be selected from the
Route
        To
drop-down box, and the timesheet can be sent by clicking on the Submit button. - On the other hand, if the administrator sets the automated routing, the employee cannot select the approver; clicking on the Submit button automatically routes the timesheet to the pre-selected approver.
- As soon as a timesheet is submitted, it appears as
Pendingon the Employee's Outbox. The employee will not be able to do further editing on the timesheet. - The same timesheet also appears in the supervisor's Inbox with the
Submittedstatus, allowing approval or rejection of the timesheet. Supervisor can click on individual timesheet, review and approve it. - Supervisor can also select multiple timesheets and clicks
Bulk Approve. When approved the timesheet is
removed from the supervisor's Inbox and appears in the employee's
Inbox with
Approvedstatus.
OfficeClip Timesheet remembers the Customers, Projects and Service Items from the last timesheet that you filled in. This saves some time when you work on multiple projects for more than one period. Any row that is kept empty will not be remembered in the timesheet for the next period.
Remember to double-check your comments before submitting the timesheet. Once submitted, the comments cannot be removed from the history.
Inbox/Outbox Tabs
When you log in with your credentials and click on the timesheet application, you can view the timesheet list screen.
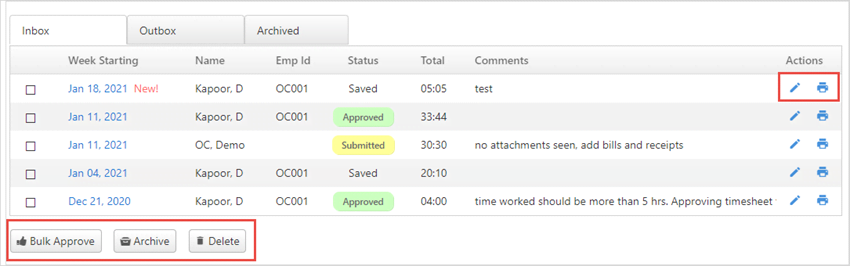
Inbox shows the timesheet requiring action. These include saved, submitted and approved timesheets.
Following actions can be performed on the timesheets in the inbox: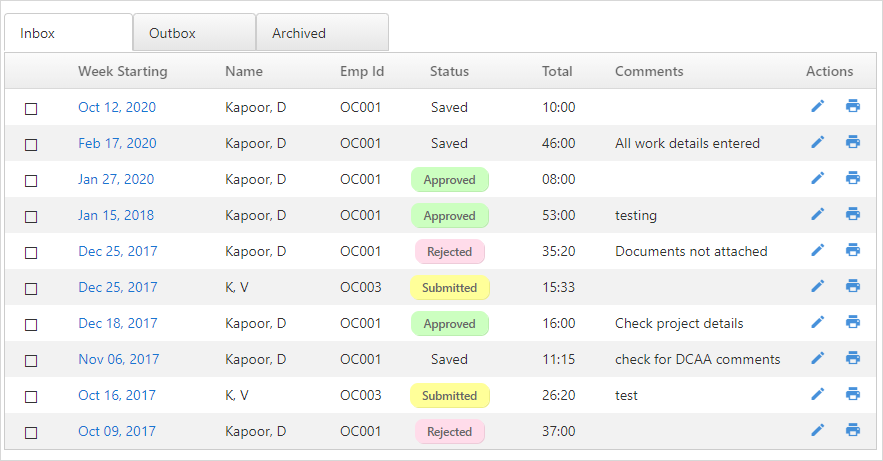
Saved Timesheets- These timesheets can be edited, removed, or submitted by the employee.Submitted Timesheets- These are submitted for approval by other employees in the organization. The approver can open the timesheet, make necessary corrections, save them, approve them, reject them, or send them to the next person in the approval path.Rejected Timesheets- These are rejected by the approver and sent back for correction.Approved Timesheets- These are the timesheets that have been approved by the approver and cannot be edited or deleted by the . The can only archive these timesheets.
- Outbox shows the timesheets that you have submitted for approval,
which shows the pending status and are awaiting action by the
approver. These timesheets can be viewed but cannot be edited or
deleted by the employee.

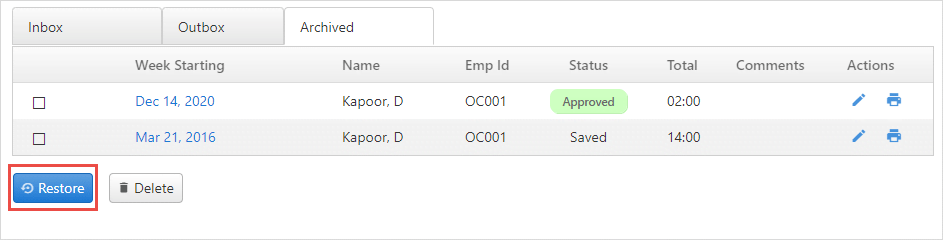
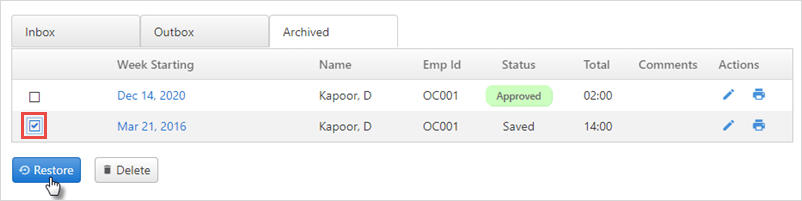
- Archived shows the list of timesheet which are no longer active.
Archived timesheets can also be restored to active status if required.
Viewing and Editing Timesheet
To view or edit the timesheet:
- Click on the view/edit
 icon in the Actions column to edit the
timesheet. Approved timesheets cannot be edited.
icon in the Actions column to edit the
timesheet. Approved timesheets cannot be edited. - You can only modify the timesheets with
Savedstatus, allowing you to update the timesheet duration, comments or add new attachments. - To view a printer-friendly screen of the timesheets, click on the
printer
 icon.
icon. - You can delete timesheets by selecting the checkbox of the timesheet item and clicking Delete. Timesheets that are in the Saved status can only be deleted from this screen.
- If your inbox contains a large number of timesheets, you can archive them by selecting the timesheets and clicking the Archive button.
- If you are the approver of timesheets, you will see the Bulk Approve button. Select the timesheets you want to approve using the checkboxes and click the Bulk Approve button. This button is not visible to those who do not have the privilege of approving timesheets. If you have the privilege, you can approve your timesheet.
The bulk approve feature is not available when the administrator enables the DCAA feature. In DCAA mode, all timesheet needs to be individually inspected and approved by the approver
Timesheets Filters
With Timesheet filters you can view timesheets with a particular status, for a particular week or for a particular employee.
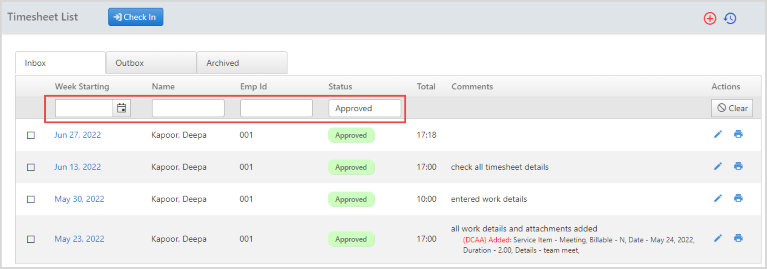
To view timesheet using different filters:
- Week Starting: To view timesheet with week starting, click on the calendar icon. Select the week for which you want to view the timesheet and it will display the timesheet for that particular week.
- Name: Enter the employee name and click enter, to see timesheet for that particular employee.
- Emp Id: Enter the employee id and click enter.
- Status: Enter the timesheet status - Saved, Approved, Submitted, Rejected and click enter. It will display all the timesheet with that particular status.
To clear the filter click on the ![]() icon.
icon.
You can view timesheets using two or more filters. Select week starting, add name and status, and you will be able to see the filters as per your requirement.
Archiving Timesheets
To remove approved timesheets from the Inbox:
- Select the timesheet you want to archive and click on the
Archive button.
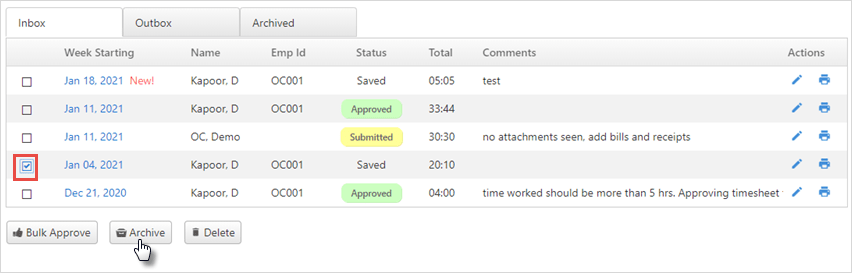
- Archiving the timesheet moves it from the Inbox and puts it on the Archive list.
- This list can be accessed by clicking on the
Archived menu To restore an archived timesheet,
select the timesheet by clicking on the checkbox and click the
Restore button.
Auto-approving Timesheets
This feature automatically approves the timesheet of an employee . The administrator of the organization needs to enable this feature.
See the detailed description of how to set the Auto Approvals.