Using Issue Tracker
Binders
Issue Tracker allows you to create multiple binders, each created with a template that can track a variety of issues.
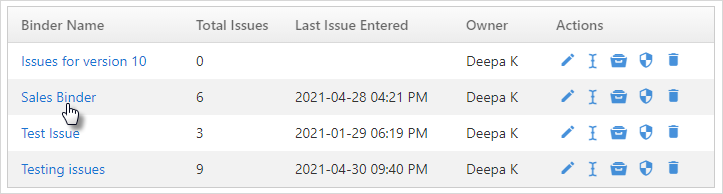
The paradigm of a binder is similar to a file folder. A file folder stores documents of a similar nature. Similarly, a binder stores issues. You can see the number of issues in each binder, the date when last issue was entered and owner of the binder.
Different kinds of binders can be created for handling different kinds of issues. For eg: For sales related issues only a Sales binder can be created, for customer related issues a separate binder can be created, for issues in system a software issue binder can be created etc. Separation of binders make handling of issues easier as each binder issue can be assigned to concerned department.
Creating Binders
To create a new binder:
- Click Service > Issue
Tracker > Binders >
New Binder. You can also click on the
 icon on the right side of the binders screen, to
create a new binder.
icon on the right side of the binders screen, to
create a new binder. - Enter the Binder Name and select the
appropriate binder type from the list.
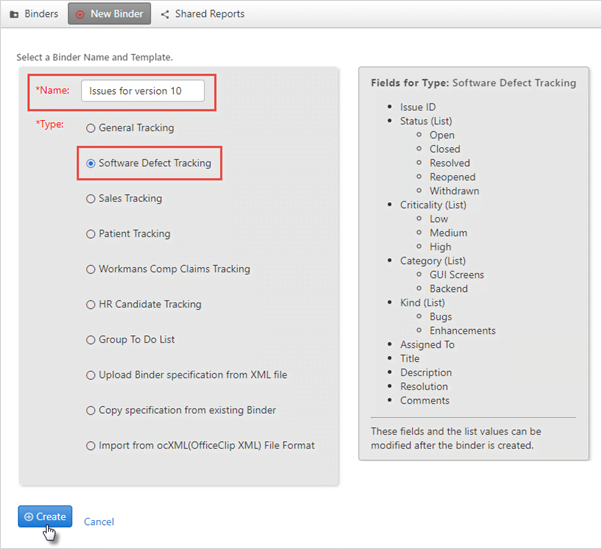
- Each binder has different fields types which are displayed on the right side.
- Click Create when finished.
- After creating a binder it will take you to the Issue tracker > Admin section. In this section, you can set up you fields, add custom fields, add options and rules for the binder, and set up email capture. Learn more about setting up various fields and features for your binders.
- You can also skip the Admin section and set fields later and directly move to the binders list by simply clicking on the Cancel button in the fixed fields screen.
Viewing Binders
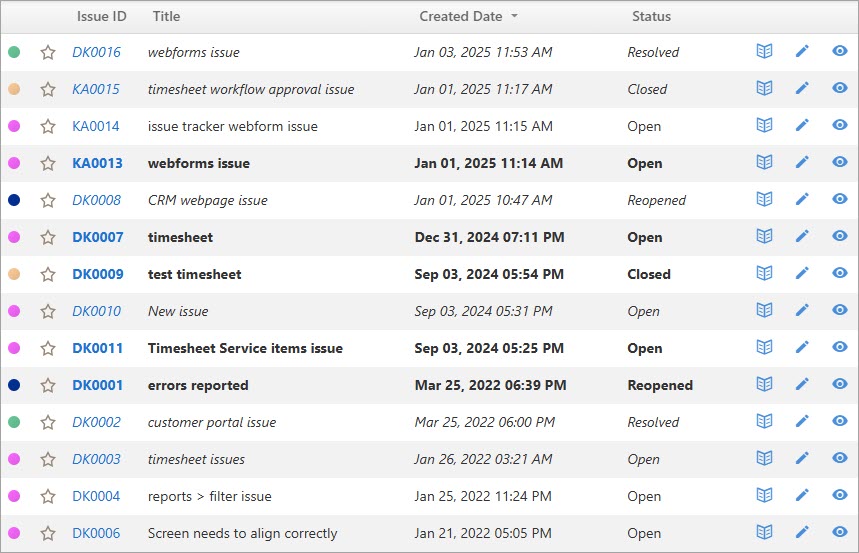
Binder list is the first screen a user sees upon entering into the issue tracker.
![]()
- To view the issues in a particular binder, click on the binder name and you can see the list of issues. Click on the Active Binders radio button to see the current active binders.
- To edit a particular binder, click on the
 icon in the Actions column. Make necessary changes and click
Save.
icon in the Actions column. Make necessary changes and click
Save. - To rename a binder, click on the
 icon in the Actions column. Enter a new name for the
binder and click Save.
icon in the Actions column. Enter a new name for the
binder and click Save. - To archive a binder, click on the
 icon in the Actions column. If you want to archive
the binder click OK, to exit, click
Cancel. To see the list of archived binders,
click on Archived Binders radio button above
the binder list.
icon in the Actions column. If you want to archive
the binder click OK, to exit, click
Cancel. To see the list of archived binders,
click on Archived Binders radio button above
the binder list. - To delete a binder, click on the
 icon in the Actions column. If you want to delete,
click OK; to exit click
Cancel.
icon in the Actions column. If you want to delete,
click OK; to exit click
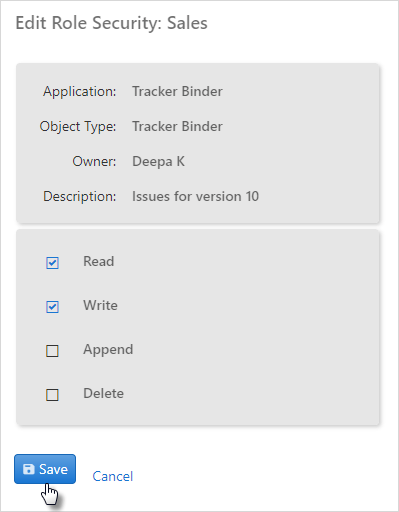
Cancel. - With setting up permissions for a binder, the Administrator can decide who can access the binder or who can make changes to a binder or whom to give access only for viewing purpose. To change permissions for a binder:
- Click on
 icon in the Actions column.
 - On this screen, click on the edit
icon to change permissions.
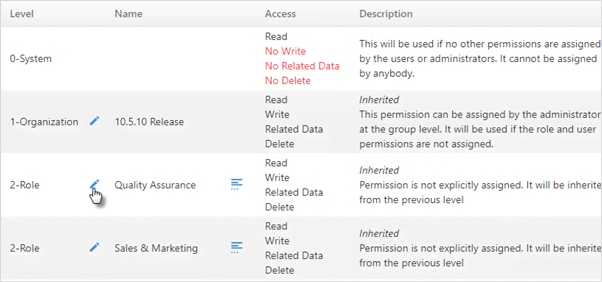
- Check-mark the box for which permissions are to be granted and
then click Save.
Creating Issues
Note: The Document Attachment feature is only available in the Enterprise Edition of OfficeClip.
All issues have a field called Title that is used to provide a short description of the issue. Also, issues have fields such as category, status, description, and so forth to help further explain the issue. For example, an issue can be tracked with High criticality and Open status, meaning in general that the issue is very important and no action is taken yet.
Issues can be assigned to certain users and rules can be set to have an email sent to them; notifying them that a new issue has been created and assigned to them.
Users can also give details about the resolution of the issue in the Resolution text box, type any additional information in the Comments text box, and write a note by clicking the New Note link.
Users can also edit issues; each edit creates a history log to record progress on an issue accurately.
The drop-down lists for various fields can be customized to have different meanings depending on the type of organization.
To create new issues:
- First, select the binder where an issue is to be created.
- Inside the binder click New Issue.
- Fill in the fields as applicable to your issue. (See the field
explanations below).
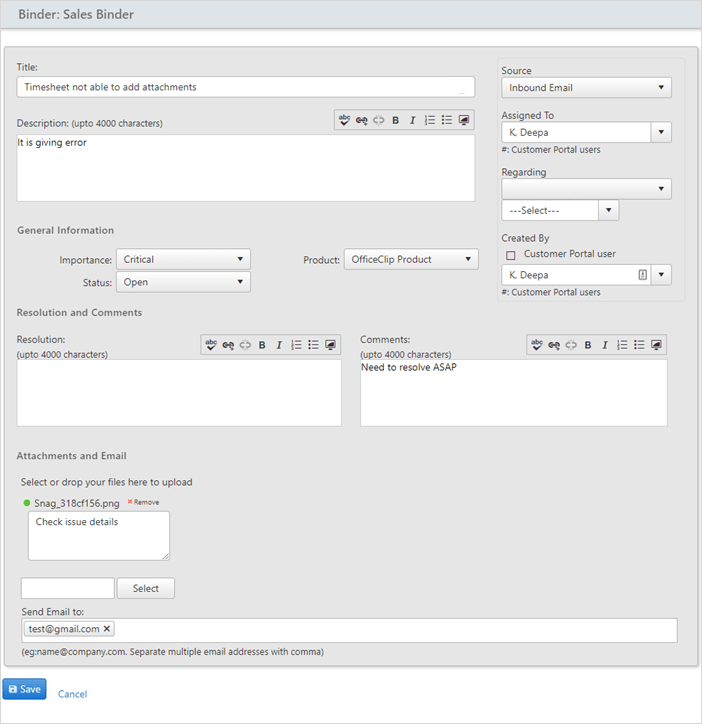
- Click Save when finished.
The following fields are presented to the user while entering issues:
Title |
Give the issue a title |
Description |
Write in the details of the issue. To add limited formatting (like bold, lists, etc.) click on the vertical bar on the right of the text box. |
Category |
Allows you to categorize an issue in ways that fit your needs |
Status |
Select the state the issue is in from this list |
Criticality |
Assign a level of importance to the issue |
Kind |
Select what type of issue you have |
Assigned To |
Selects the person who will work with the issue |
Archived |
If checked, the issue is archived and will not show on the case list screen. To see the Archived issues, select Archived Cases within the filter in the case list screen. |
Regarding |
Choose if this issue is linked to another object
like |
Resolution |
Write the details about the how the issue was resolved. To add limited formatting (like bold, lists, etc.) click on the vertical bar on the right of the text box. |
Comments |
Write the additional details, commentary, etc. about the issue here. To add limited formatting (like bold, lists, etc.) click on the vertical bar on the right of the text box. |
Attachments |
Outside documents can be attached to the issue by clicking the Edit Attachments link. |
Send Email |
Send the issue to anyone by typing in their email address. |
The administrator can change the field names, who can also add an unlimited number of user-defined fields.
The required fields are marked with an asterisk (*) in front of them. These fields must be filled in for the issue to be saved.
Reporting Issues
The users can use Issue Tracker as a help desk. Your customers can report issues in three ways:
1. Via email.
2. You can design a web form and put on your site. See the details on how to create a web form.
3. Customers can call in and report issues.
Viewing List of Issues
- From the binder list, click on the binder whose list of issues you
want to view.
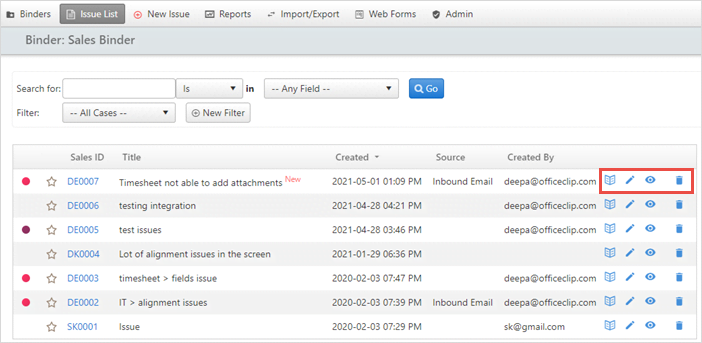
- You will see the list of issues.
- Clicking on the
icon to edit the issue.
- Click on the
 icon to view the issue.
 - To preview the issue click on the
 icon.
icon. - Click on the Case ID or Issue
ID to view the details of the issue.
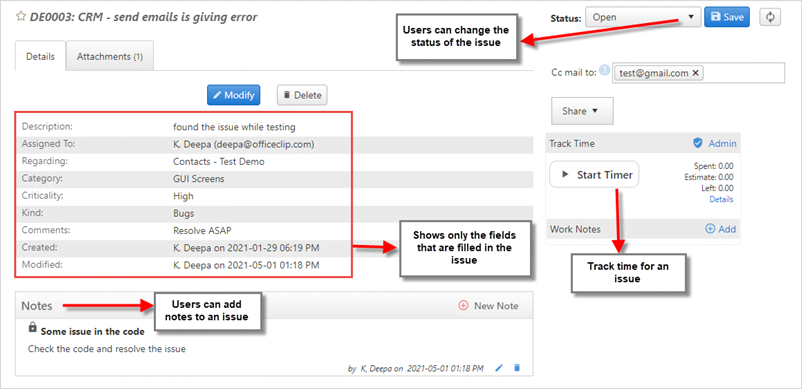
- The
Sharesection has two option:- Copy to Clipboard: This option will
give you the issue link which you can send to the customer portal
user or simply paste it in the browser to view the issue. Once the
link is pasted the user can view the issue and also can post a
reply about the issue.
- Email: With the email option, you can directly email the issue to the user, so that the user remains updated about the status of the issue.
- Copy to Clipboard: This option will
give you the issue link which you can send to the customer portal
user or simply paste it in the browser to view the issue. Once the
link is pasted the user can view the issue and also can post a
reply about the issue.