Category & Accruals
Time Offs consists of different types of leaves and employees may take leaves for different purposes. OfficeClip Time Off application helps to differentiate these leaves in various categories.
Different categories for different types of leaves are created like vacation leave, sick leave, personal leave and so on. Each employee are allocated leaves taking into consideration their position and number of years worked in an organization.
Excess leaves are calculated at the end of the year and are either compensated in form of money or carried over for the next year.
Each leave category may have different accrual policies. Accruals are an accumulation of paid time offs over a period of time. Accrual policy for each employee are different which are again based on the years spent in an organization
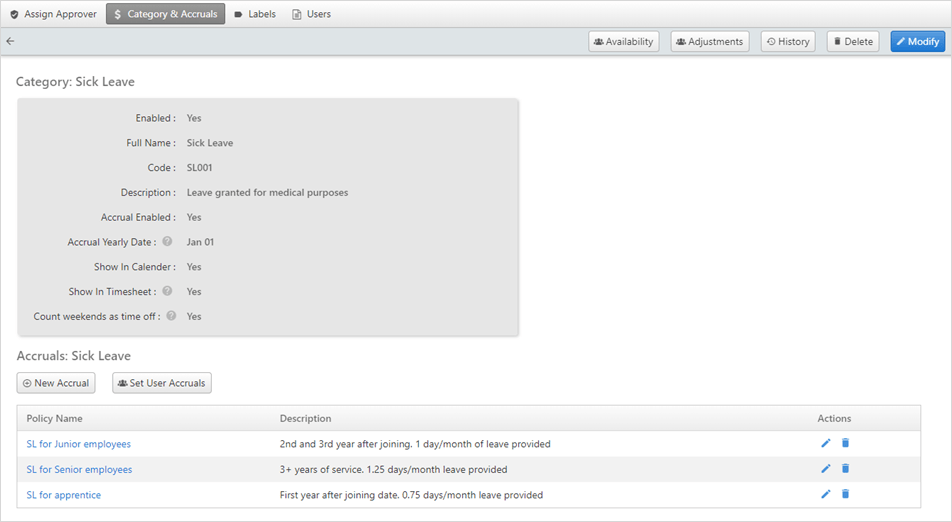
The above mentioned category consists of different accrual policies. This category an be modified and availability and adjustments for this category can be set through this screen.
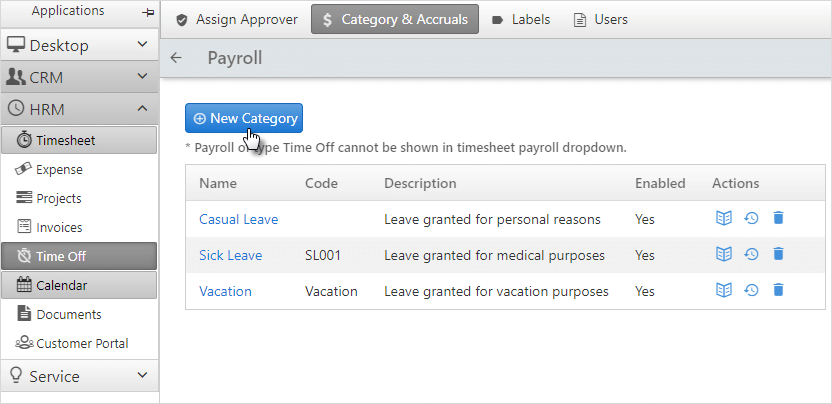
New Leave Category
Time off categories can be used to request time off, and time off can be charged against each category.
To access categories, click Time Off > Admin > Category & Accruals.
To create a new category click on the New Category button.
From this screen, users can view the time off category details by
clicking on the ![]() icon,
view history of time off by clicking on the
icon,
view history of time off by clicking on the ![]() and delete the category by clicking on the
and delete the category by clicking on the ![]() icon.
icon.
To delete a time off category the users need to disable the category
first by unchecking the Enable button inside a
category.
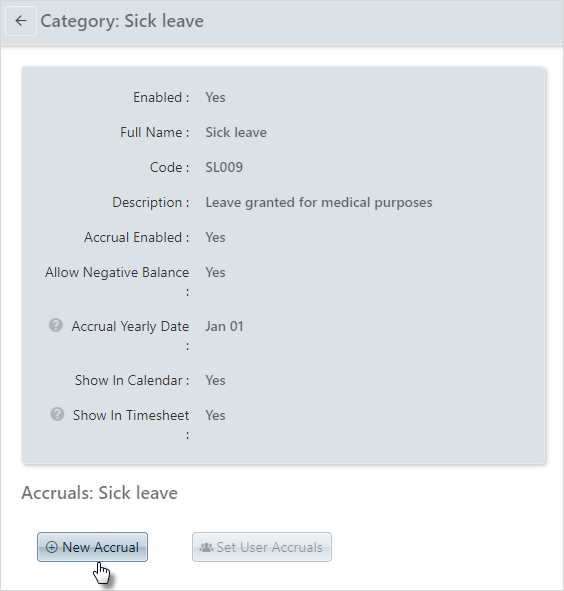
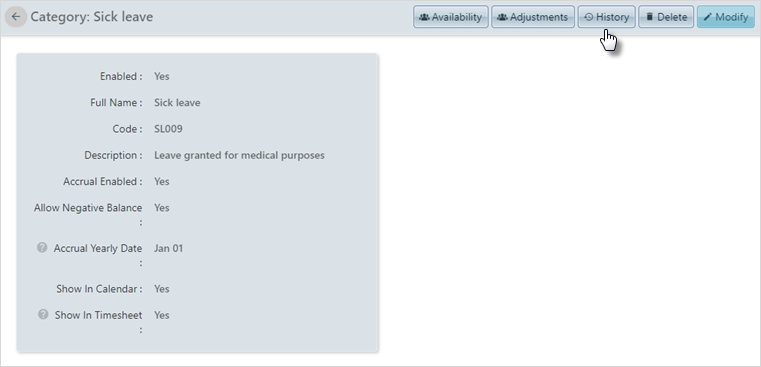
The category consists of the following fields:
Enabled: Checkmark if you want to enable this particular leave category
Full Name: The full name of the leave category (required)
Code: A short code that is shown on the request capture screen (required)
Description: Detailed description of the category
Enable Accruals: Checkmark, if you want to enable accruals for this leave category
Accrual Yearly Date: Accrual renewal date every year; this could be a fixed date (usually year-end) or the employee work anniversary date
Allow -ve balance: This option can be enabed if the organizations want to allow employees to request time off even if their balance is zero.
Show in Calendar: Enable this option, if you want to see the employees' time off's in the calendar
Show in Timesheet: Checkmark if you want to see the time off's in employee timesheet
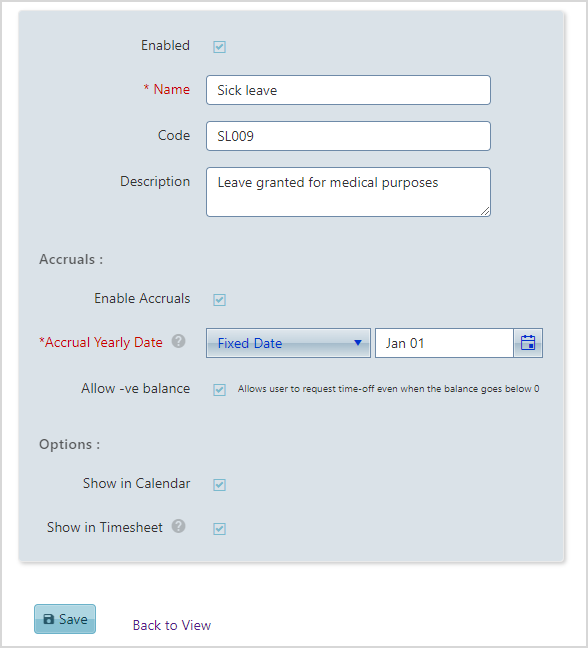
After entering the details, click Save.
New Accrual policy
This feature allows calculation of Time Off accruals over a period. Each organization has different accrual rules for various types of time off such as vacations, family leave, etc. Also, accrual rules may change based on other factors, such as seniority.
To understand the concept of accruals in depth and some scenarios, click here.
To create a new accrual policy, click on the New Accrual button on the desired category of time off.
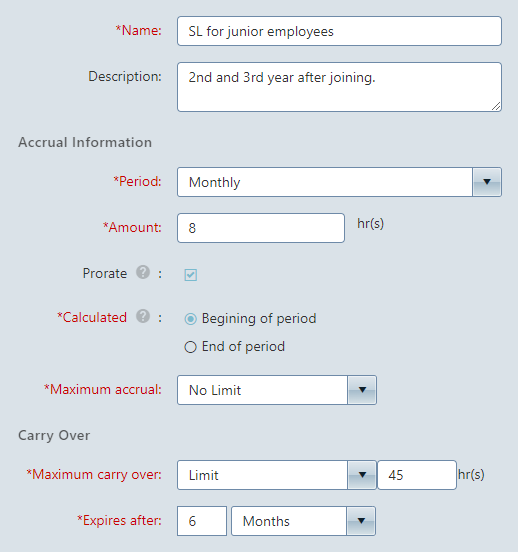
Accruals consists of the following fields:
Policy Name: The name of the Accrual Policy (required)
Description: The description of the Accrual Policy
Period: The Unit of measurement of when the accrual is awarded. Some companies award a fixed number of hours daily, monthly, while others award every week, year or day (required).
Amount: Amount of accrual hours per period (required)
Prorate: Checkmark this option if you want the Time Off to be prorated. For example, if an employee joined a few months later than the accrual start date, he/she will accrue the time off only for the portion of the time worked.
Calculated: Determines if the accrual is calculated at the beginning of the month or the end of the month. For example, if John gets 1.25 hours of vacation every month and the accrual is calculated at the beginning of the month, John will be credited with the vacation of the entire month on the first of the month (required).
Maximum Accrual: Maximum number of Time Off accrual a person can have at any time (required)
Maximum Carry Over: This amount determines when the accruals are reset if not used for a period. For example, an employee who earns 1 day of personal time every month can have his/her personal time reset to 5 at the beginning of the next year (7 days lost if the employee did not use any of the personal time) (required).
Expires after: The administrator can decide on the carry over expiry period. The accruals which are carried forward to the next year will either never expire or can expire within a period of certain days or months.
Each employee can have a different accrual setting for each category. For example, a senior manager may have a different vacation accrual than the newly hired employee.
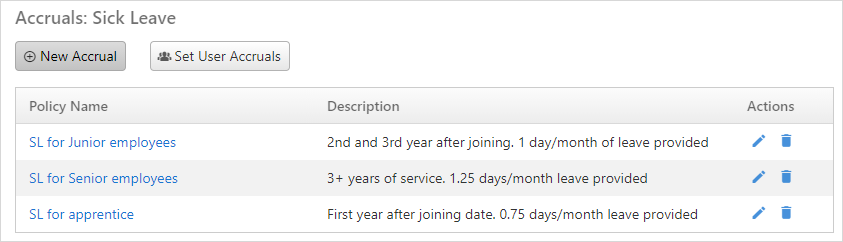
- Use the
 icon to make changes to the accrual policy and click on
  icon to delete an accrual policy.
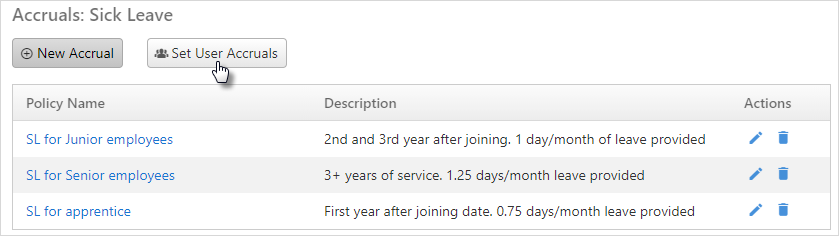
Set User Accruals
To set accruals for each category:
Click Timeoff > Admin > Category & Accrual.
- Select the appropriate leave category, scroll down to the accrual
section and click the Set User Accruals button.
- By default, users are set to No Policy.
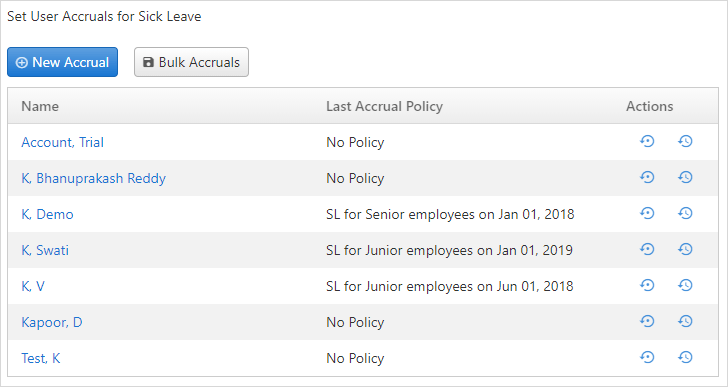
- To set user accrual policy, click on the
 icon for the user.
 - Click on the Add accrual policy button,
select the accrual policy from the dropdown and choose
Effective Dateand click on the icon
to save the policy.
icon
to save the policy. 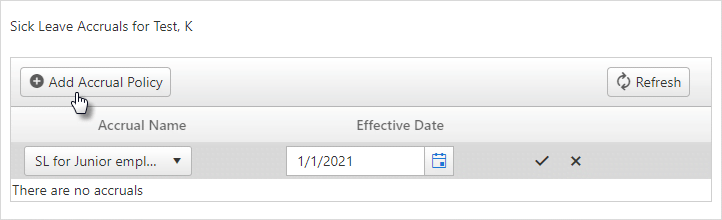
- Bulk Accruals can be set for multiple users at one time by
clicking on the Bulk Accruals button.

- Set appropriate accrual policy and effective date for users and click Save.
History
The history screen gives the details of all the Time Off calculated for a particular category. Administrators can easily understand the calculated accrual balance for a particular user.
To view the history of time off's for a category, click on the
 icon in the Actions column on the Category
& Accruals screen.
icon in the Actions column on the Category
& Accruals screen.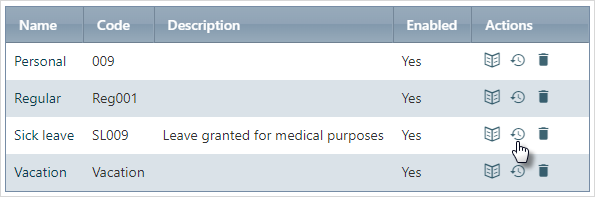
Select the user from the dropdown and select upto which date you want to view the time off history of the user.
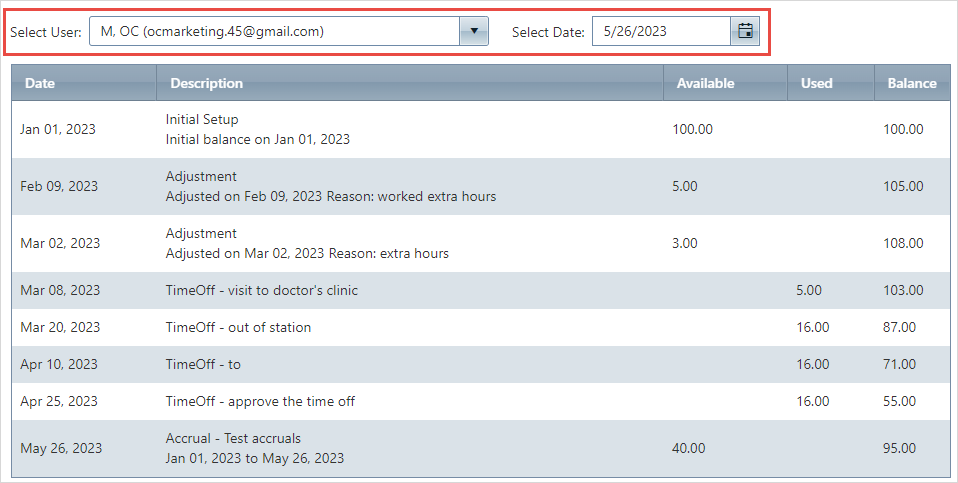
Users can also view the history of a users time off from within the leave category screen by clicking on the history button.
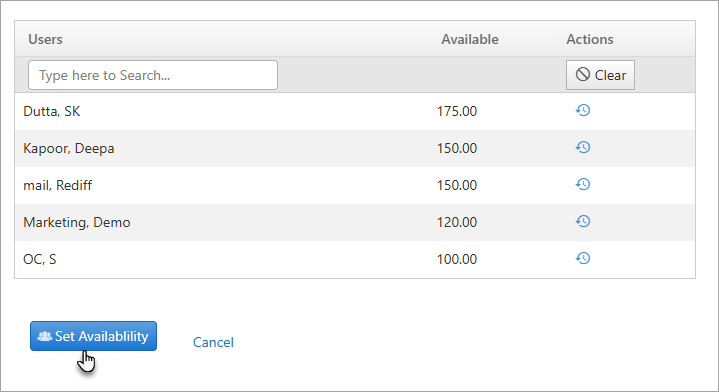
Availability
When calculating time off, it is important to consider the entire history of a particular category. Often, the OfficeClip Time Off application replaces an existing application, and the history is not migrated. This creates inconsistencies which may result in incorrect result.
To avoid this, OfficeClip allows administrators to enter hours available at a particular point in time. All OfficeClip Time Off calculations are from that point of time.
To set the availability:
Click on a
categoryand then click on the Availability button on the right side of the screen.- You will see the time off availability for all the users.
- Click on the Set Availability button to set
availability.
- Set the Availability date and set the availability hours for each
users.
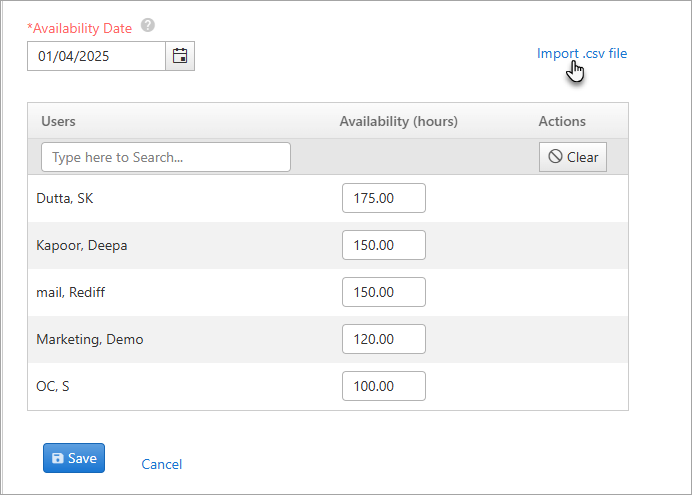
- You can also import the availability hours using a .csv file for bulk users.
- To set import availability hours using .csv file, click on Import .csv file option.
- Note that your .csv file should contain two columns: Email
address/Employee id and Balance in hours. Also the first line should
be empty.
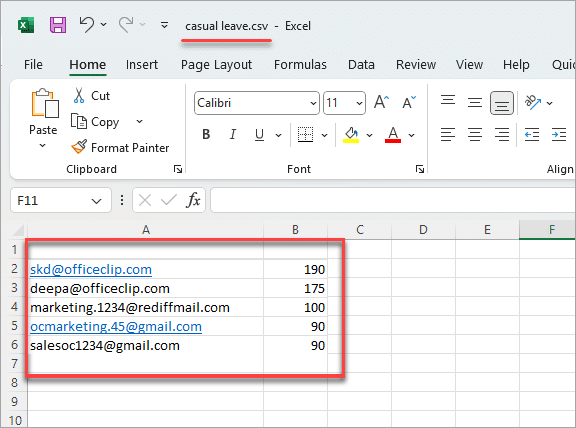
- Click on Choose File, select the .csv file
and click Import.

- You will see all the availability imported in hours.
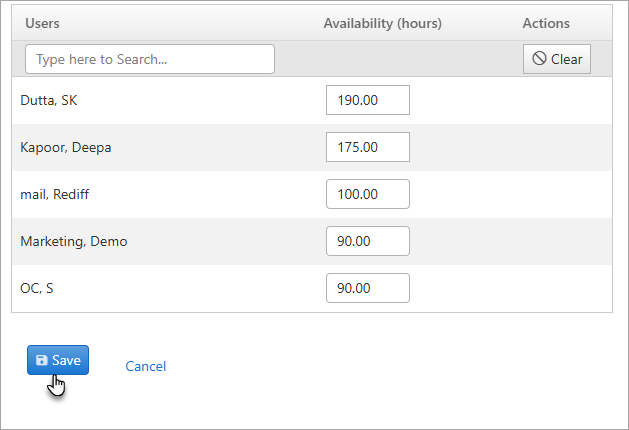
- Click Save to save all the changes.
Adjustments
Adjustments are designed to take care of events that do not fall under normal accrual patterns. For example, a company can decide to give some employees additional sick leave. These unforeseen events can easily be managed by adding these times as adjustments to the Time Off for a particular category.
To enter adjustments:
- Click on a
categoryand then click on the Adjustments button on the right side of the screen. You will see the list of adjustments for each user. - Click on the
 icon to add an adjustment.
- On the next screen, click on the New
Adjustment button.

- Add the
Adjustment Date,No. of hours workedandDescription. Click on the icon to save the adjustment. - Click Save once done.
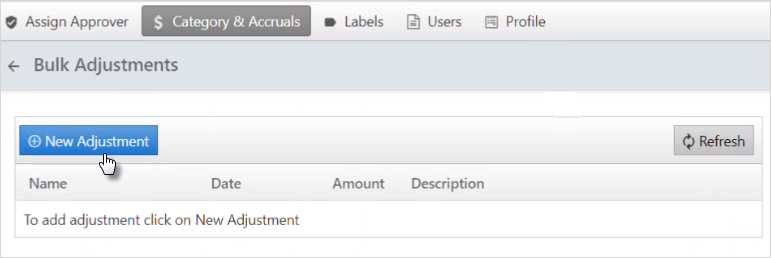
Bulk Adjustments
If you have a bigger team, you can do bulk adjustments to save time. For bulk adjustments:
- Click on the Bulk Adjustments button on
the Category and accruals screen for a particular leave
category.

- On the next screen, click on the New
Adjustments.
- Select the user for whom you want to create an adjustment, add
the adjustment date, amount of hrs, and description.
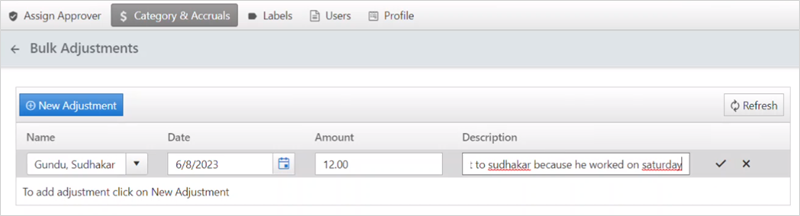
- After adding the desired information, click on the icon to save the
information
- In this way, you can add adjustments in bulk for multiple users.
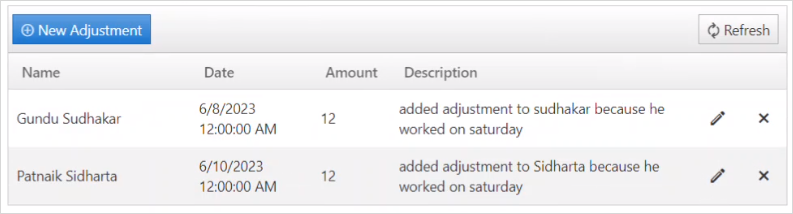
- To delete an adjustment click on the
 icon.
icon.