Fixed Fields for Accounts
The Fixed Fields configuration screen enables administrators to change the names and other attributes of fixed account fields.
- Click CRM > Accounts > Admin > Fixed fields.
- To edit a fixed field, click the
 icon in the Actions column on the right side.
From this screen, the administrator can also configure the field.
icon in the Actions column on the right side.
From this screen, the administrator can also configure the field. 
- To alter the display name, just type the desired name into the text
field.
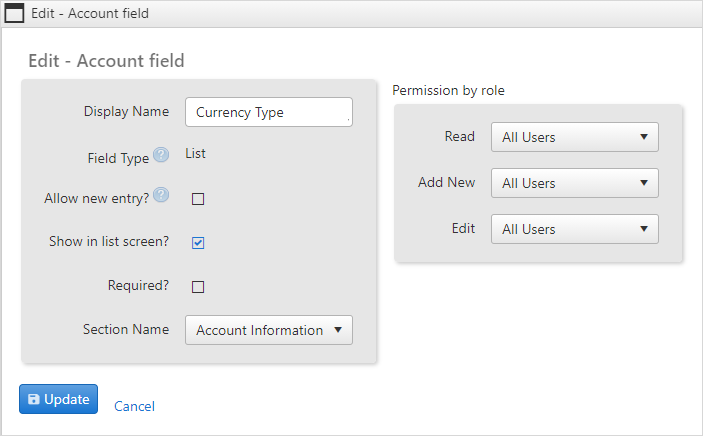
- The users cannot change the field type in fixed fields, it can only be changed in the custom fields.
- If you want fields to show in the main contact list screen check the box beside the Show in List Screen? field.
- If you wish to make certain fields mandatory when information is entered, either for a new account or an existing account, check the field in the Required? column corresponding to the field you wish to make mandatory. The fields will appear with an asterisk (*) next to them in the account entry/edit screen.
- The Permission by Role section allows
administrators to select who can see, add new values or edit this field.
In each case, an OfficeClip Role is assigned permission.
Add New: Users in this role will be able to add values to this field in the Add New screen. If you want all users to be able to add values to this field from this screen (default), you can keep this role toAll Users.Read: Users in this role will be able to see the value of this field in the Add New, Detail and Modify screen. If you want to hide this field from a particular group of users, create a new role with those users and assign it here. By default, everyone will be able to see all fields.Edit: Users in this role will be able to change the value of this field. This could either happen in the inline mode from the detail screen or the modify screen. By default, everyone will be able to edit this field.
- You can name the Section as Account Information or Additional Information in edit fields.
If many fields are selected to show in the main account list, a horizontal scrollbar will appear on the account list screen to accommodate the field.
Field |
Description |
Account Number |
The number of the customer account |
Account Name |
The name of the account |
Short Account Name |
The short form of the account name |
Parent Account |
Name of the parent account |
Primary Contact |
The main contact you can approach |
Relationship Type |
Customer's relationship with your organization |
Website |
Customer's Web Site URL |
Email Address |
Customer Email ID |
Main Phone |
Customer's primary contact number |
Other phone |
Other contact numbers |
Fax |
Fax Number |
Archived |
Selecting the checkbox archives the account information |
Currency Type |
Currency type the customer uses |
Account Source |
Source of the account to be selected from the drop-down list |
Address Line 1 |
First line of the customer's address |
Address Line 2 |
Second line of the customer's address |
City |
Name of the city |
State |
Name of the state to be selected from the drop-down list |
Zip/Postal Code |
Zip or postal code |
Country |
Name of the country to be selected from the drop-down list |
Industry |
The industry of the customer's company |
Annual Revenue |
Annual revenue generated by the company |
No. Of Employees |
Total number of employees of the company |
SIC code |
Standard Industry Classification code of the company |
Ownership |
Mode of company ownership |
Description |
Any other information that you can record for the account |
Configuring List Fields
- A List field is a drop-down box with a list of available choices
relevant to the field. To edit drop-down list items, click the
 icon in the Actions column on
the right side.
icon in the Actions column on
the right side. - A window pops up which allows you to add and remove list items;
select the default list item to be initially displayed and change the
order in which they appear on the list.
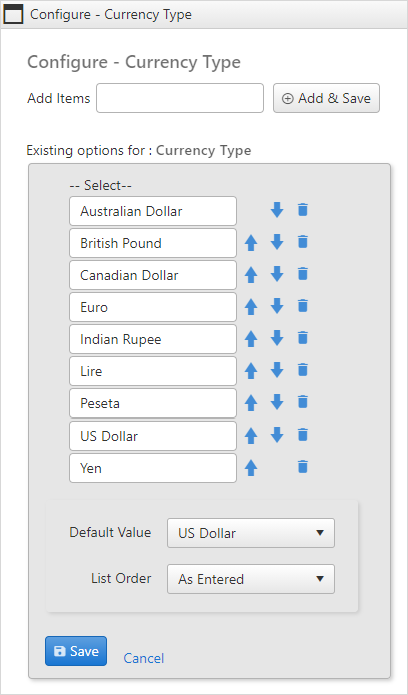
- To add an item, type the name in the Item Name field and click Add & Save.
- To delete an item, click the
 icon next to
the field you wish to remove.
icon next to
the field you wish to remove. - To change the position of an item as it appears in the list, click
the

 icons.
 - To select a default value, choose a value from the Default Value drop-down list.
- Click the Save button to save the settings.
Click on the Next button to go to the next Admin screen.
To go back to the Accounts list screen, click on the ![]() icon.
icon.