Managing Rules for Accounts
Note: This feature is only available in the Enterprise Edition of OfficeClip.
Administrators can set rules for accounts to trigger certain events based on conditions of the accounts. Rules have the following components:
Conditions: Certain conditions need to be satisfied to trigger a rule
Actions: The actions are taken when a condition is satisfied
There are three kinds of rules in Accounts:
On-Screen Fields
Workflow Rules
Access Rules
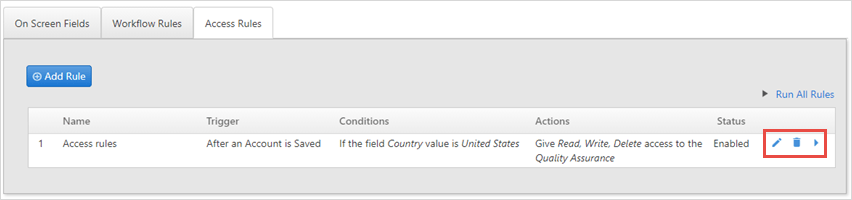
To edit a rule, click the
 icon.
icon.To delete a rule completely click the
 icon.
icon.To run a rule that is not active, click the
 icon or, to run all existing rules, click the Run All
Rules link.
icon or, to run all existing rules, click the Run All
Rules link.
On-Screen Fields
These rules change the fields on the New Account or
Edit Account screen based on some other fields. For
example, it can change the country automatically when the state is
selected or changed.
To set up rules in the On Screen Fields:
- Click CRM > Accounts > Admin > Rules.
- By default, there are no rules listed. To create a rule, click the
Add Rule button.
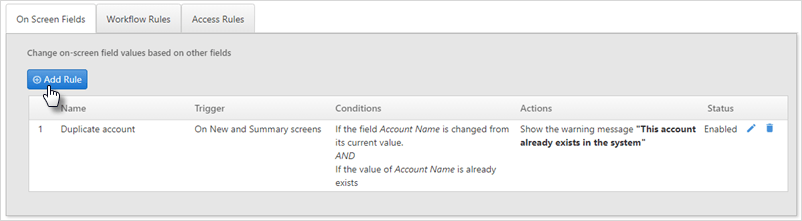
- Clicking Add Rule brings up a new window.
- You can choose to add conditions by clicking the Add link. This will bring up corresponding fields to fill in according to the conditions you need.
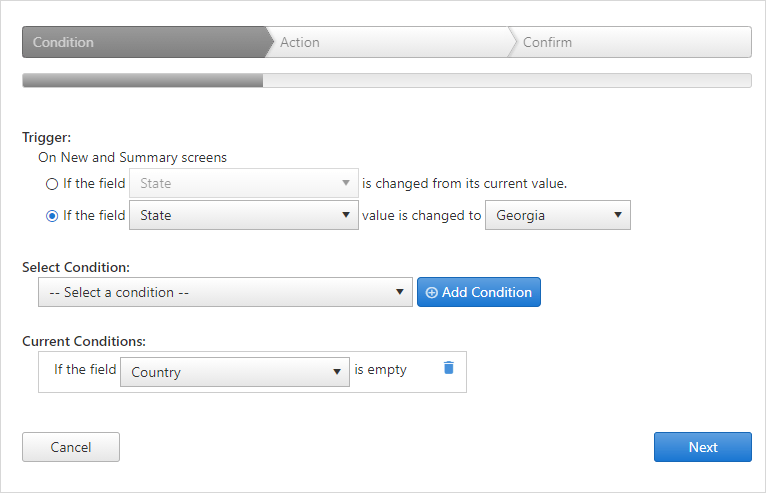
For example:
- If the field selected is State, the value is changed to Georgia.
- Select a condition, (Test if a field value is empty or Test if a
field value is duplicate). Here, we have selected the first condition
and then click on Add Condition. Here, we enter
the condition if the field Country is empty and then click
Next to continue or
Cancel to exit.
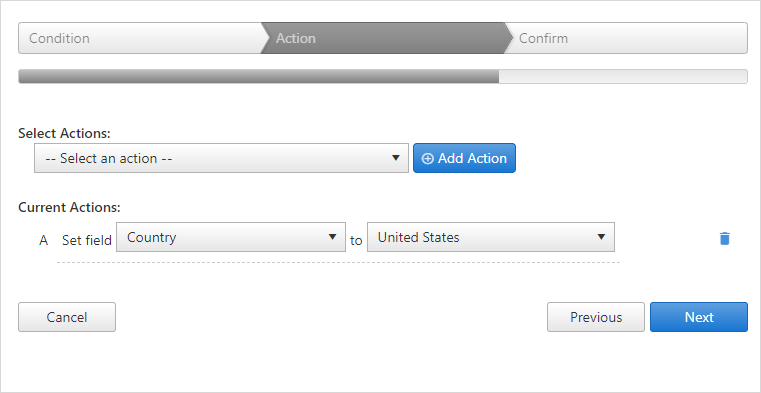
- On the next screen, we can select the actions (set a fixed value,
set the same value for the previous account, show a warning message to
the user) Here; we have set a fixed value and click Add
Actions. We have Set field Country
to United States. Click Next.
- On the next screen, we can see the Rule set and we have entered
the rule Name as Georgia Users. The
Enabled checkbox is automatically selected,
which means the rule will be active. To make the rule inactive,
uncheck the box.
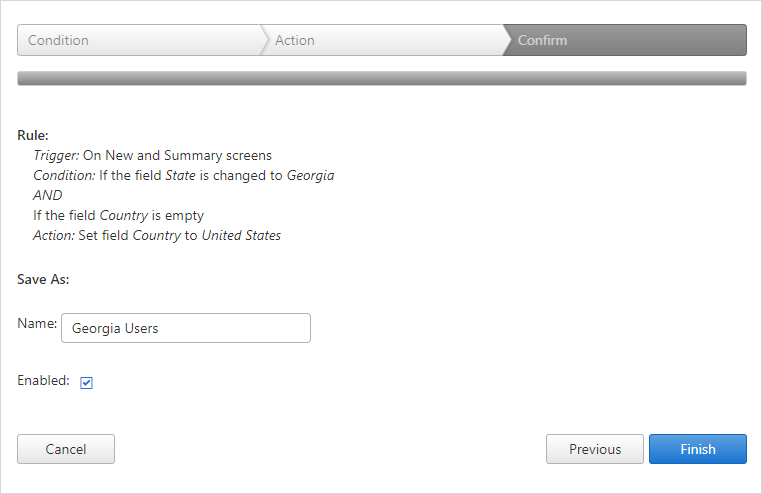
- Click Save Rule when finished, Previous to go to the previous rules screen or Cancel to exit without saving the rule.
Now, whenever a new account is created and if the
Stateentered is GA, theCountryname will automatically be set to United States.
Workflow Rules
Workflow rules allow certain actions to be performed automatically
based on an event. For example, an email can be automatically sent to an
account a week after entry in the database. Sometimes this is also
called Drip Marketing.
The Workflow Rules in Accounts are similar to the workflow rules in Contact Manager. To see the detailed description of the workflow rules, click here.
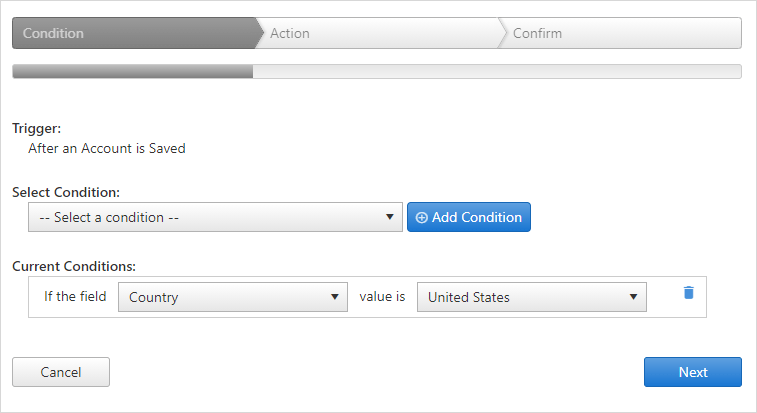
Access Rules
Access Rules are used to allow or restrict access to accounts when
various conditions are met. For example, if the administrator wants all
accounts with a certain company to be able to be accessed by all users,
he/she can set up the condition: If field Company Name value is
OfficeClip, give Read, Write, Append, Delete access to the All Users
role.
To setup rules in the Access Fields:
- Click CRM > Accounts > Admin > Rules.
- By default, there are no rules listed. To create a rule, click the Add Rule button.
- Clicking Add Rule brings up a new window. You can choose to add conditions by clicking the Add link. This will bring up corresponding fields to fill in according to the conditions you need.
For example:
Here, we select a condition, if a field is set to some value, and we click on Add Condition.
- Then, we enter if the field Country value is United States (you
can enter the name of any Country you have to set rules for). Click
Next.
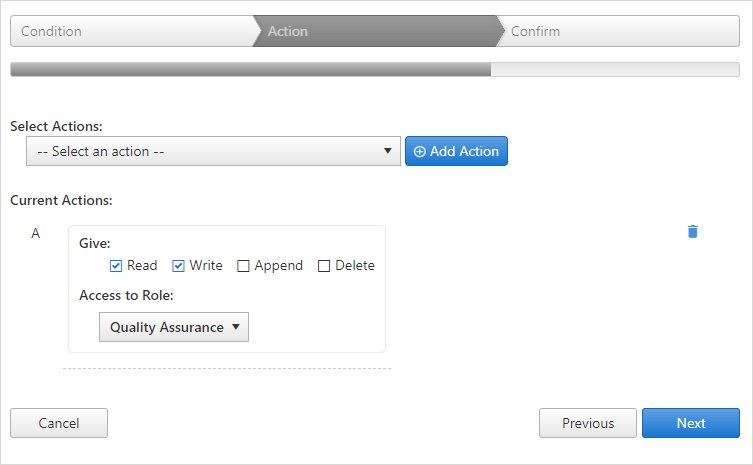
- Then we set Actions by selecting the grant access to read, write, append and delete to the user option from the dropdown. Click Add Action.
- Then, we can check on the boxes to indicate the specific access to
be given to the users from specific roles.
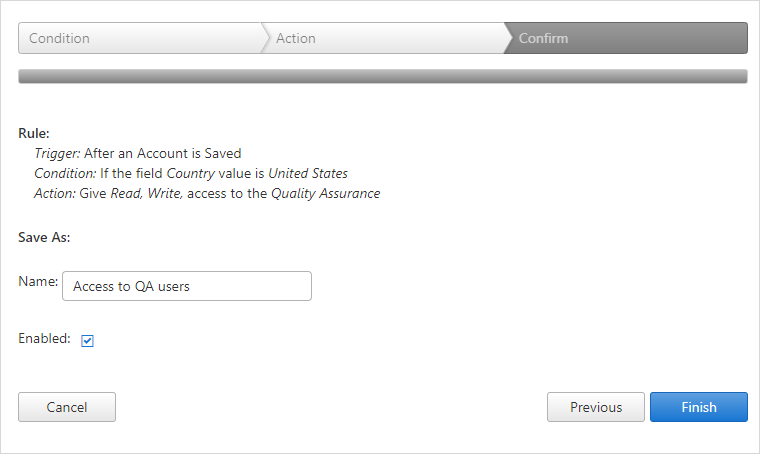
- On the next screen, we can see the Rule set and we have entered
the rule Name as Access to QA Users. The
Enabled checkbox is automatically selected,
which means the rule will be active. To make the rule inactive,
uncheck the box. Click Save Rule when finished,
Previous to go back or
Cancel to exit without saving the rule.
- Finally, on the Account summary screen, when we click on
Change Permission, we can see the access we
have granted to the users in role.

Click on the Next button to go to the next Admin screen.
To go back to the Accounts list screen, click on the ![]() icon.
icon.