Setting up Rules for Contacts application
Note: This feature is only available in the Enterprise Edition of OfficeClip.
Administrators can set rules for contacts to trigger certain events based on conditions of the contacts. Rules have the following components:
Conditions: Certain conditions need to be satisfied to trigger a rule.
Actions: The actions are taken when a condition is satisfied.
There are three kinds of rules in Contact Manager:
On-Screen Fields
Workflow Rules
Access Rules
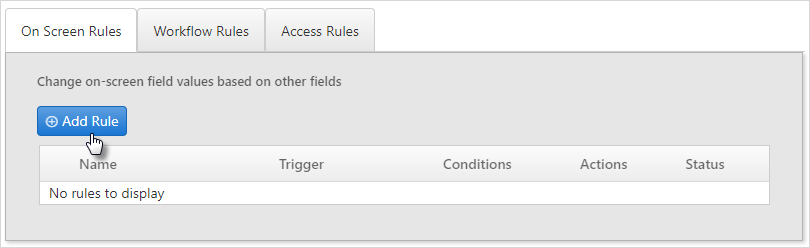
On-Screen Fields
These rules change the fields of the New Contact or
Edit Contact screen based on some other fields. For
example, it can change the contact country automatically when the
contact state is selected or changed.
To setup rules in the On Screen Fields:
Click CRM > Contacts > Admin > Rules
By default, there are no rules listed. To create a rule, click the Add Rule button in the On Screen Rules section.
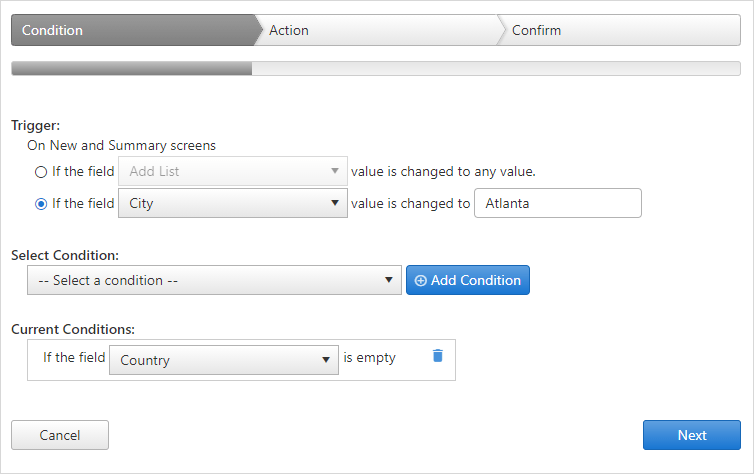
Clicking Add Rule brings up a new window. You can choose the conditions and actions as you need to set up a rule.
For example:
If you enter, if the field is City, the value is changed to Atlanta.
Select a condition, (Test if a field value is empty or Test if a field value is duplicate). Here, we have selected the first condition and then click on
Add Condition. Here, we can enter the condition: If the field Country is empty, and then click Next to continue.
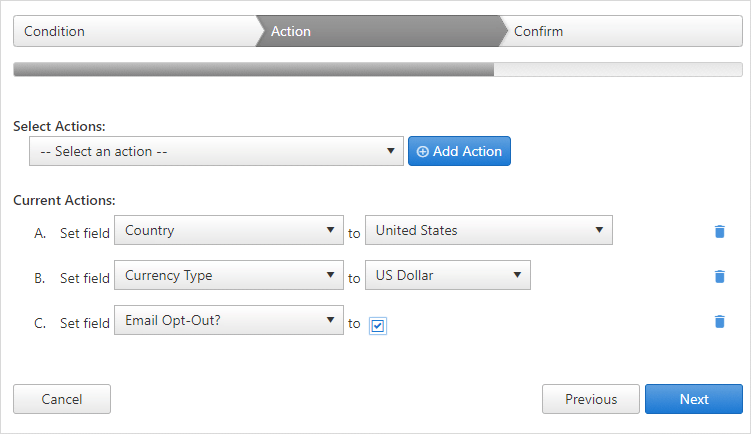
On the next screen, we can select the actions (set a fixed value, set the same value for the previous contact, show a warning to the user) Here, we have selected set a fixed value and click Add Actions. We have Set field Country to United States, we have also Set field Currency to US Dollars and Set field Email opt-out to Yes.
- Click Next.
- On the next screen, we can see the Rule set, and we have entered
the rule Name as Rule for Atlanta Users. The
Enabled checkbox is automatically selected,
which means the rule will be active. To make the rule inactive,
uncheck the box.
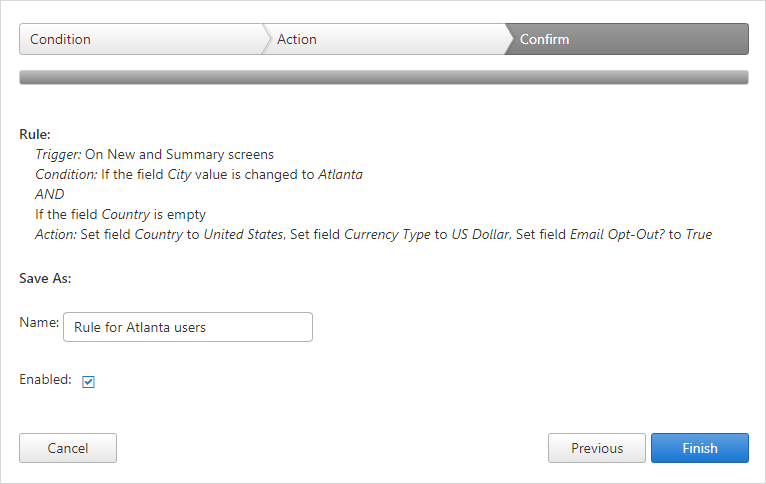
- Click Finish when done, Previous to go to the previous rules screen, or Cancel to exit without saving the rule.
Now, we can see that whenever we enter City as Atlanta the Country for a new contact, will automatically change to United States, Currency will be set to US Dollars and Email opt-out box will be checked.

- If you want to edit a rule, click the
 icon, or to delete a rule completely click the
  icon.
icon. 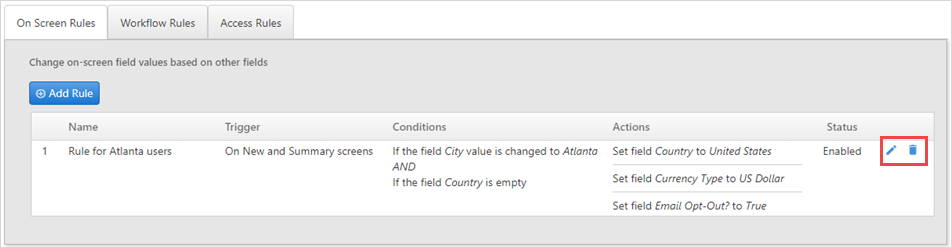
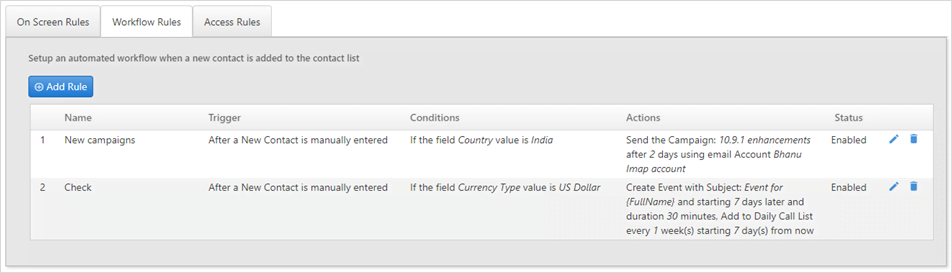
Workflow Rules
The ability to follow through each contact after they are entered is
a key requirement for successful sales. Workflow rules allow certain
actions to be performed automatically based on an event. For example, an
email can be automatically sent to a contact a week after entry in the
database. Sometimes this is also called Drip
Marketing.
Drip marketing is direct marketing which helps to acquire customers and which involves sending marketing information to prospects at regular intervals.
With workflow rules users can:
Create automated tasks and events.
Send campaigns at regular intervals to the prospects or customers.
Create a call list schedule for new contacts to keep in touch with them.
To setup rules in the Workflow:
Click CRM > Contacts > Admin > Rules.
- Select the Workflow rules section.
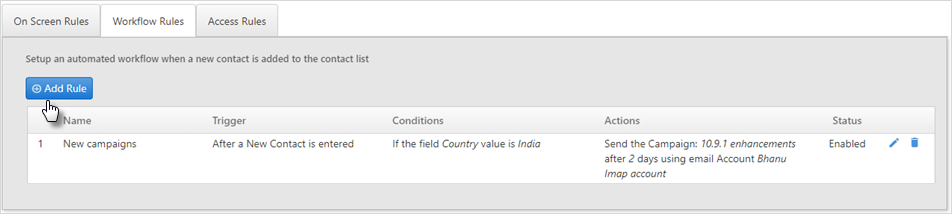
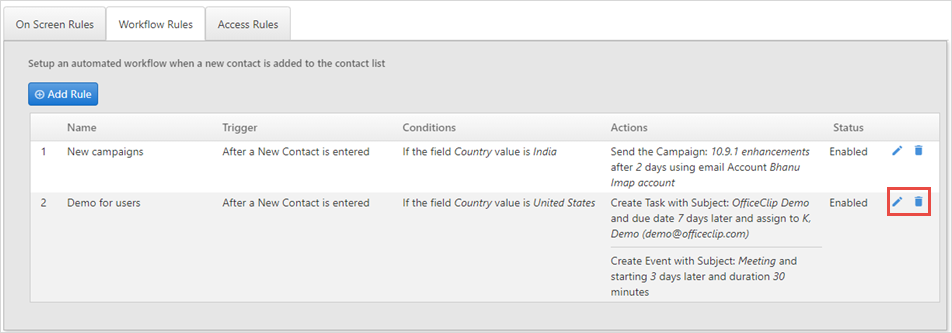
By default, there are no rules listed. To create a rule, click the Add Rule button in the Workflow section.
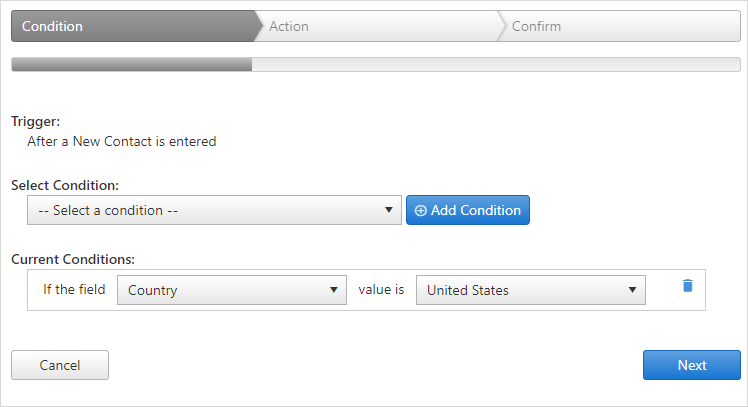
Clicking Add Rule brings up a new window. You can choose to add conditions as per your need. This will bring up corresponding fields to fill in according to the conditions required.
For example:
Select a Condition: There are two possible conditions to be matched:
If a list field matches an item: Match this condition when you know the value of a contact field that is a drop-down list.
If a field has a text value: Match this condition when you want to match a value of the contact field that is in a free form text box.
- After selecting the condition click on the Add Condition button.
Depending on this value, select a condition from the bottom part of the screen and click the Next button.
On the next screen, you can select the action field. The action field is activated when a new contact is entered, and the condition matches the one you just defined on the previous page. These actions trigger automatically after a predetermined interval. Various actions are supported:
Create a New Task: This action creates a new OfficeClip task.
Create a New Event: This action creates a new OfficeClip calendar event.
Send a Campaign: this action sends a campaign to the email address of the contact just entered. This feature is useful if you want to send multiple emails to the contact periodically.
Add to daily Call List to call every week: The contact is entered into the daily call list. OfficeClip users can use the daily call list to call the contacts weekly.
Add to daily Call List to call on fixed dates: The contact is entered into the daily call list. OfficeClip users can use the daily call list to call the contacts on fixed dates.
- After selecting the action click on the Add
Action button.
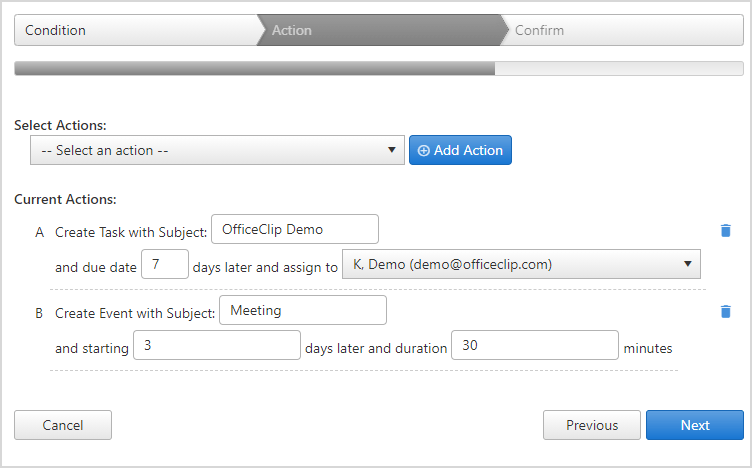
Set the parameters for the action (for example, the number of days until the action should take place) and click on the Next button.
Now save the Rule by giving it a name and clicking on the Finish button. Checkmark the Enabled box to make the rule active.

These Workflow rules are a way of marketing communication which helps to share content about your brand with your customers in an automated way and it also saves your time and resources.
If you want to edit a rule, click the ![]() icon, or to delete a rule completely click the
icon, or to delete a rule completely click the ![]() icon.
icon.
Access Rules
Access Rules are used to allow or restrict access to contacts when
various conditions are met. For example, if the administrator wants all
contacts with a certain company to be able to be accessed by all users,
he/she can set up the condition: If field Company Name value is
OfficeClip, give Read, Write, Append, Delete access to the All Users
role.
To set up rules in the Access Fields:
Click CRM > Contacts > Admin > Rules.
- Select the Access rules section.
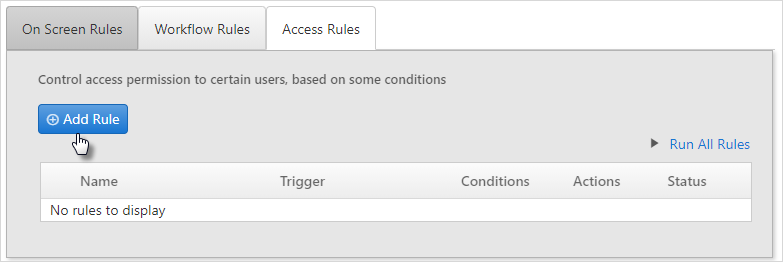
- By default, there are no rules listed. To create a rule, click the
Add Rule button.
Clicking Add Rule brings up a new window. You can choose to add conditions as required. This will bring up corresponding fields to fill in according to the conditions you need.
For example:
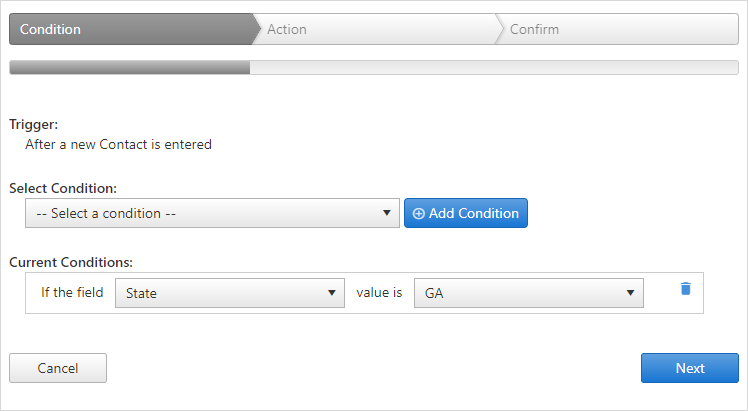
Here, we select a condition, if a field is set to some value, and we click on Add Condition.
Then, we enter if the field State value is GA (you can enter the name of any State or Country you have to set rules for).
- Click on the Next button.
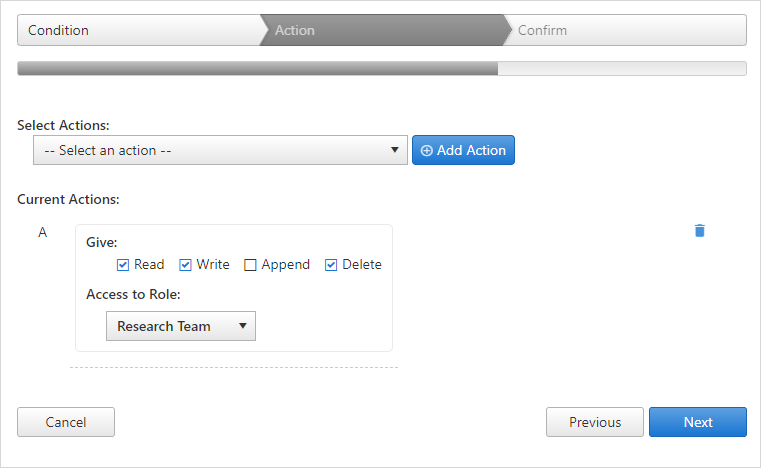
Then we set Actions, or grant access to read, write, append and delete to the user. Click Add Action.
Then, we can check on the boxes to indicate specific access to be given to the user.
On the next screen, we can see the Rule set, and we have entered the rule Name as Access rules for teams. The Enabled checkbox is automatically selected, which means the rule will be active. To make the rule inactive, uncheck the box.
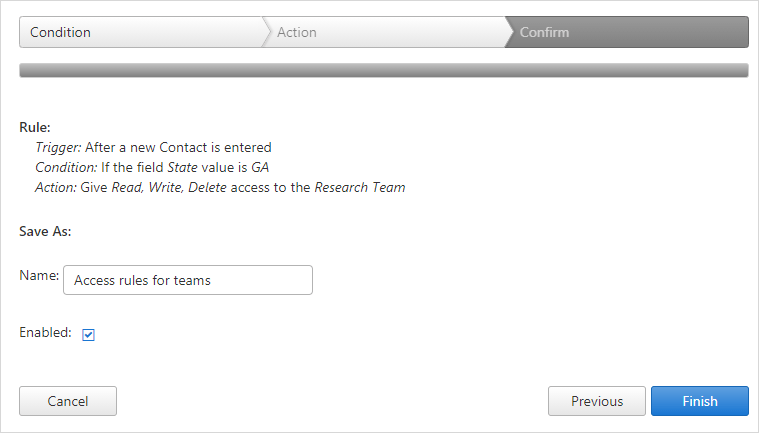
- Click Finish once done, Previous to go back or Cancel to exit without saving the rule.
- If you want to edit a rule, click the
icon, or to delete a rule completely click the
icon. To run a rule that is not active click the
 icon or,
to run all existing rules, click the Run All
Rules link.
icon or,
to run all existing rules, click the Run All
Rules link.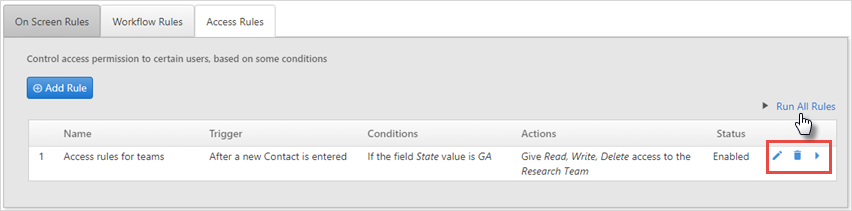
Finally, in the Contact summary screen of a contact from GA, when we click on Change Permission we can see the access we have granted to the user.

Click on the Next button on the right side of the Rules screen to go to the next Admin screen.
To go back to the Contacts list screen, click on the ![]() icon.
icon.