Viewing Contact Details
View Contact Details by clicking on the details icon
![]() at
the left side of each contact or by double-clicking on a row.
at
the left side of each contact or by double-clicking on a row.
On the right side of the details screens you will see the Tools menu, New menu, History button and print button. The tools and new menu has few options where you can quickly create a note, task, event or attach document.

Move to the next contact by clicking on the ![]() icon
and go to the previous contact by clicking on the
icon
and go to the previous contact by clicking on the ![]() icon.
icon.
Tools Menu
On the Contact summary page, we can see the tools button on the right side of the page.
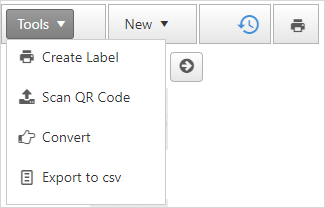
The Tools button has following options:
Create Label
This option allows you to create labels using the Dymo
Label Writer. In addition to the contact address, you will be
able to print the barcode for the post office.
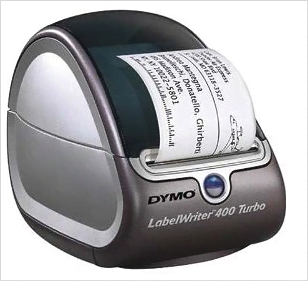
To create a label, click on CRM > Contacts.
Then double-click on a contact or click on the Contact Details icon
 from the contact list.
On the Contact summary screen, click on the Tools drop-down at the top right and click on the Create label button.
If Dymo Printer is installed, you should be able to see the print label preview. You will be able to make necessary changes and print the label.
: This option can only print using the Dymo Label Writer printer, make sure that you have one installed on your computer before using this feature.
Scan QR Code
Scan the
QR Codeof the Contact.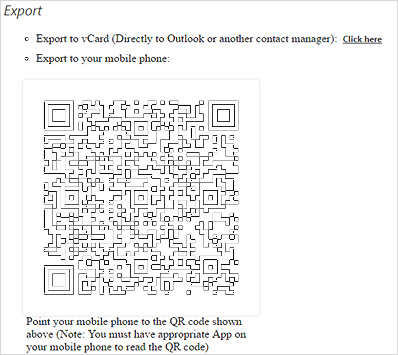
The
QR Codeallows the user to capture the contact directly to the Contacts application of a mobile phone using the phone's camera.This screen captures limited information like name, email address and phone number of the contact.
Converting a Contact to an Account
When a prospect or a contact becomes a customer, you can use this option to create an account record in OfficeClip. The company name becomes the account name of the new entry. The existing contact becomes a contact child record under that account.
This option may be disabled if an account is already created for the contact.
Export to CSV
To Export contacts:
Click the Export to CSV icon from the Tools button.
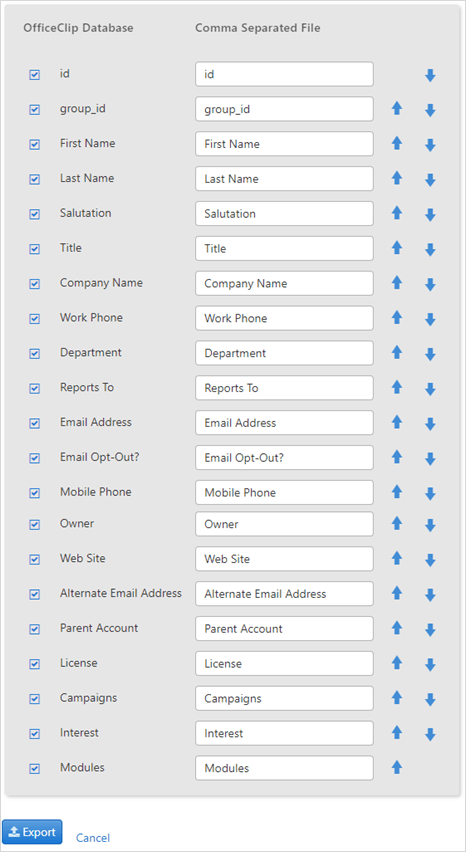
Select which fields from the OfficeClip database you want to have in the CSV file. You can move them up and down with the

 icons. These fields will appear as the first row in
the CSV file after being exported.
icons. These fields will appear as the first row in
the CSV file after being exported.Click Export when finished mapping, or click Cancel to exit without taking any action. Depending on your browser settings, either you can see the excel worksheet on your screen, or you will be presented with an Open or Save pop-up dialog box
New Menu
The New menu button, next to the Tools menu button in the top right corner, allows the user to insert some related information quickly (without changing the context of the screen).
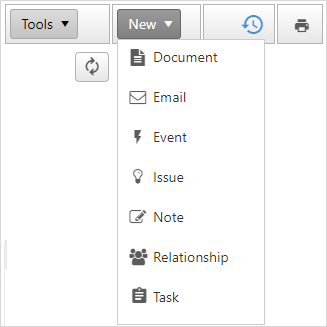
Add the following related information to the contact
Documents
Relevant Documents can be attached to a contact, allowing to access important information from one place easily.
Upload File: These files can be uploaded from the local disk and stay with the Contacts. These files are removed when the contact is deleted.
To Upload file:
In Contacts, click on the
icon of a contact.On the Contact summary screen on the top right corner, click on New > Documents.
Click Select button and choose the file from desired location.
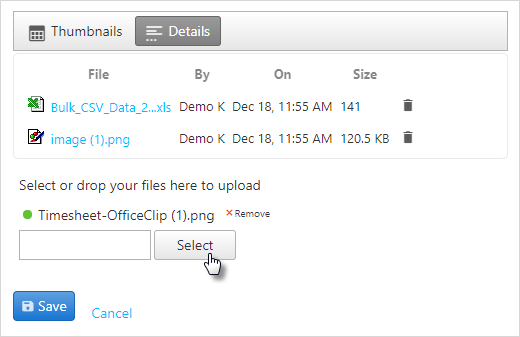
You can also drag and drop a file from your windows explorer application.
Click Save.
- Click on the
 icon to delete the uploaded document or image.
Emails associated with the contact can be seen in this widget. These emails are captured from the OfficeClip Email application and matched against the Contact's email address.
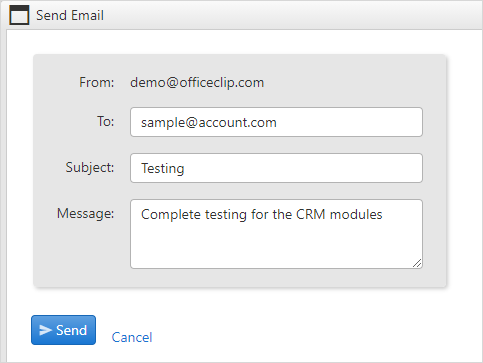
To send Email from this screen:
Click New > Email.
Enter the email-id, subject and message.
Click Send, or to exit click Cancel.
Events
Events are appointments linked with the contact; these events show up with the Contact as well as OfficeClip Calendar.
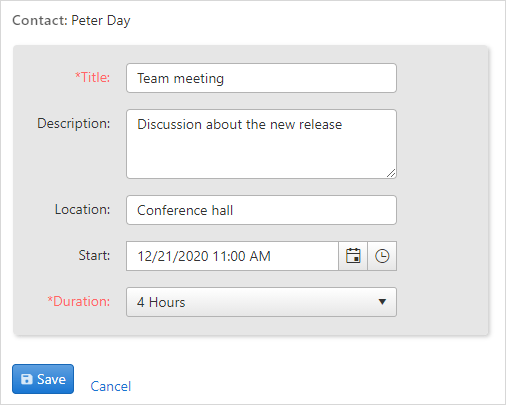
To add New Events:
In Contacts, click on the
icon of a contact to add new events.Click New > Events.
Enter the title, description, location, the start time and date of the event, and the duration of the event.
Click Save after you finish and Click Cancel to exit.
Issues
The Issues displayed are issues within the Issue Tracker application associated with a particular contact. You can select a binder to view any issues within that binder, and you can create new issues and binders by clicking on the respective links and filling in the necessary fields.
To create issues:
In Contacts, click on the
icon of a contact.On the Contact summary screen on the top right corner, click on New > Issues.
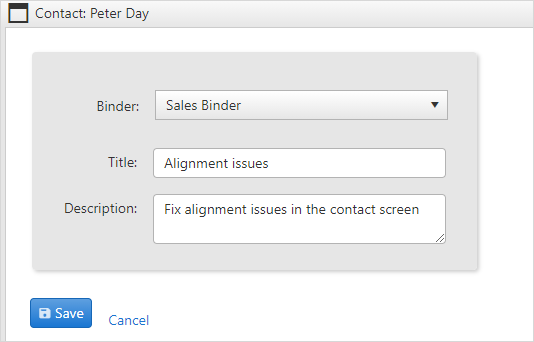
- Select the issue binder from the dropdown.
- Add the title and description for the issue.
- Click Save.
Notes
Notes are encounters with the Contact. They appear in chronological order and can be
public (shown to all the Organization users) or private (seen by the creator only).
Add a Note
In Contacts, click on the
icon of a contact to add a note.Click New > Notes. The screen appears with the note creation template.

Enter the title and type your notes in the Note box.
If you are creating a personal note, click the Private checkbox. In the Note List, a lock icon
 is displayed beside the note, indicating that it is a personal note.
A public note will be visible to all users.
is displayed beside the note, indicating that it is a personal note.
A public note will be visible to all users.To upload a file in the notes, click on the Select button and choose the file from the desired location. You can also drag and drop a file in the box from your windows explorer.
Click Save to save the note in the Note List, or Cancel to exit.
The user can only access personal notes; public notes can be seen by every user in the organization
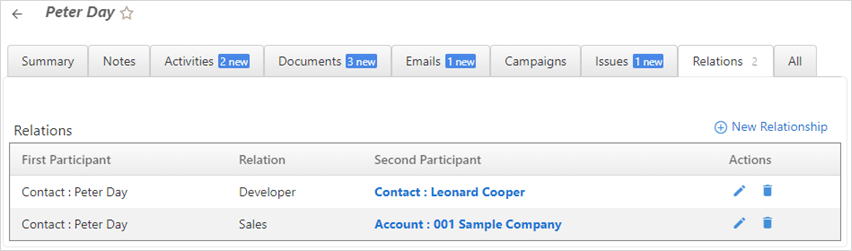
Relationship
Contact Manager provides the ability to create arbitrary relationships between various entities in OfficeClip.
For example:
For Real Estate Transactions, a Broker can be a relationship between two
Contacts.An
Accountcan be a Partner of anotherAccount.A
Contactcan be a Coordinator for anOpportunity.
To create relationships in Contact Manager between the Contact Manager (Contacts, Accounts, Opportunities and Campaigns modules, first we need to Add new relation. To do so:
Click CRM > Contacts > Admin > Relations.
Click on Add Relations.

Enter the
Name, and click on the icon to save the relation.
- To Edit the relation click on the
 icon and to Delete the relation click on the icon.
To create a relationships for a contact:
- On the Contact Screen, click on the Contact detail icon for the
Contactfor which you want to create a relationship. - On the contact summary screen, click New
and Relationship.
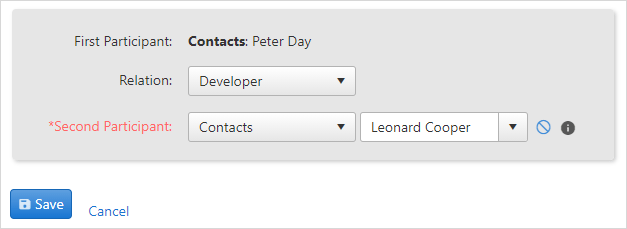
- Choose the
Relationfrom the drop-down list. - Select the
Second Participantand its entity from the drop-down list for which you want to create a relationship. - Click on the
 icon to view
details of contact or account selected.
icon to view
details of contact or account selected. - Click Save.
- On the contact summary screen of the contact, you can see the
relationship created.
Tasks
See the tasks related to the Contact here. You can also see them in the OfficeClip Tasks application.
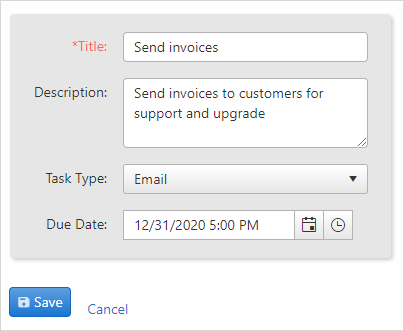
To add new Tasks:
In Contacts, click on the
icon of a contact to add new tasks.Click New > Task.
Enter the title, description of the task, the type of task, due date and time affixed if any.
Click Save after you finish and Click Cancel to exit.
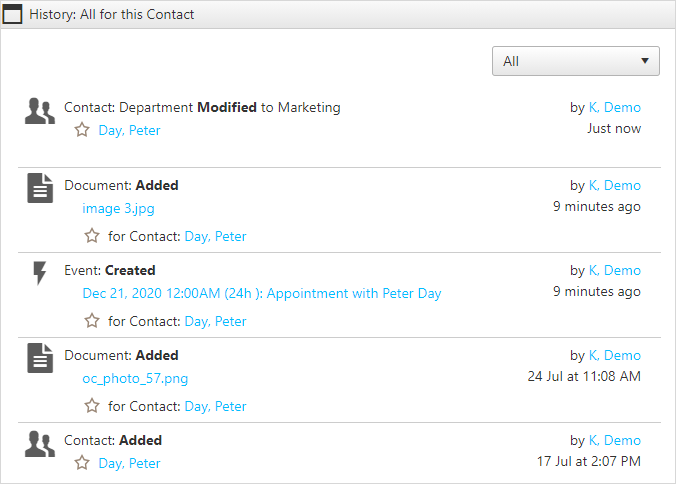
History
The History button on the top right corner of
the contact details screen next to the New menu, helps
to keep track of what your team is working on at many levels.
When you click on the History button, you will be able to see the changes made to the contact.
To print a particular contact:
- Click the Print Button on the right side of the contact details screen.
It will show a Print Preview of the Contact Details and allows you to pick and choose what you want to print. Click Print.
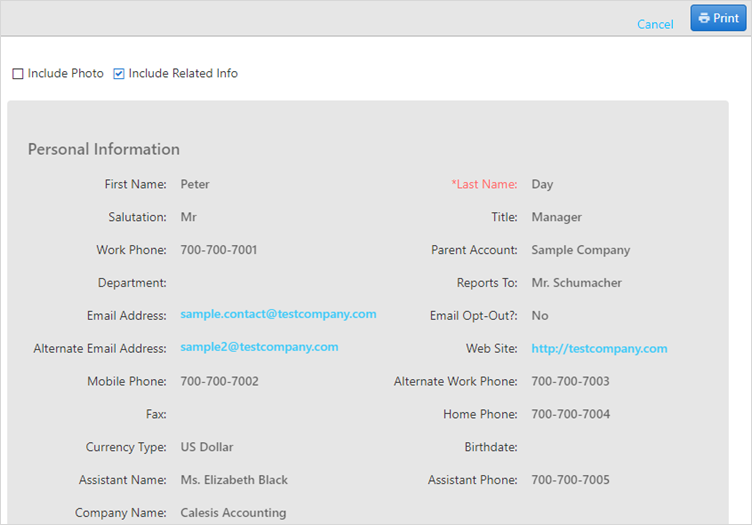
- If Include related info is check marked it will show all the related info like notes, activities, documents attached, issues, etc. after the contact information.
To exit, click on the
 icon
on the pop-up window.
icon
on the pop-up window.
In-Place Editing
In-place editing is possible, to make changes for a particular contact, on Contact details screen.
Just hover the mouse over fields that you want to change.

An Edit link will appear on the right.
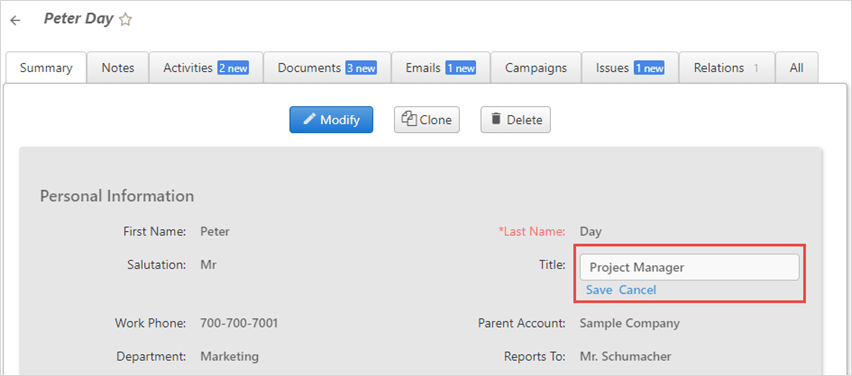
Click on the edit link of that field, make necessary changes and click on Save.
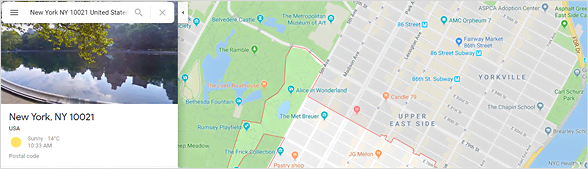
Maps
You can locate the address of a particular contact using google maps.
To locate the address, in contact details there is a Map icon in Address information.
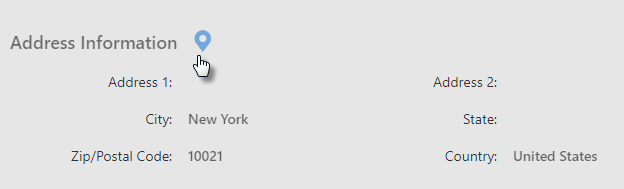
Click on the icon to see the map.
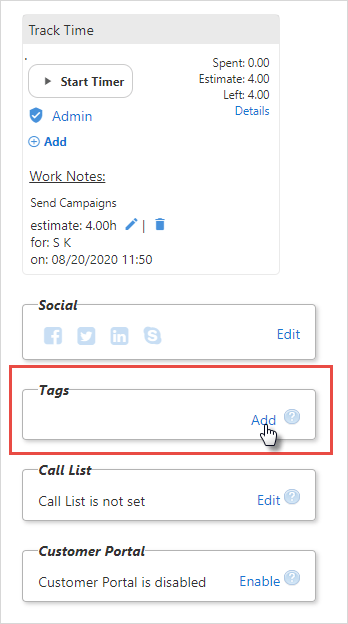
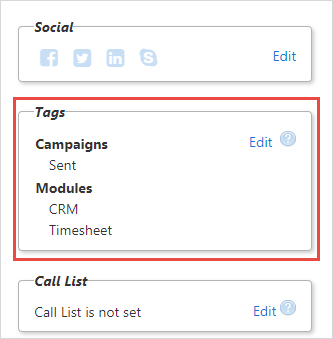
Tags
Tags are identifiers which help in the better categorization of contacts and helps to find information faster. Tags are assigned to contacts to categorize them on the basis of their interest, work, preference, location, etc.
Once tagged, the contact can be filtered using the Tags. OfficeClip allows two levels of hierarchical tagging. Tags can also be searched using the tag name and also the tag group name. Multiple tags can be added to a single record.
Access Tags by going to the Summary of the
Contact Detail. Users who have adequate permission can
associate existing tags with a Contact or can create
new Tags.
To create new Tags:
Click CRM > Contacts > Tags > Add New Tag.
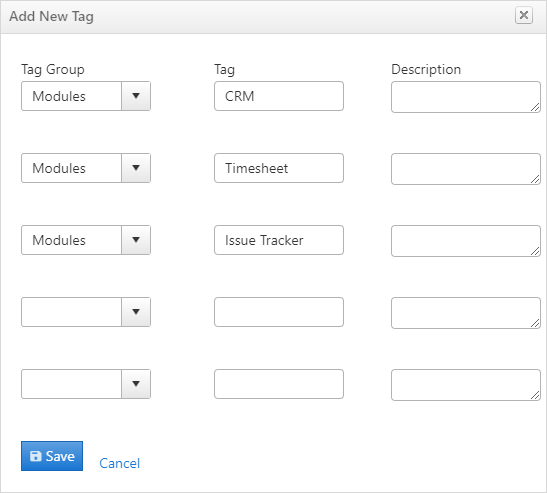
Enter a new tag group or select an existing tag group from the dropdown, tag and description for the tag. And then click Save.
To associate a tag with contacts:
Double-click on a Contact that is to be tagged or click on the
icon of a contact.On the right side of the Contact summary page, you will see Tags; click Add.
- Check the appropriate box and click Update.
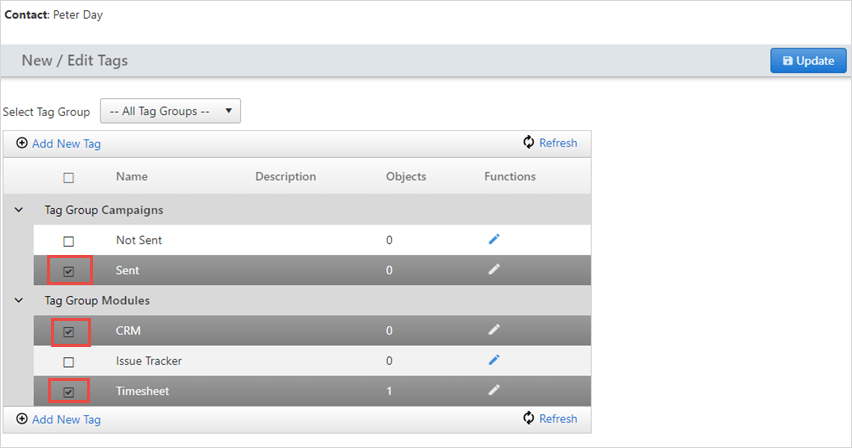
- In the Contact Summary, you will see the tag added.
To edit a tag, click on the Edit button and you can change the tags.
You can also Delete, Modify tag group and Ungroup tags.
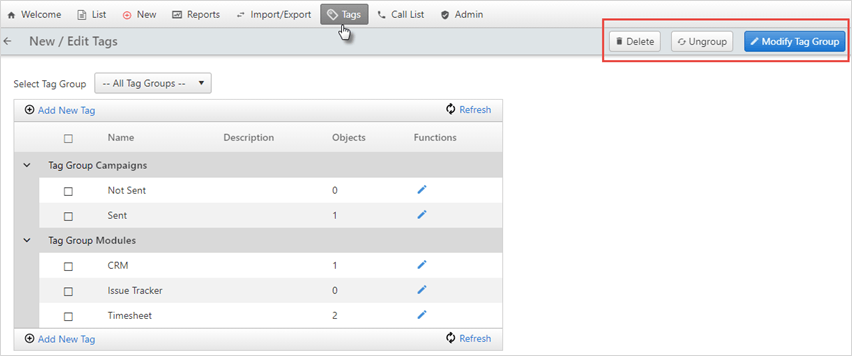
- Click CRM > Contacts > Tags
To Delete a tag, select the tag you want to delete and click Delete.
To Modify tag group, select the tags you want to change the group for and click Modify Tag Group. Then, enter the Group name you want to associate with your tag and click Save.
To ungroup tags, select the tags you want to ungroup and click Ungroup.
Using Call List
To use the Daily Call List:
Click CRM > Contacts > Call List
This screen allows you to view today's call list (as well as missed calls in the past). To check future calls, change the drop-down from Daily to Future.
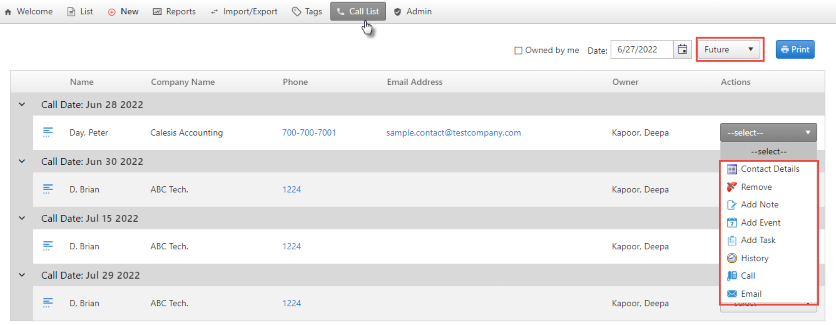
Under the actions column you can:
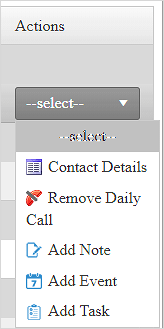
Go to Contact Details screen to take further action
Remove this Contact from the Daily Call List
Add a Note to the Contact
Add an Event to the Contact
Add a Task to the Contact
To learn more details about how to use Call List click here.
Customer Portal
The Contact Detail screen can also set up a support portal for
customers, partners, vendors, etc.. Customer portal
users are contacts who can get limited sharing access to certain modules
of OfficeClip, like Documents, Issues, and Reports.
Adding users through Customer portal:
- Click CRM > Contacts.
Click on the
icon to open the Contact summary
screen for a Contact.On the Contact summary screen, below the Call List, you will see the Customer Portal.

Click Enable.
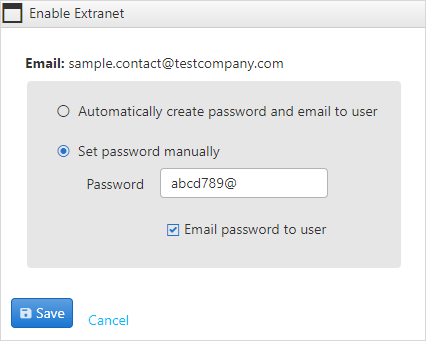
- The enable customer portal screen will set up a password for the
user. This password can be created automatically by the system or can
be created manually. After choosing the appropriate option click
Save.
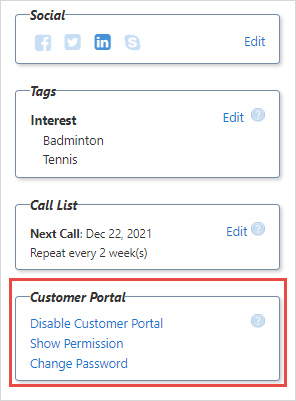
- Once the password is saved, the password can be changed if required by using the Change password option.
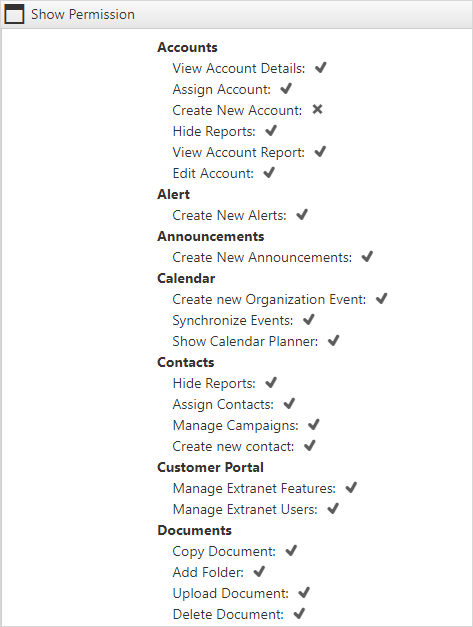
- With the show permission option the contact can view the
permissions he has to access various things in the OfficeClip
application.
Add Picture
We can add a contact photo to the right side corner of the
Contact summary screen.
To add a picture to a contact:
Click on Change picture, select the file from the desired location and then click Save.
Manually upload the contact photo or obtain it by synchronizing with
Google ContactsorOutlook Contacts.
Links to Social networking sites
The social networking icons on the contact summary screen provide a simple way to link with popular social networks like
Facebook,Twitter,Google +, LinkedIn, Skype.
To link to the Social Networking sites:
Click on the Edit button, a pop-up window will appear with social networks.
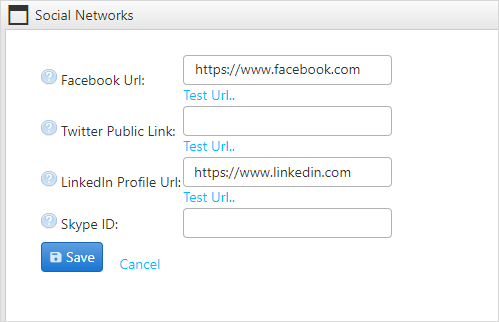
Click on
 icon.
You will be able to see the details about how to log in to your sites
through OfficeClip contacts.
icon.
You will be able to see the details about how to log in to your sites
through OfficeClip contacts.Click Save after you finish.
- You will see the links activated on the contact details page.
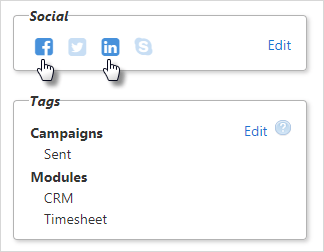
- With these links you will be able to easily connect with the social networking sites from this page.
Integration with Skype
OfficeClip Contact Manager provides integration with Skype. This combination enables you to call your contact via Skype.
To enable this feature:
From Settings > Entire Site click on Options.
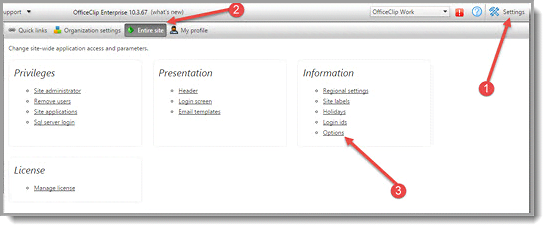
Checkmark the Skype button.
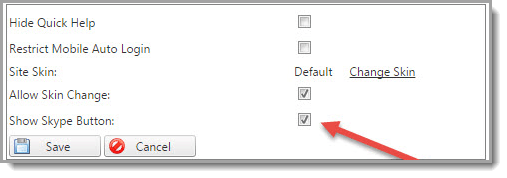
Now you will be able to see a phone icon next to the phone field.
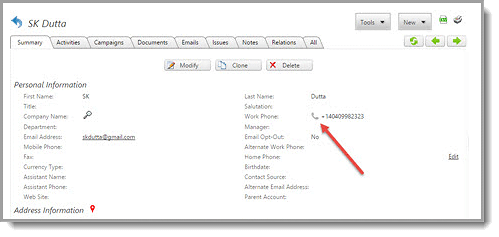
Clicking on it should bring up Skype call window (if Skype is installed)
