
Note: If you are using OfficeClip from AWS Marketplace, you *DO NOT* need to follow the instructions given below. Your initial password of the created instance is abcd1234@ which must be changed before using the software.
Amazon provides a free-tier for its EC2 (Elastic Cloud) on their smallest server (called micro-instance) for one year as long as you are within their limits of access (for limits see https://aws.amazon.com/ec2/pricing/). In most cases you will not have to pay for it in the first year. After the first year you will pay around $15 to $20 per month if you prepay for one or three years. Please visit https://aws.amazon.com/free and the amazon AWS site at https://aws.amazon.com to get more details.
We have created an Amazon Machine for you with OfficeClip already installed. The basic version of OfficeClip is free for 10 users. So essentially you can run OfficeClip dedicated server free for one year.
Let’s see how this compares with installing OfficeClip at your own machine:
- Pros: You have a dedicated machine but do not have the hassle of software installation and maintenence
- Pros: OfficeClip is pre-installed for you, so all you have to do is start the machine
- Pros: Amazon currently provides a free-tier for one year
- Pros: You can dynamically scale processing power, memory and disk space while keeping the information intact.
- Cons: Amazon Free Tier Micro Instance is a small machine and OfficeClip may run slow. We have tested it ourselves. While most operations are fast, sometimes you may have to wait for a few seconds delay.
- Cons: Amazon charges for the bandwidth, so you have to be careful. If your machine is compromised by some spyware, it can run up your bills quite a bit. Amazon has alarms to guard against it but most people do not set those.
- Cons: It is more expensive to host your machine at amazon compared to hosting it on premise if you do not consider human labor cost of installation and maintenence.
Installation Steps
[more]
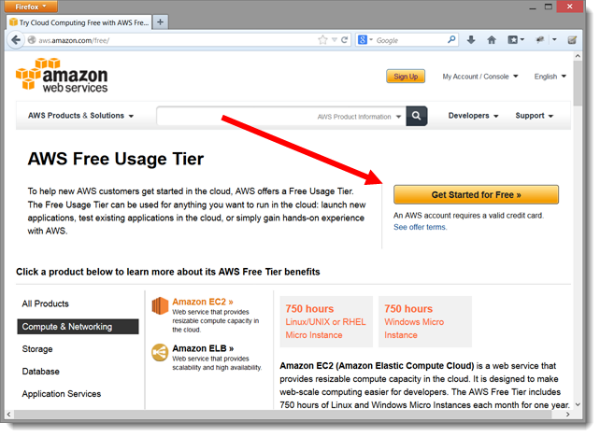
- Visit https://aws.amazon.com/free and click on Get Started for Free (if you already have an account then login to Amazon AWS and click on EC2)

- While creating new account it will ask you to put your credit card information. Your credit card will be charged if you incur more charges than allowed by the amazon free tier.
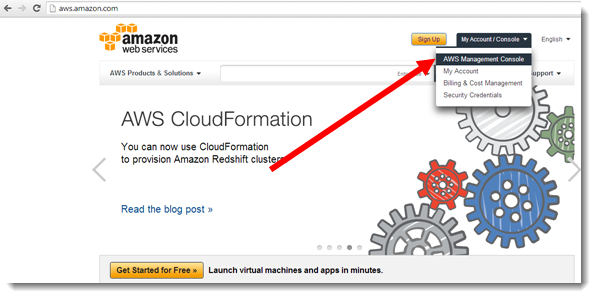
- After your account is created, visit https://aws.amazon.com and login to the AWS Management Console

- Click on the Launch Instance button to create a new instance

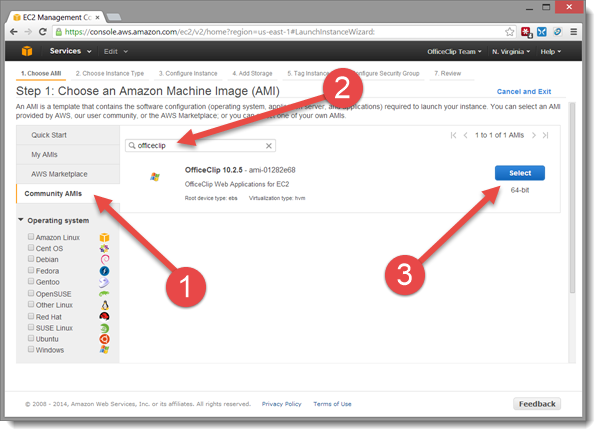
- Next select the OfficeClip AMI (Amazon Machine Image). To find the latest OfficeClip AMI click on Community AMIs from the left menu, then type officeclip on the searchbox and press Enter. It will show you one or more OfficeClip images with version number. Click on the Select button.
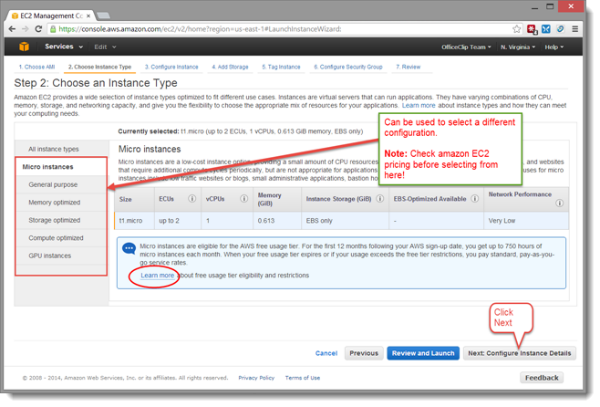
- Next it will ask you to select the instance type. By default, it will be selected as Micro Instance with the free-tier. The free-tier has limited memory and disk space and is fine for most practical purposes. However, if you need faster speed, you can select another instance type (the most popular being small instance). Note: Amazon has a complicated pricing scheme and charges you for cpu time, memory and bandwidth. Make sure you check the amazon website at https://www.amazon.com/ec2 so that you understand it well before changing the default instance. Click on Next: Configuration Instance Default.

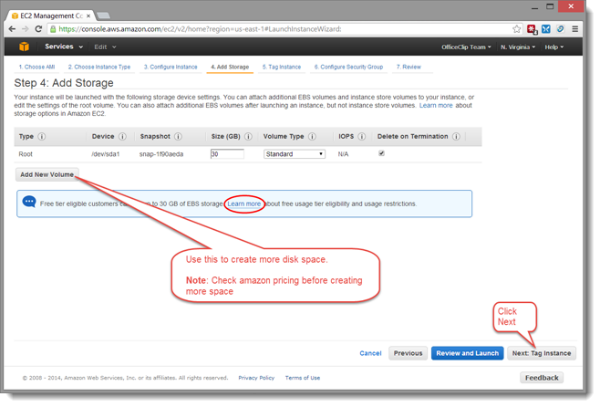
- Now you can add extra storage to your instance. Note that on the OfficeClip machine, you will have about 9GB of space left on the C-Drive, so if you want extra space for your documents, you can add a new Volume. There will be extra fee payable to amazon for this drive. Click on Next: Tag Instance.
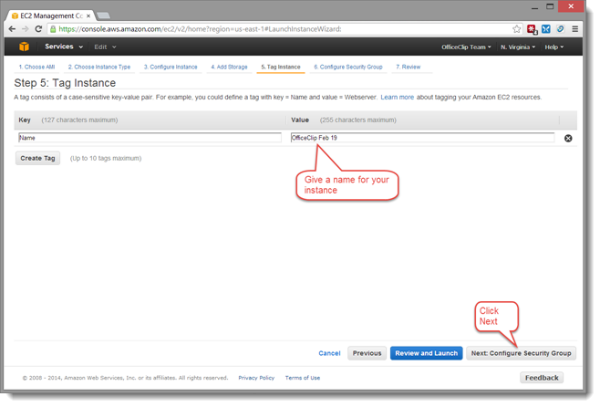
- Give a name to your machine so that you can recognize it later. Click on Next: Configure Security Group.
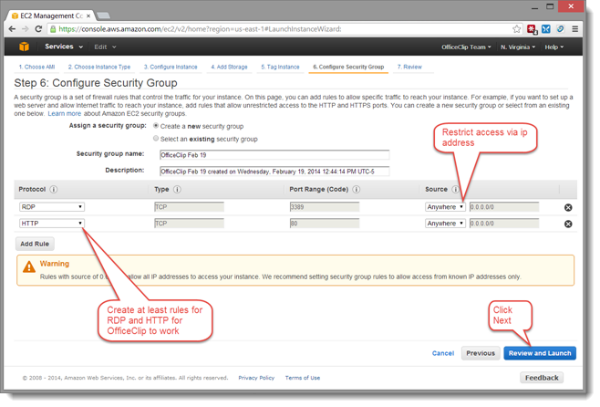
- Configure the security groups. Security group restricts access to your machine via particular TCP port and IP Address. In this example, we will open the RDP (Remote Desktop) port so that you can login to the machine and the Http port so that you can access officeclip from outside. Click on Review and Launch.
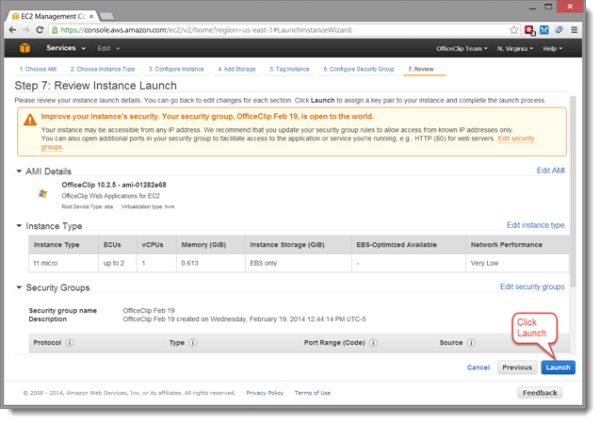
- Review everything you have setup so far and then click on Launch.

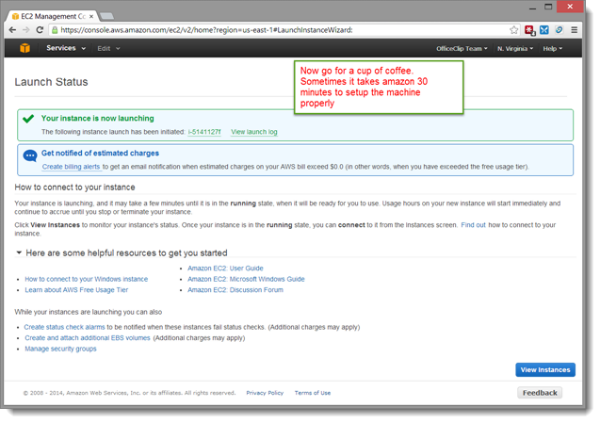
- At this point you should see a confirmation screen saying that the instance is launching. Amazon sometimes takes a long time to launch an instance (in some cases it is more than 30 minutes).
- Now, click on Services from the top left of your browser and then click on Instances from the left menu. Wait till the Status Checks column of the new instance shows a green check mark icon. Next select the instance and click on the Connect button next to the Launch Instance.
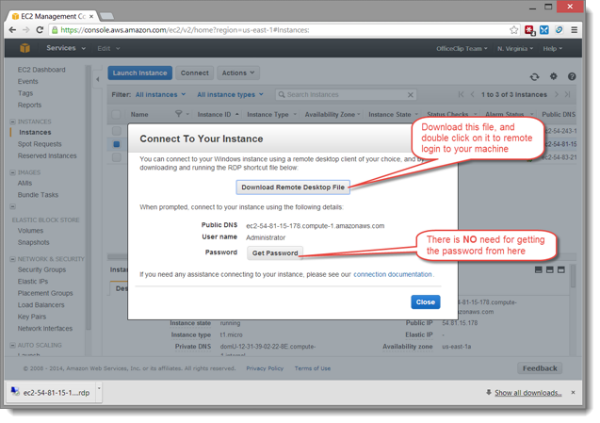
- Click on Download the Remote Desktop File and save it on your machine.
- Amazon allows you to create a static ip address called Elastic Ip to associate with your instance. This is useful because if you stop your instance you will be allocated a new ip address. However, if you have an Elastic Ip, you can always attach it to your instance so that your users can access OfficeClip using the same static ip or domain. To create and associate Elastic Ip, click on Elastic Ips from the left menu, then click on theAllocate New Address button. Select EC2 from the drop down list and click on the Yes, Allocate button.

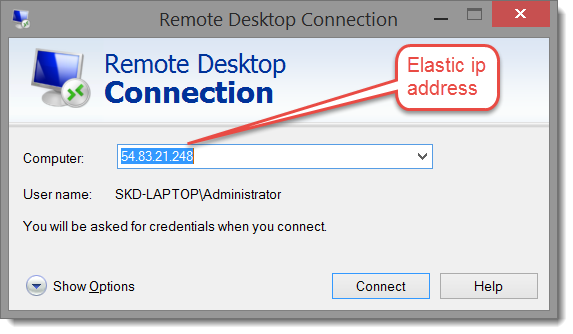
- Next right click on your instance and select Associate Address. Now select your instance from the drop down menu and click Associate. The screen will now show the static ip address with your instance. This static ip address can be used to access your OfficeClip machine.
- Now let’s connect to your machine. You can do it in two ways: you can double click on the remote access file you downloaded in a previous step, or you can use the Elastic Ip address with remote desktop. The User name should be Administrator and the password abcd1234@. This is a temporary password and you will be forced to change it as soon as you login.
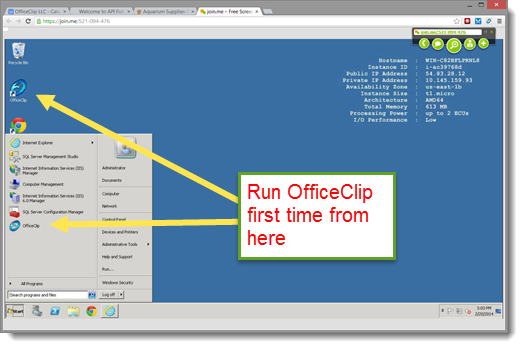
- You now have various options to setup your OfficeClip:
- Click on the OfficeClip icon on the desktop
- Click on the OfficeClip icon in the Startup menu
- Type the elastic url or the domain on a browser anywhere on the internet


You can now give the amazon url or the elastic ip address to everyone who needs access to OfficeClip.
SK Dutta is a software architect and creator of OfficeClip Suite of products. He loves to design and develop software that makes people do their job better and more fun. He always explores ways to improve productivity for small businesses. He is also an avid reader in many areas, including psychology, productivity, and business.

