Workflow
Timesheet Software offers a straightforward workflow routing configuration. Reviewing and approving timesheet ensures the right number of hours are spent on the right projects. Once the timesheet is submitted, the assigned workflow routes the timesheet to assigned approvers. Timesheet once approved for the week are locked and cannot be edited.
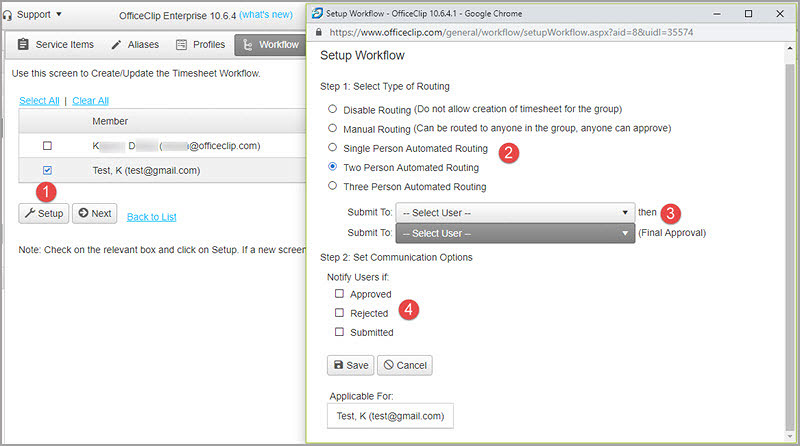
The Workflow flexibility allows various levels of automated and manual workflow settings as determined by the Administrator. Only the authorized person can approve the timesheet submitted.
- Checkmark the username box for whom workflow is to be created and select Setup.
-
Different types of routing are available in OfficeClip Timesheet.
- Manual routing: The timesheet can be routed to anyone in the organization.
- Single Person Automated routing: Only one person authorized can approve the timesheet.
- Two Person Automated routing: Two person from the organization, like the manager approves the timesheet and
it is then routed to the Accounts department who approves or rejects the timesheet accordingly. - Three Person Automated routing: The timesheet will be routed to three authorized people in the organization. Like first the Administrator approves the timesheet, it is then routed to the manager and then it is routed to the
Accounts department for final approval.
- Authorized approvers for the timesheet can be selected from the drop-down.
- The Administrator can checkmark the options required so that the Approver will receive the notification when the timesheet is submitted and the users will receive the notifications when the timesheet is approved or rejected.
Payroll
Timesheet Payroll helps the administrator to define various payroll variants. It helps to track different categories in one software.
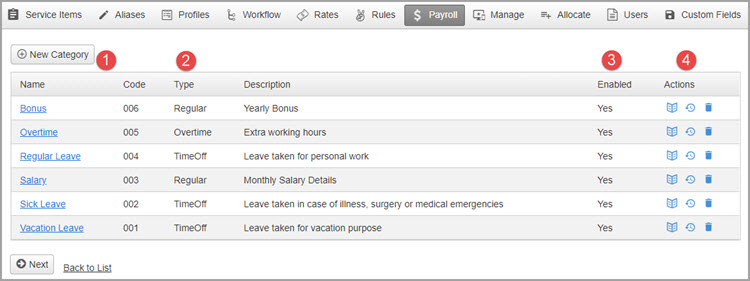
- In the New Category the administrator can set up different categories like leaves, monthly salary, bonus, overtime, commissions etc. The administrator also needs to set up users for each category.
- The type of categories can be regular, time off or overtime.
- The categories can be enabled or disabled as per the organizational requirements.
- From actions column, the user can view the category, view history and also delete the category after disabling it.
Rules
Timesheet rules help to validate whether the data entered in timesheet is valid or not. If any discrepancies are found, it shows a warning or an error. It does not allow the users to submit a timesheet. Administrators can assign multiple rules in a timesheet for an organization.

- The Administrator needs to set up the rules to fix some conditions before making any entry for timesheet.
- The rules can be enabled or disabled as per requirement.
- The Administrator can edit or delete the rules.
Profiles
Every organization has specific protocols to follow regarding timesheet. In the Profiles section of the timesheet, the Administrator sets up various features, functions, and layout. The user needs to follow those like mode of the timesheet, approving own timesheets, proxy data entry, auto approve and bulk approve.
Mode
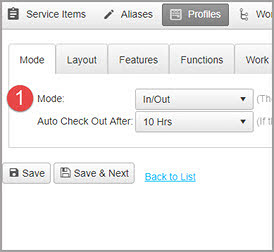
- The first option in Timesheet profiles is Mode. Mode has two sections:
Periodic: This is a mode where regular entries for timesheet can be done by opening a new timesheet and entering hours and details.
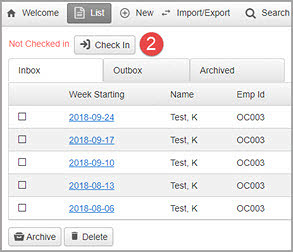
In/Out Timesheet: In this kind of timesheet, the check-in time of users is recorded and when the user selects check out, his total working hours get calculated automatically. In Auto Check Out After option, if a user forgets to check out after his working hours, the system automatically logs him out of the system after 10 hrs or 12 hrs, as set up by the Administrator. - When In/Out mode is selected, the user needs to click on Check-In button above the timesheet inbox, when he starts working.
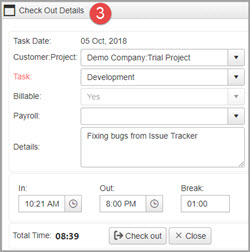
- At the end of the day, when is user has finished working he needs to click on the Check Out button. A pop-up appears, where the user needs to fill in the details of the Customer: Project, task, details if any. He also needs to enter the break time. The total time automatically is seen on the screen and when the user clicks on the Check Out option the time automatically is entered in the timesheet.
Layout
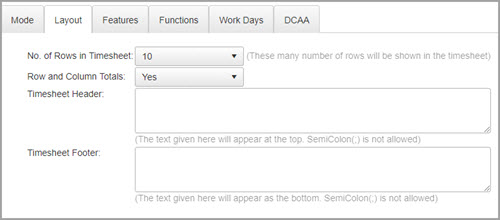
The Timesheet Layout has some adjustments:
- No. of rows in a timesheet.
- Totals of rows and columns.
- Header and Footer.
Features
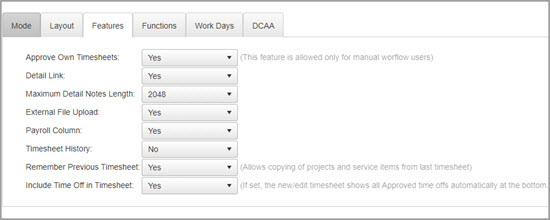
The Features are set up by the Administrator.
- Approve own timesheets.
- Detail link or payroll column.
- External file upload or attachments.
- Include time off.
Functions
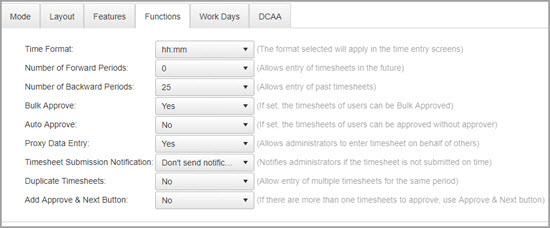
The Functions to be adjusted in timesheet are:
- Time Format.
- Forward and Backward periods.
- Bulk approve or Auto approve.
- Proxy Data Entry or Duplicate timesheets.
Workdays

The Workdays in Timesheet helps to set:
- The start day for a timesheet.
- Set work days for an organization.
DCAA Mode
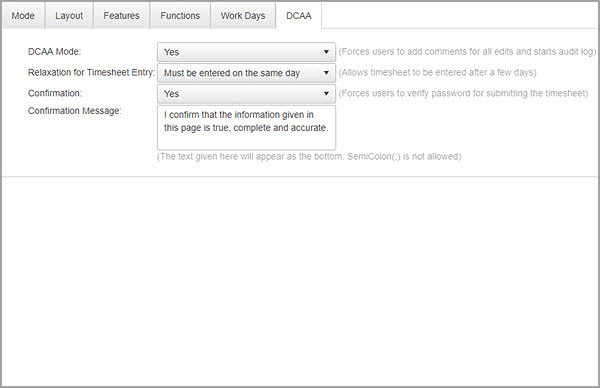
The working of DCAA in Timesheet:
- If the DCAA mode is set to Yes, the users are forced to add their comments before saving and submitting a timesheet.
- Relaxation for timesheet entry can be allowed up to the next day, a week or timesheet entry has to be done on the same day.
- The confirmation message forces the users to verify the password before submitting a timesheet for authenticity.

