
CRM filters cut through the clutter in your CRM, letting you focus on what matters most. This saves time, improves targeting for sales and marketing, and helps you deliver better customer service. OfficeClip CRM filters are powerful because they can express many complex conditions. This short tutorial will show you how to use the CRM filters efficiently. Teams can also create a video walkthrough to train employees on building custom CRM filters and advanced search conditions.
Video: Using CRM filters
This short tutorial will show you how to use the CRM filters efficiently.
Introduction:
Overview of Filters:

- Click on the dropdown to view the list of filters created.
- From the contact list screen, you can create new filters by clicking on the + icon next to the filter box.
- Click on the Edit icon to make changes to the current filter.
In the above image we can see the four contacts on the list screen that we will refer to throughout this tutorial.
How to create new filters?
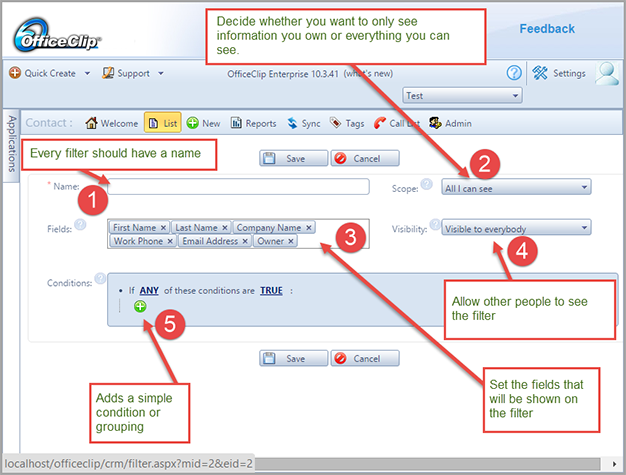
Figure 2: The OfficeClip Filter definition screen
- Every filter should have a unique name.
- The scope of the filter determines whether you want it to work only on the data you own or all the data that you can see (based on your permission). You become the owner of a contact when you create it or someone else makes you the owner.
- The Fields box shows all the fields shown on the list screen. You can add or delete them as needed.
- You can also make your filter private or visible to everyone in the organization.
- Create and run filter conditions as and how you need to see the data.
Further in this article we’ll explore how to create specific conditions and group them for efficient searches.
Basic Filters
Let’s see an example filter condition:
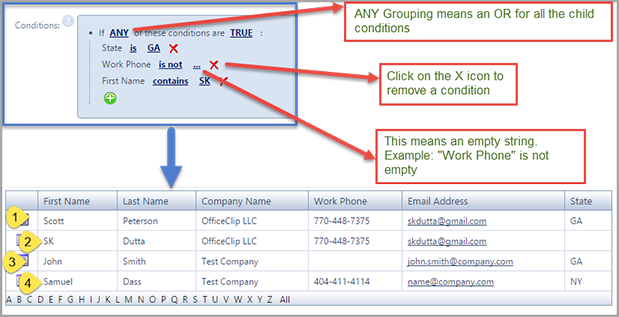
Figure 3: Grouping with Any and True conditions
The above figure shows a sample filter and the result it produced on the list screen.
Let’s say you want to find contacts from any of the conditions mentioned below:
- Who live in the state of Georgia (GA) OR
- Work phone is not empty OR
- Whose first name contains SK
The first line of the filter shows, if ANY of these conditions are TRUE. This is called the top level group. This means that, if any of the conditions within a group are true, the contact will show up in the results.
So the filter will show all the contacts that match any one of these conditions. It is worth noting the second condition has a … which means empty, so it will match all contacts whose Work Phone is not empty.
Let’s now see the result from the above figure on which row matches what part of the filter.
- Contacts 1 and 3 in the result set match with the first condition (State is Georgia).
- Contacts 1, 2 and 4 match with the second condition (Work Phone is not empty) and
- 2 matches with the third condition (First Name contains SK).
So, we see that all contacts (1, 2, 3 and 4) are matched by at least one of the conditions. Because the grouping is ANY, it shows all of them.
Let us now remove one of these conditions and see what happens:
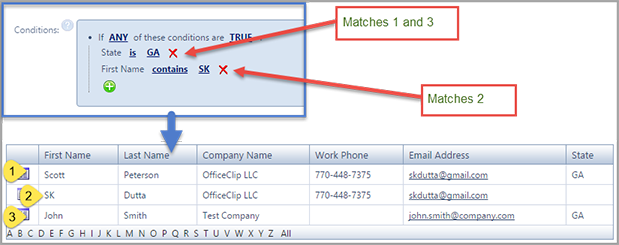
Figure 4: Grouping with two conditions
In the above image, we have removed the second condition (Work Phone is not empty). This filter returns only three contacts. The two conditions we have in this filter are:
- State is GA
- First Name contains SK
Like before, we see that
- Contacts 1 and 3 are matched by filter condition 1, and
- Contact 2 is matched by filter condition 2.
Filter groupings can also be done on FALSE condition of the group.
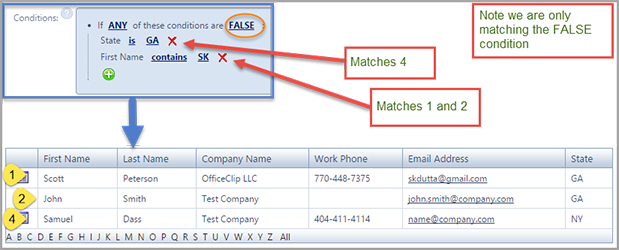
Figure 5: Testing for false condition in any group
Let’s say you want to find:
- Contacts whose state is not Georgia OR
- First name does not contain SK.
In this case the filter is evaluated in the same way as before but each individual condition will be tested for false. Let’s walk through the example:
To show the contacts the following two conditions should be false:
- State is GA
- First Name contains SK
Contact 4 is matched by the filter condition 1 and contacts 1 and 2 are matched by the filter condition 2.
Filter grouping can also be done using the ALL grouping instead of ANY. In this case, only contacts that satisfy all the conditions in the group will be shown in the result. For example, let’s search for all contacts in Georgia who have a work phone:
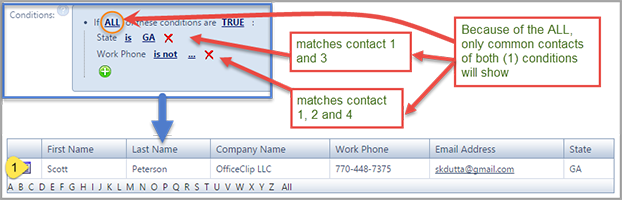
Figure 6: Filter using All grouping
In Figure 6, there are two conditions grouped by ALL. They are:
- State is GA
- Work Phone is not …
You will see that only contact 1 satisfies both these conditions.
Complex Filters
So far we have discussed simple filter creation. Oftentimes you want to create filters using complex conditions. When you want to create a complex filter, you have to accept trade-offs between power and simplicity. Let’s say you are trying to find all the contacts where:
- The Company Name contains OfficeClip and
- Location State is Georgia
OR
- The Company Name contains the word Test and
- Is located in New York
Let’s see how to write such a filter.
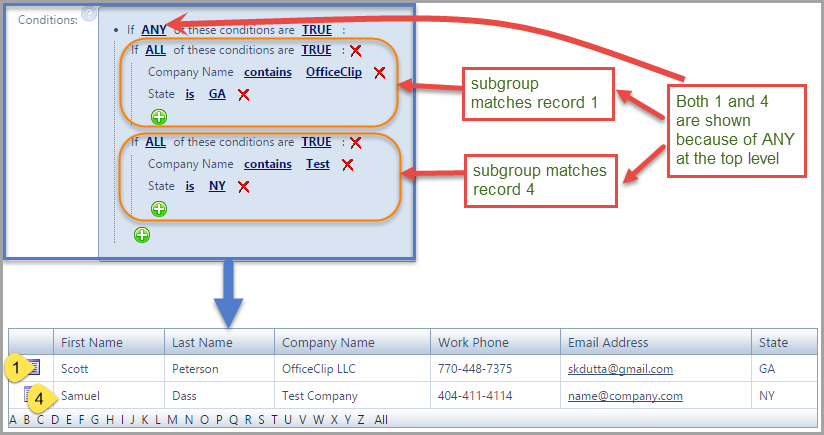
Figure 7: Subgrouping in a filter
First we create two subgroups for each sets of conditions like in Figure 7, then we combine them in the main group.
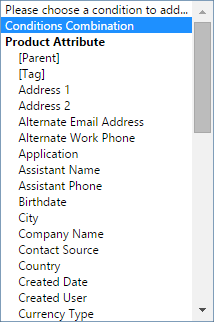
Figure 7A: Creating Subgroups
To create a subgroup filter, click on the + icon and select the Conditions Combination option as shown in Figure 7A.
Let’s construct them individually:
Sub Group 1:
- The Company Name contains OfficeClip and
- Located in State is Georgia
Filter:
- If ALL of these conditions are TRUE
- Company Name contains OfficeClip
- State is GA
Matches:
- Contact Record 1
Sub Group 2:
- The Company Name contains Test and
- Located in State is New York
Filter:
- If ALL of these conditions are TRUE
- Company Name contains Test
- State is NY
Matches:
- Contact Record 4
Because we want contacts where any one of the subgroups is true, we can use the top level grouping as ANY. So, we see both contact records 1 and 4 in the list.
Now let’s see what happens if, in the above example, we change the top level grouping to ALL and subgroups to ANY. It means that we could be searching for something like:
Search for all contacts where:
- Company Name contains OfficeClip OR
- Located in Georgia
AND
- Company Name contains Test OR
- Located in New York
This example may sound complicated, but we have shown it here to illustrate how complex filters are constructed.
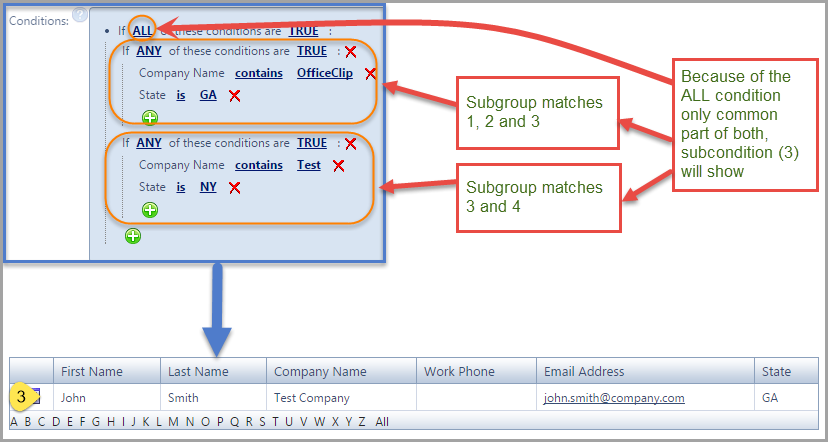
Figure 8: Subgrouping with ANY and ALL reversed
Let’s construct them individually:
Sub Group 1:
- The Company Name contains OfficeClip AND
- Located in State is Georgia
Filter:
- If ANY of these conditions are TRUE
- Company Name contains OfficeClip
- State is GA
Matches:
- Contact Record 1, 2 and 3
Sub Group 2:
- The Company Name contains Test and
- Located in State is New York
- If ANY of these conditions are TRUE
- Company Name contains Test
- State is NY
Matches:
Contact Record 3 and 4
Because we want contacts where both of them is true, we can use the top level grouping as ALL. So, we see contact record 3 in the list which satisfies both groups.
Filter using List
If you are trying to match contacts with particular values and you know the exact values you are looking for, you can use the is one of predicate as shown in Figure 9.
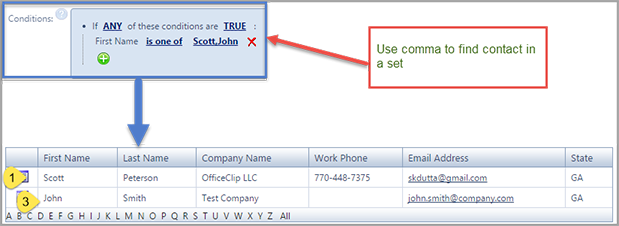
Figure 9: Creating filter with is one of predicate
Here you can select the is one of predicate and separate values with a comma. In Figure 9, we see that it only shows contacts 1 and 3, with first names as Scott and John respectively.
Filter Using Date
The OfficeClip filter can also create powerful conditions based on Date. Figure 10 shows a list of all our contacts with the date they were created.
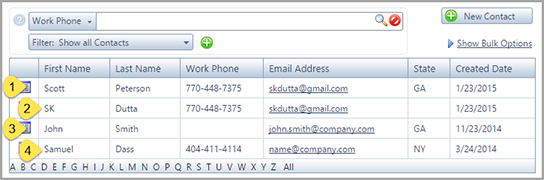
Figure 10: List of all contacts with created date
Using this example we will create some date-based filters.
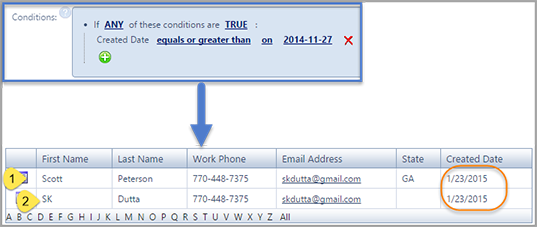
Figure 11: Testing date based on equals and greater logic
In Figure 11, we show a filter to extract contact records where the created date is Nov 27, 2014 or higher. We see that only two out of four in Figure 10 contacts match and are shown in the result.
Sometimes, we may not know the exact date and we need to search by relative date.

Figure 12: Relative date search
In Figure 12, we search for all contacts created in the last year.
Oftentimes, we need to find contacts based on month in any year. For example, we may want to find contacts which has been entered in the current month.
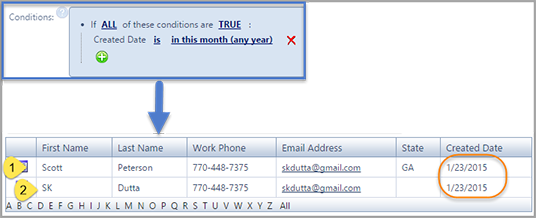
Figure 13: Filter for finding month in any year
In Figure 13 we show all the contacts created in the current month of any year.
Pdf Document for this tutorial:
Image courtesy:
- Wikimedia, creative commons attribution
Note:
This blog was published in 2020 and has been updated.
SK Dutta is a software architect and creator of OfficeClip Suite of products. He loves to design and develop software that makes people do their job better and more fun. He always explores ways to improve productivity for small businesses. He is also an avid reader in many areas, including psychology, productivity, and business.

