
This guide contains step-by-step instructions on using a timesheet. An initial setup for the timesheet will make the time tracking process smoother.

It includes steps right from setting up new users in the system to creating a timesheet:
Step 1: Users
Step 2: Administrators
Step 3: Account/Project
Step 4: Setting up Timesheet
Step 5: Using a Timesheet:
Also, see:
Step 1:
Adding users in the system:
These users will track time for a project in the system.
- Click on the Settings button on the menu bar.
- Click Add/Remove users from the Users section.
- You can select an existing user from the Add Existing Users section. Select the user from the dropdown and click on Add button.
- To add a new user, add the user details in Add New User section, select the desired option – create password automatically or set manually and then click on Add button.
Step 2:
Setting up Administrator:
Administrators are the users who can:
- Set up Projects and tasks in the timesheet
- Allocate the projects to users
- Manage service items for tasks
- Set up profiles(features and functions of a timesheet)
- Set up billable rates for the projects
- Set up the workflow for submission of the timesheets
- Set up rules to set working of a timesheet as per the guidelines of the organization
- Set up the custom fields.
- Click on Settings on the menu bar.
- Click on the Organization administrators option in Organization Settings
- Select the Show Users for Role as Administrator from the dropdown.
- You can have one Administrator or more than one Administrators.
- Click on the user in the Available Users for Role column and click on the right arrow to move the selection to Users in Role column.
Now all the users and Administrators are set up for your organization.
To start tracking time, we need to create accounts, their projects, and tasks.
Step 3:
Creating Account:
An account is your client for whom you will be tracking time.
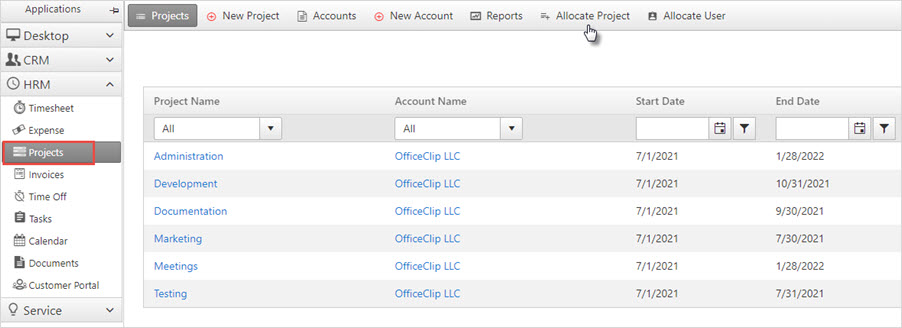
- Go to HRM > Projects
- Then click on New Account.
- Add the necessary account details and click Save.
Creating Projects:
The next step will be creating different kinds of Projects for an account.
- Click on HRM > Projects.
- Click New Project.
- Add all the project details.
- Select the Account/client for which you want to create multiple projects.
- You can allocate the projects to your team members by selecting the users from the dropdown.
- Finally, click Save.
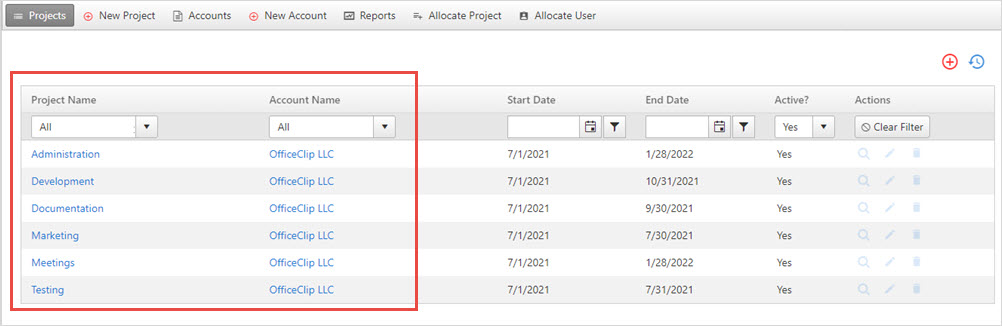
- In this way, you can create multiple projects for an Account.
- If you want to allocate a project to more users, click Projects > Allocate Project on the menu bar.
- Select the user from the dropdown to whom you want to allocate projects.
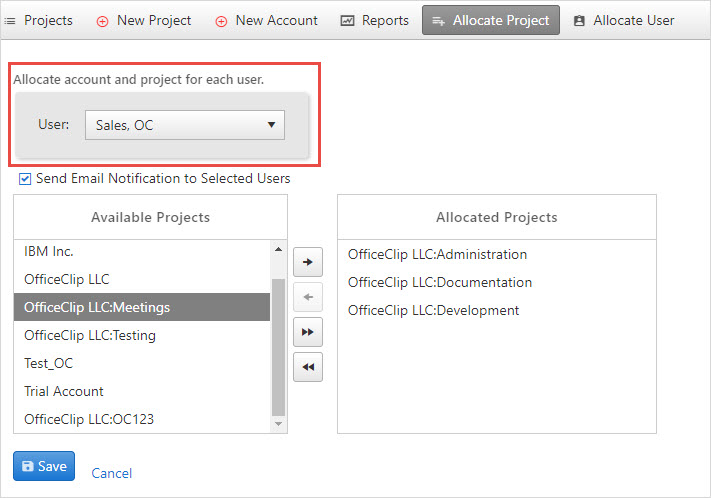
- Click on the Project from the Available projects column and, with the help of the right arrow, shift the project to the Allocated Projects column.
- The users will be working on these allocated projects and will track time for the projects mentioned above.
- After completing the allocation, click Save.
After setting up Users, Administrators, Accounts, and Projects, we need to set up the timesheet for use. We need to set up the Admin section in advance to carry the time tracking process smoothly.
Step 4:
Setting up the Timesheet:
The Administrator has the authority to set up the features, functions, rates, workflow, etc., in the timesheet.
To set up a timesheet, click HRM >Timesheet > Admin
- Service Items:
These are items created for each Account/Project. They can be billable, non-billable, or both.
- To add service items, in the Admin section, go to Service Items.
- Create different service items for each account/project.
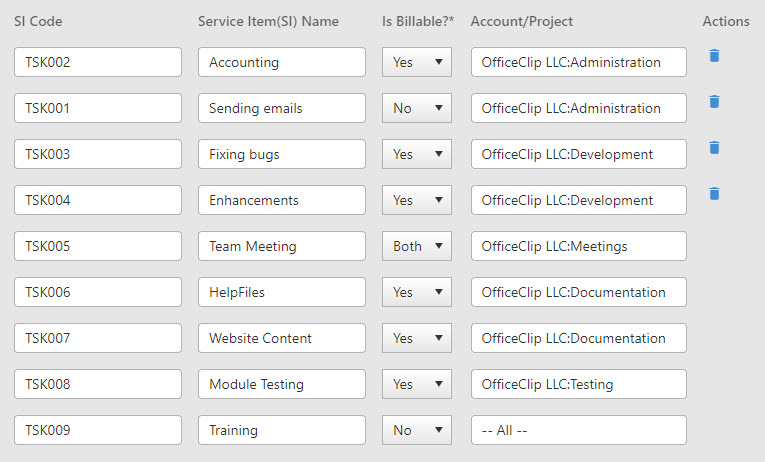
- Set their preferences billable, non-billable, or both.
- Click Save.
2. Profiles:
Consists of different layouts, features, functions, etc. Let’s check all one by one.
To set profiles, go to the Admin section and click on Profiles.
- Mode:
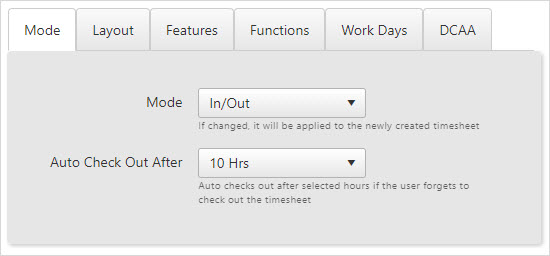
There are two types of modes in the timesheet:
- Periodic: This mode allows manual entry of a timesheet without using any timer. Only enter the work hours, work details and save the timesheet.
- In/Out: In this mode, the user clicks on the Check-in button on the timesheet screen when they start working. At the end of the day, the user checks out and then enters the task, work details, and break hours.
This mode will automatically calculate your work hours. And, if the user forgets to check out of the system at the end of the day, the system will auto-checkout the user after 10 hrs or 12 hrs as set up by the Administrator. For more details on how In/Out system works, click here or check Step 5 using a timesheet In/Out mode.
- Select the mode of timesheet you want to use and click Save.
- Layout:
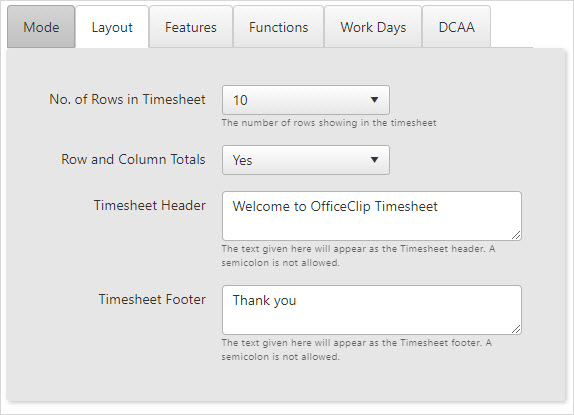
- Select the number of rows in a timesheet. You can select up to 100 rows for a timesheet.
- If you want the work hours total for rows and columns, select Yes.
- Add the Timesheet Header and Footer.
- Click Save after selecting appropriate options.
- Features:
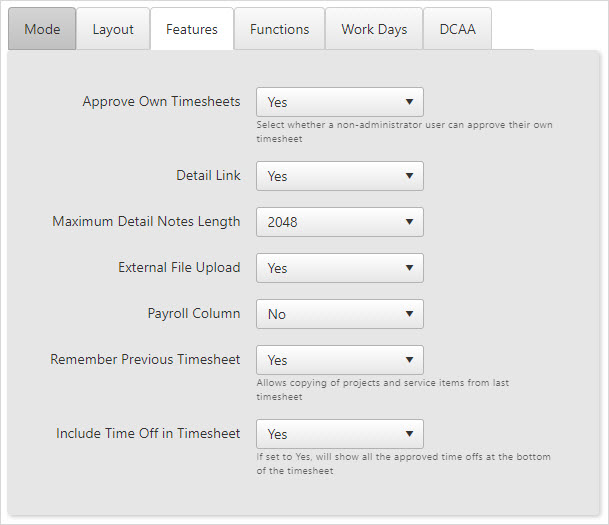
- If you are given the authority to approve your own timesheets, select Yes.
- If you want to know the work details for a user’s project, select Yes and select the length of the notes from the dropdown. If you choose the No option for detail link, the manager will not know about the work details performed for a task.
- To add attachments like bills, receipts, documents, etc., choose Yes for External File Upload.
- To see the Payroll Column in your timesheet, select Yes, and if you want to remember the previous timesheet, select Yes. This feature will help filling up of timesheet quickly.
- If your employees have taken time off for a particular week and you want to see the time off in the timesheet, select option Yes.
- After selecting the appropriate options, click Save.
- Functions:
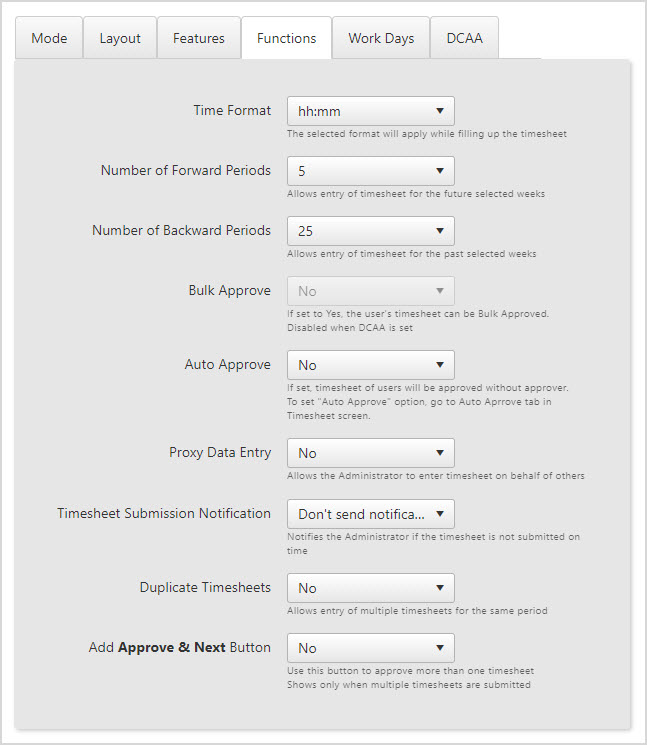
- Select the appropriate time format for your organization.
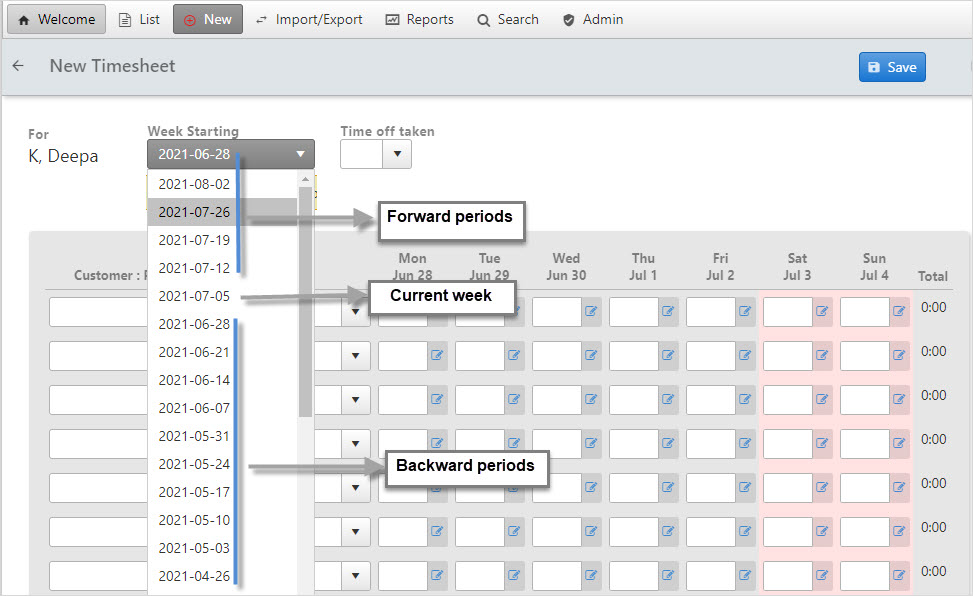
- Select the timesheet’s forward periods(allows entry for future weeks) and backward periods(allows entry for past weeks). See the image below:
- If a user sends timesheets together for a few weeks, then the manager can Bulk Approve timesheets if the option is set to Yes. This option will be disabled if DCAA mode is set to Yes.
- If Auto Approve is set to Yes, the submitted timesheet will automatically get approved without an approver.
- Proxy Data Entry, if set to Yes, will allow Administrators to enter timesheets on behalf of other users.
- Select the Timesheet Submission Notification options from the dropdown, and it will help notify the Administrators if the users have not submitted timesheets on time.
- Duplicate timesheets, if set to Yes, will allow the creation of duplicate timesheets for the same week.
- Approve & Next button, if set to Yes, will allow quick approval of timesheets if multiple timesheets are submitted to the manager.
- Click Save after selecting the options.
- Workdays:
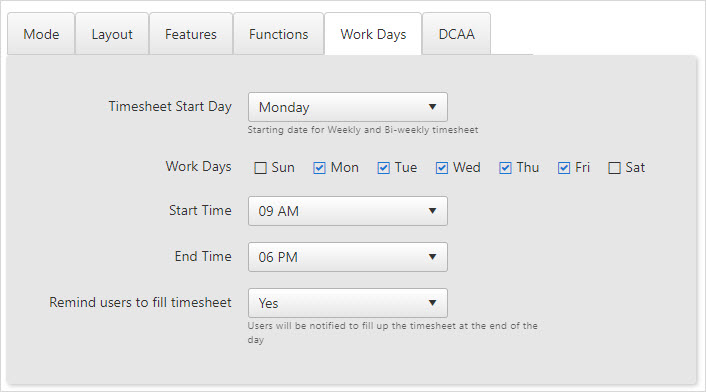
- Choose the timesheet start day for your organization and checkmark workdays.
- Enter the Start time and End time of your working days.
- Set the option for Remind users to fill the timesheet to Yes, to notify the users to fill up the timesheet daily at the end of the day. This feature will help users to record time daily and accurately.
- DCAA:
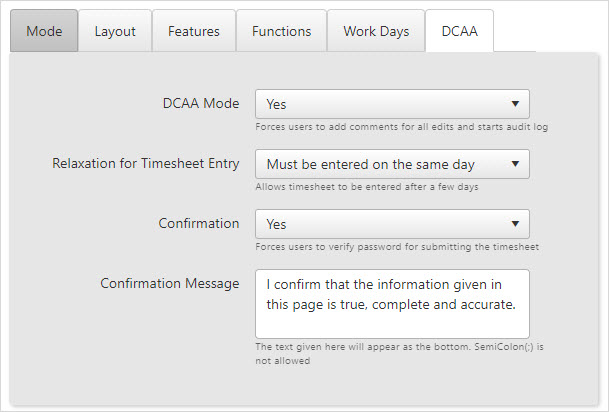
Organizations working on Government contracts need to follow the recommendations and guidelines set up by the DCAA while submitting a timesheet. OfficeClip timesheets are DCAA compliant, which will help in accurate recording of time every day. Learn more about DCAA.
- To enable DCAA mode, select the Yes option from the dropdown. Once DCAA mode is enabled, entering comments for each change in the timesheet or while submitting a timesheet will be mandatory. And this history gets recorded in the timesheet.
- Relaxation for Timesheet Entry has options where users will have to submit timesheets on the same day, the next day, or in a week. Choose the desired option.
- If the confirmation is set to Yes, the users will have to enter a password every time they submit a timesheet.
- Enter the message in the Confirmation message box.
- Click Save to save all the changes.
3. Workflow:
This feature will help the Administrators to set up an Approver for each timesheet submitted.
Once the timesheet is routed to the approver, the approver will validate the timesheet and approve or reject it. Once the timesheet is approved, it is forwarded further for payroll processing. Rejected timesheets are routed back to users. Learn more about workflow approval.
- From the Admin section, select the Workflow option.
- Checkmark the users for whom you want to create a workflow, and click Setup.
- With manual routing, you can route the timesheet to an authorized person in the organization by selecting a user from the dropdown while submitting a timesheet.
- For a single person, two and three people routing select the users from the dropdown for approval of the timesheet. If you wish to receive notification for approved, rejected, or submitted timesheets, checkmark the communication options and finally click Save.
4. Rates:
Every client or account we work for has different rates. In this section, we can fix the rates for every account in advance.
- From the Admin section, click Rates.
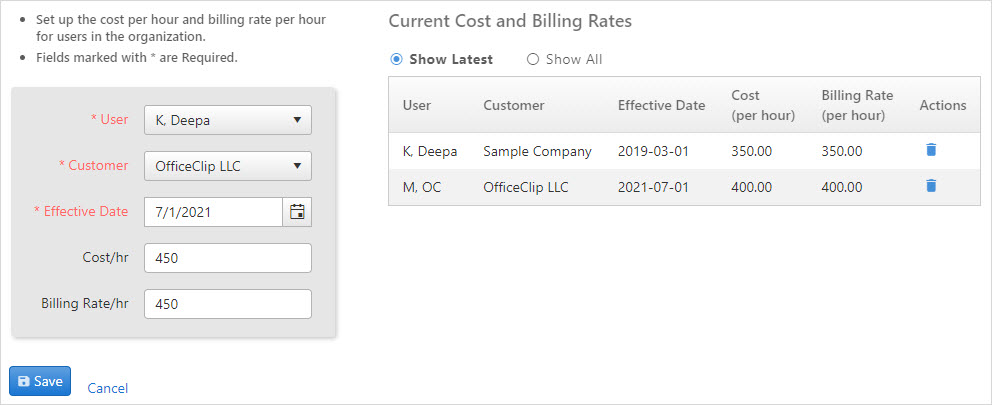
- Select the user, customer, effective date and enter the cost and rate per hour.
- Click Save.
5. Rules:
Setting up rules will ensure that the timesheets are filled up as per the guidelines set by the organization.
- From the Admin section, click Rules.
- Click on Add Rule and enter the desired conditions and actions for a rule.
- Once the rules are saved, the warning or error will trigger if the timesheet conditions are not met.
- Find more about how to add a new rule.
Once the Admin section is set up, the timesheet is ready to use.
Step 5:
Using a Timesheet:
The users can enter time in a timesheet in two modes:
- Periodic mode: Here, the time is entered manually.
- In/Out mode: Here, the time is entered using the Check-in button.
Periodic mode:
If your Administrator has set the timesheet in a periodic mode then, let us see how to enter time manually in a timesheet.
- Click on HRM > Timesheet and click on the New button on the menu bar.
- Select the week for which you want to track time.
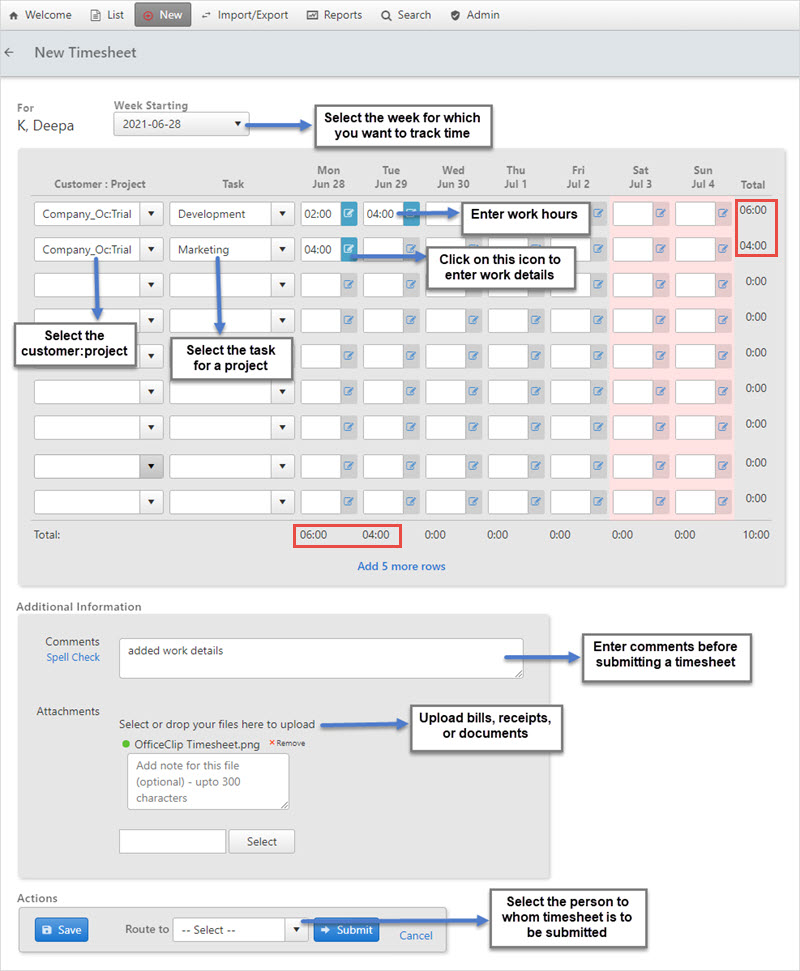
- Select the project and task from the dropdown.
- Enter the work hours.
- Enter work details in the pop-up that will show up by clicking on the details icon.
- Enter comments and add attachments to the timesheet.
- You can also see the rows and columns total marked in red.
- Finally, click on the Save button to save all work details.
- Enter your work details daily in a similar manner.
- Select a concerned authority from the dropdown to approve your timesheet and click Submit at the end of the week.
- If the approver is already set for you, click on the Submit button to submit the timesheet.
In/Out Mode:
If your Administrator has set up the timesheet mode to In/Out, let us see how to use this mode.
- If the timesheet is set in In/Out mode, you will see a Check-in button below the menu bar.
- Click on the Check-in button.
- When you click on the check-in button, you will see the time when you have checked in.
- You will also see a new timesheet created.
- Once you have completed the work, click on the Check Out button.
- A pop-up will appear where you will have to enter project, task, and work details.
- Enter the break hours, if any.
- You will see the total time spent on a task.
- Click Check-out.
- You will see the work details entry in the newly created timesheet.
- Similarly, enter the work time for the whole week.
- At the end of the week, submit your timesheet.
Also, see:
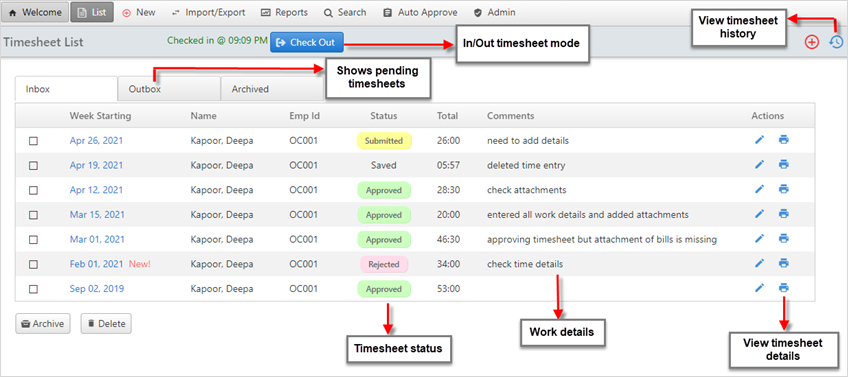
Timesheet List Screen:
The timesheet inbox will show the status of all of your timesheets.
With OfficeClip, time tracking becomes an easy process. Once the timesheet functions are set, it will be easy for the users to track time. The OfficeClip timesheet will boost your revenue, increase productivity, and improve employee efficiency with a smooth time tracking process.
Photo Courtesy: People vector created by pch.vector – www.freepik.com
Deepa Kapoor is an online writer for small businesses. She loves to write on the advancements of new technologies and how it affects our lives. She always explores ways to make small businesses more profitable. When not writing, she enjoys reading books and cooking exotic traditional food.

